Lately, there seems to be an explosion of interest in photographing the Milky Way. And why not? It is a fascinating subject and adds a lot to your pictures. A generic night sky shot has no center of interest, but when you include the Milky Way, you have a ready-made subject.
But why is this interest just happening now? Why weren’t we seeing all these Milky Way shots 5 or 10 years ago?
The reality is that it has only been in the last few years that most digital cameras were really capable of doing this. Starlight is exceedingly dim and you will have to use a very high ISO level to capture it.
Until cameras started showing dramatic improvements in low-light performance, any picture with the sort of ISO that is required would be ruined by digital noise.
Now that photographing the Milky Way is within reach of most photographers, let’s take a look at what is required. There is a lot more planning involved than you might think.
Equipment needed for photographing the Milky Way
The good news about photographing the Milky Way is that you likely already have everything you need.
All you really need is your camera, a tripod, and a wide-angle lens. Let’s talk about these in a little more detail.
Lens for shooting the Milky Way
The most important thing is the lens, so let’s start with that first. I will explain further when we get to exposure, but the best lenses for photographing the Milky Way have two characteristics: they are wide angle lenses and they are reasonably fast (meaning they have large apertures).
You want an effective focal length no higher than 24 mm, and a lot smaller (wider) if you can. You will also be shooting with the lens wide open (at its largest aperture setting) for all of these shots, so the faster the lens the better. Don’t worry though, you can get by with a kit lens since these generally have apertures of f/3.5 at their widest focal length.
But when you go out to capture your Milky Way shot, make sure you bring your fastest, widest-angle lens.
Camera
Of course, you are going to photograph the Milky Way with the camera you already have, and most modern cameras will get you there. You want one that has good low-light performance, meaning it doesn’t show a lot of noise since you will be shooting at high ISOs (usually upwards of 3200). Full frame cameras also offer a slight advantage in that they avoid the crop factor – remember that you want wide angles.
Tripod
The old saying, when it comes to tripods, is that you want one that is stable, lightweight, and cheap, but you can only have two of those things. In this case, just make sure it is stable. You will be creating exposures of 15 seconds or longer, so you will need to keep the camera absolutely steady during that time.
You don’t need anything else to shoot the Milky Way. There are no filters or other gadgets to buy.
You might want to use a remote shutter release to keep from touching the camera (and potentially shaking it) when you trip the shutter, but lately, I have just been using the camera’s two-second timer most of the time.
Planning where to shoot the Milky Way
You need a place that is really, really dark – light pollution is not often visible to the naked eye – and you need a place with an interesting foreground.
The more time you spend researching your location, the more likely you are to be pleased with your results.
Don’t just pick any old place an hour or so outside of town. You’ll be disappointed with the results. How do you tell if it is dark enough?
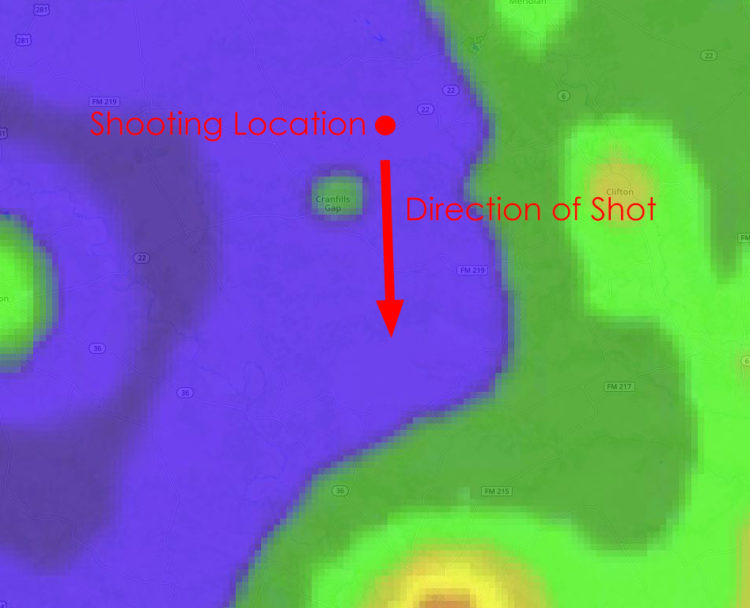
What you do is find a light pollution map and check it. There are several of these online, but the one I use is called the Dark Site Finder. I like it because it is based on Google maps, so I can clearly see the exact locations.
From there, different areas are shaded different colors, depending on the level of light pollution. In general, the darker the color, the better.

How dark you need it to be, really depends on the location. I find that the areas shaded green are a minimum, preferably darker.
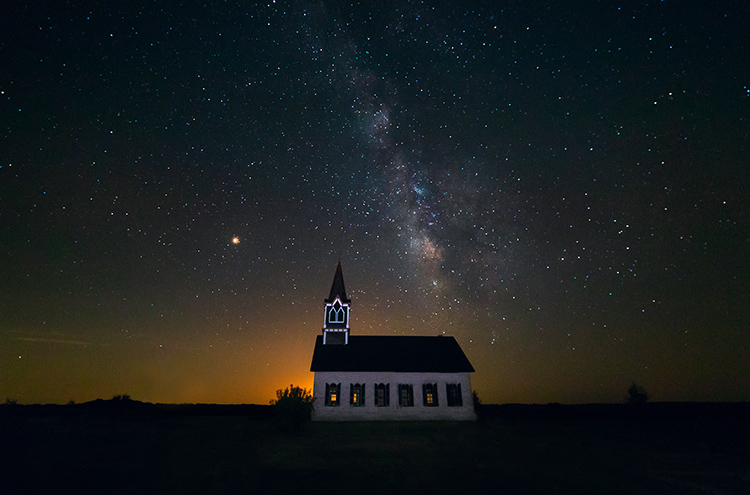
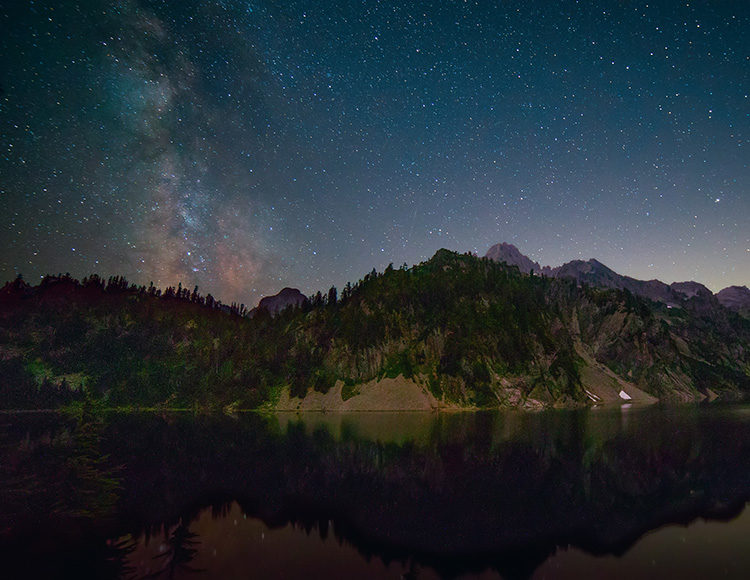
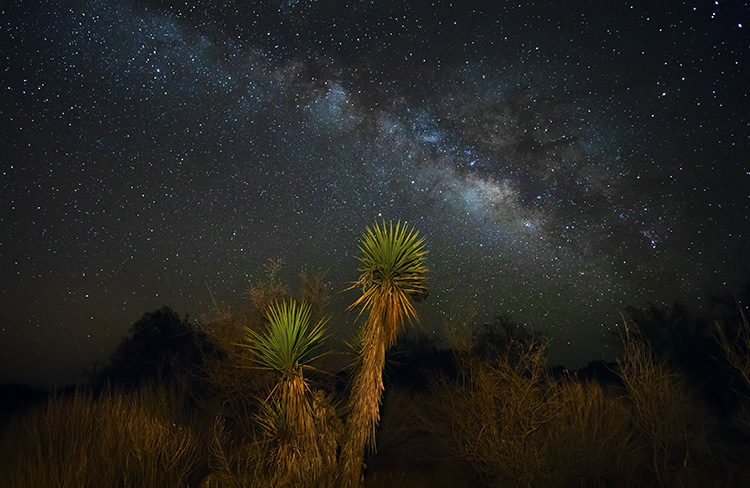
Let me give you an example so you can see for yourself. Take a look at the picture below, which was taken in an area shaded blue on the Dark Site Finder.
As you can see, there is some light pollution in the lower left part of the picture. That is because I had the camera aimed in the direction of a small town about 10 or 15 miles away. Here is how it looked on the Dark Site Finder:
That’s not to say the picture is ruined or that I don’t like it. It is just to give you an idea of what you face.
So not just any dark site will do.
If you have a flat terrain with no distinguishing features, the shot may lack interest, despite the Milky Way.
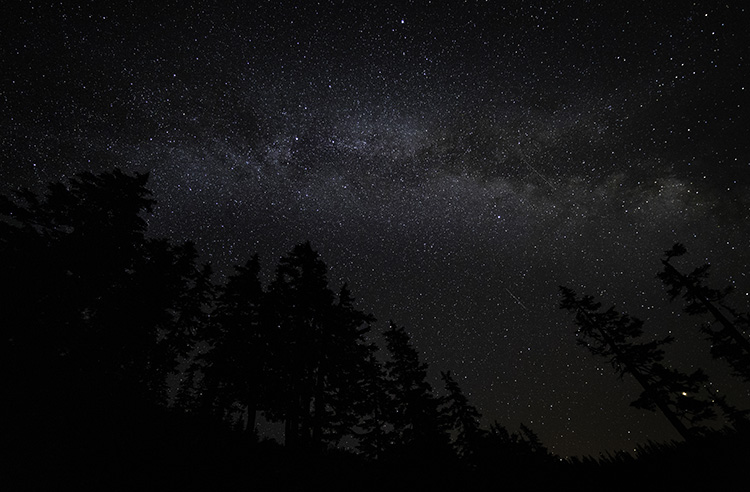
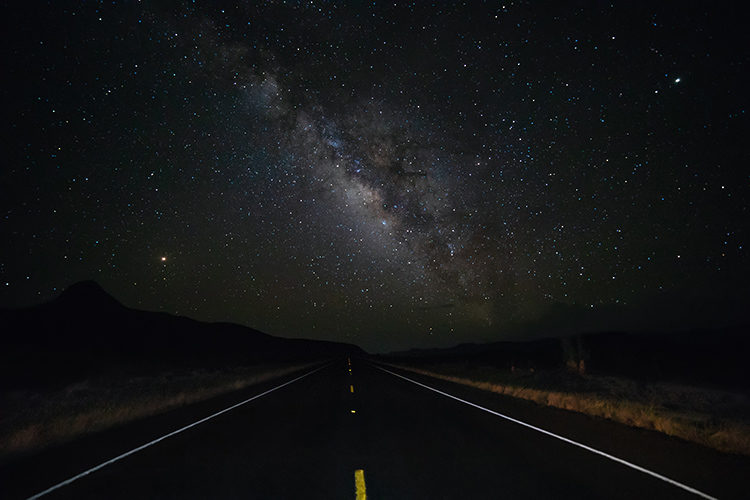
Look for places with mountains and lakes to give your picture some interest. But if that isn’t possible, you’ll have to make do with what you have. Use trees to create a little interest. If all else fails, you might use the road.
Best times to shoot the Milky Way
Once you have your place picked out you have to decide when to go. To decide this, you need to understand a little bit about how the Milky Way appears.
The Milky Way is the galaxy we live in, so it might seem weird to “see the Milky Way.” We are in a distant spiral arm of the Milky Way though, so it is possible for us to look towards the main body of it. When we do, we see what appears to be a stripe of stars across the sky.
That stripe isn’t always visible though. During the months of November through February, photographing the Milky Way will be impossible as you won’t be able to see it at all. This is true no matter what time of night you look. The stripe never rises above the horizon line.
Starting in about March, however, the stripe starts becoming visible. This will occur early in the morning, just before sunrise.
As the months go on, this stripe will get higher and higher in the sky throughout the night. In other words, it will come up over the horizon line earlier and earlier and then rise higher in the sky before it gets light.
During the months of about June through August, the Milky Way will be visible in the sky most of the night.
After sunset the stripe will be low in the sky in one direction, it will rise throughout the night so that at some point it is directly overhead, and then it will sink in the other direction.
As the months go by, the shift continues so that during the months of September and October, the Milky Way is only visible for a few hours after sunset.

Of course, this is very general and you’ll want more detailed information before heading out. Further, you don’t have to learn all this information about the movements of the Milky Way at all.
There are several apps for your phone that will show you exactly where the Milky Way will appear during any given night.
The one I use is called Star Walk 2 (For Android, for iPhone). You just set your location and then you can scroll to any day or time you want. The app will show you whether the Milky Way will be visible and at what times.
Even better, it will show you the specific stars, so you can see whether the main cluster of stars at the heart of the Milky Way will be visible. You can also note directions and see how this interacts with the direction of any sources of light pollution or other celestial bodies like the moon.
How the moon affects your Milky Way shots
Almost nothing will limit your opportunities for photographing the Milky Way more than the moon, so we have to address it.
The reason for that is that the moon is over 100 times brighter than starlight, so having the moon in the sky will wash out your Milky Way shot. To avoid that, you need to understand a little bit about moon phases.
As you know, each month the moon goes through different phases from a full moon – when the entire face of the moon facing the Earth is illuminated – and a new moon – when no part of the moon is illuminated.
Obviously, the fuller the moon the brighter it is. But there is more to it than that.
The moon phase also affects when the moon travels across the sky. During the full moon phase, the moon appears in the sky entirely at night. During the new moon phase, the moon appears in the sky entirely during the day.
You can use this to your advantage.
The best time for photographing the Milky Way are nights that are nearest the new moon.
Not only will this limit the illumination, but it will also limit how much of the night the moon will be present.
How do you determine the moon phase and the times when the moon will rise and set?
Just check TimeAndDate.com. It will show you not only the moon phase, moonrise, and moonset, but also the direction of the moon – so you can see if it will be in or near your shot (PhotoPills does this too).

Weather
The final consideration for photographing the Milky Way is the weather.
I won’t spend much time here because I have no weather forecasting secrets. I just use the weather app on my phone and weather.com.
It is likely already obvious to you that you need a clear night. Just use whatever you normally use to check the weather to be sure it will be clear. Be sure to check the hourly forecast to make sure it will be clear at the exact time(s) you will be shooting.
How to expose your Milky Way images
At long last, your planning phase is over. You are now prepared to get out photographing the Milky Way.
Let’s now consider how you expose it. First, the short answer.
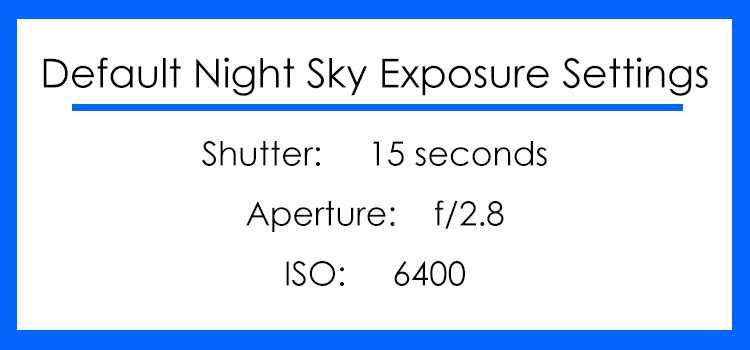
As your default setting, go with a shutter speed of 15 seconds, aperture of f/2.8 and ISO 6400.
For the most part, these settings are all you ever need to know. Since it is always 100% dark when shooting the Milky Way, you will generally use the same exposure settings.
If your lens does not open up to f/2.8, just make sure it is at its widest setting. You’ll either have to use a longer shutter speed to offset that change, or your picture will be slightly underexposed.
That leads to an interesting question, which is: why don’t we just use a really long shutter speed in the first place?
That way we could use a smaller aperture and get a wider depth of field, and we could also use a lower ISO value to reduce the amount of digital noise in the picture. The answer is that if you do that, the stars will look blurry.
The stars are moving across the sky, and they are doing so faster than you might think. If you use a shutter speed longer than about 15 seconds, the stars move during the exposure, resulting in blur. If you use a super-wide-angle lens, you can go a little longer – up to about 30 seconds. But that is the limit of it.
If you want to see how long of a shutter speed you can use, there is a concept called the Rule of 500 designed to help you that. This rule says that the longest shutter speed you should use for night sky photography is 500 divided by your focal length. Here is a chart with some common values:
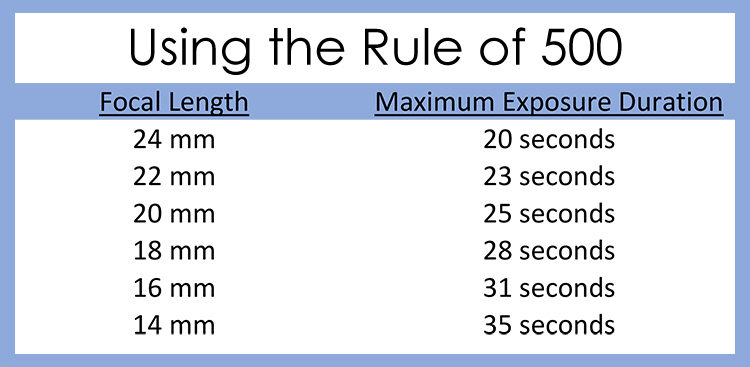
Keep in mind that this isn’t etched in stone. There are those that recommend using faster shutter speeds wherever possible. In addition, there are those who urge the use of the Rule of 400, which results in even shorter shutter speeds.
The foreground is important
Now that you have your exposure set, that will take care of the sky, so now you need to think about the foreground.
If you just expose the foreground as is, it will be entirely silhouetted. That is hardly a disaster, and there are many great Milky Way shots that have the foreground entirely black. But that is what you will be limited to using the exposure values above.
If you want to have a brighter foreground, there are a few things you can do. You obviously cannot just increase your exposure or you will make the sky too bright. You can, however, take a second exposure and then blend them together later in processing.
You can also add your own light.
During the exposure, shine a light on the foreground. When you do so, however, be careful!
The problem is usually not how much light you can shine on the foreground but rather how little. Usually, that means starting with the biggest light source you can find (think deer lights) and then diffusing it.
Just flit around the edges and shine the light very quickly or you will blow out the scene. Another option is to use constant lights and turn them down to their lowest settings.
If you want to get specific about lights, here is what I use. For my spotlight, I use a Brinkmann Q-Beam Max Million III. It is about $60 USD on Amazon. For constant lights, check out the Yongnuo YN300 Air LED Video light. It costs about $40 USD.
Processing
You have the shot in the bag and now you want to process it to make it pop.
Everyone has their own processing methods and techniques, but there are three areas where Milky Way pictures can generally use a little help.
- Because of the high ISO, you are likely to have some digital noise in the picture.
- Color will be a little lacking, and often you want to adjust the overall color cast.
- And finally contrast – you want the stars to pop, so they’ll need some help.
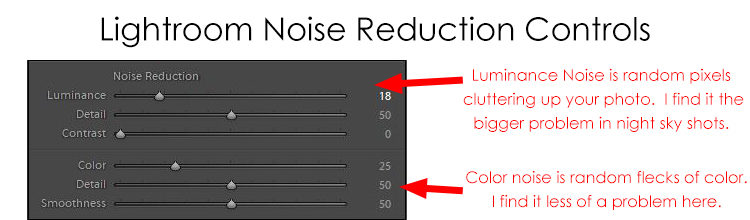
Noise Reduction
Let’s start with noise reduction. You are likely generally familiar with noise reduction. For most purposes, the noise reduction in Lightroom is easy to use and does a nice job. To use it, just pull up the Luminance slider (in the Detail panel in the Develop module of LR) a bit.
If you want something beyond that, there are separate noise reduction applications that do a great job.
You can just use them as you normally would. That is, apply a moderate amount of noise reduction – enough to get rid of most of the noise but not so much that you eliminate the detail in the stars. Some good applications are Noiseware and Noise Ninja.
You can also work to specify where you want noise reduction applied and where you don’t want it. Specifically, you might want to reduce noise in the dark areas of the picture – which is where most of the noise will be – without affecting the detail in the stars. You can get really involved in this in Photoshop (using Luminosity Masks, for example).
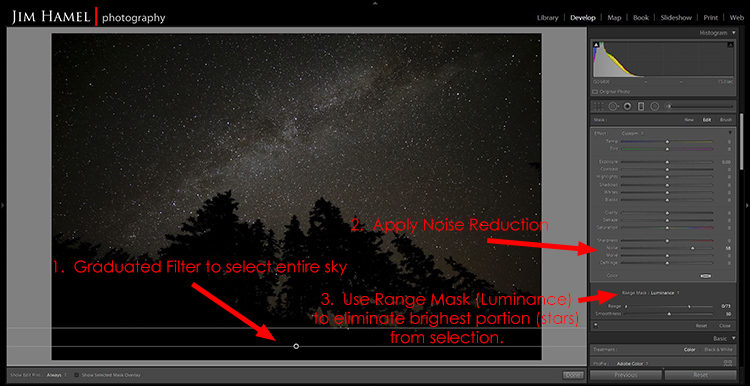
If you use Lightroom and want a simpler way to do that, you can use the new Range Mask features to do so.
What you will do is use one of the local selection tools (like the Adjustment Brush or the Graduated Filter) but select the whole image. Then apply noise reduction using the slider. It will apply the noise reduction to the whole selected area.
Now go down to the Range Mask tool, and select Luminance. Scoot in the slider on the right (meaning drag it to the left), which will remove the effect from the brightest parts of the picture.
Color
Color is actually a function of light, and since there is very little light in these sorts of pictures, it will come as no surprise that there is very little color in your images of the Milky Way
You can add some color pretty easily though. Even better, the tools are pretty much the same no matter what post-processing software you use. To add color, just increase the Vibrance of your picture.
Resist using the Saturation slider, because it will often cause some colors in the image to become super-saturated. Vibrance works harder on more muted colors, so it is usually the better choice.
Cranking up the colors can also make overall color casts more visible.
In any event, you may want to bias your pictures more toward one color. I personally like my pictures to have a slightly blue cast. To do that, just use the White Balance tools.
Contrast
Finally – and perhaps most importantly – you want your stars to pop.
This is all a function of contrast – pushing the dark tones darker and making the bright tones brighter. What’s more, the sharpening tools are really just contrast adjustments.
Let’s walk through the controls you might use in Lightroom, ACR, or other software.
- Contrast – it might seem that a big global contrast adjustment would be in order, but you should temper this. Typically, only a slight increase (maximum of about 10-15) is helpful. Other sliders will give you more fine-tuned control over contrast.
- Whites and Highlights – yes, these are two separate controls, and which one you use will depend on your picture. Generally, you will want to increase one or the other (or both) to make the stars brighter.
- Blacks – dragging up the whites and highlights as just discussed will have the effect of brightening the whole picture slightly. Offset that by decreasing the blacks. Pull the slider slightly to the left, usually no more than -5 to -10.
- Clarity – now you want to sharpen those stars. Before you reach for the sharpening controls, use the Clarity slider. This will have a far greater effect on your picture. Try something like +10 to +15 and then work from there.
- Dehaze – this is the most recent addition to the Lightroom and ACR controls, and it can help these types of pictures. Just a minor amount (+5 to +10) is usually enough. Don’t use too much because it will darken your picture.
- Sharpness – oddly, sharpness is the least impactful tool here. Go ahead and increase the amount to something like 40-50. At the same time, increase the masking to keep from sharpening the blank, dark areas (which usually means accentuating noise). TIP: Hold down the ALT key to see the mask and where the sharpening is applying as you move the slider. Only the areas in white will be affected so pull it until you see only the stars being sharpened.)
These moves may appear rather tame to you. The idea is to get a great picture coming out of the camera and then just enhance it a little bit in these different ways. If you push your edits too far, you are headed for problems.
Conclusion
The key to all night sky photography is planning.
That is especially true once you add the Milky Way to the picture. When photographing the Milky Way, you have to know where it will be and when it will be there. If you don’t know, you will likely miss it.
When photographing the Milky Way, your camera sees the scene much differently than your eyes. It is much more pronounced in pictures than when you are standing there. There have actually been occasions when I didn’t even see the Milky Way until my camera picked it up.
Once you find yourself on a clear night with the Milky Way in your sights, follow the steps in this article and you should end up with something you really like. Remember to keep the exposure times short.
You might be tempted to lengthen the shutter speed to lower the ISO, but this can lead to blurring in your photo.
When it comes to composition, a good practice is to get a good exposure with a silhouetted foreground first. After that, you can work on lighting up the foreground.
Once you get home, remember that an underprocessed image is better than over processing it, so keep those changes minor and subtle. Doing all this could result in a spectacular shot.
Let me know in the comments how you make out photographing the Milky Way.
Check out my other articles here on DPM: