Getting sharp images is a common problem among beginning photographers. So, in this article I will give you some tips to hopefully answer some, if not all, of your questions about finding focus.

Some of the things we’re going to cover include:
- Focus mode (single, continuous, auto – AF-S, AF-C, and AF-A)
- Focus point mode (when to use single point, when to use zone/multi, when to use auto)
- Drive mode (single or continuous, when to use each)
- Using a large aperture, especially in low light
- Focus on an area with contrast
- Focus on the eyes of a person
There are several different settings on your camera related to focusing, so you need to choose the most appropriate one for each situation you photograph. Let’s go through them one by on,e so you know which to pick.
- Choose the right Focus Mode
- Most DSLR and mirrorless cameras (as well as many point and shoots) have a setting for focus mode. This is how you tell the camera what type of subject you’re shooting, and how it should focus according to that subject. There are generally four focus modes (some cameras have more:
- Single: called One-Shot on Canon cameras, AF-S on Nikon and Sony, AFS on Pentax, and S-AF on Olympus.
- Continuous: called AI Servo on Canon, AF-C on Nikon and Sony, AFC on Pentax, and C-AF on Olympus.
- Auto: called AI Focus on Canon, AF-A on Nikon and Sony, AFA on Pentax.
- Manual: pretty much the same on all cameras – M.
Note: it would be really nice if all the camera manufacturers could get together and use the same names, right?!
If you have another brand of camera, check the user manual to find out about your focus modes, and what they are called. But, likely there will be four that are similar to those above.
Single Focus Mode
Best used for stationary objects, anything that is not moving, this mode will engage autofocus, and do a focus lock when you press the shutter button part way down. You may hear a beep when lock is achieved (you can usually disable that if it annoys you as much as it does me, check your camera menu under sounds). This mode is also best combined with using a single focus point (more on that below).
Continuous Focus Mode
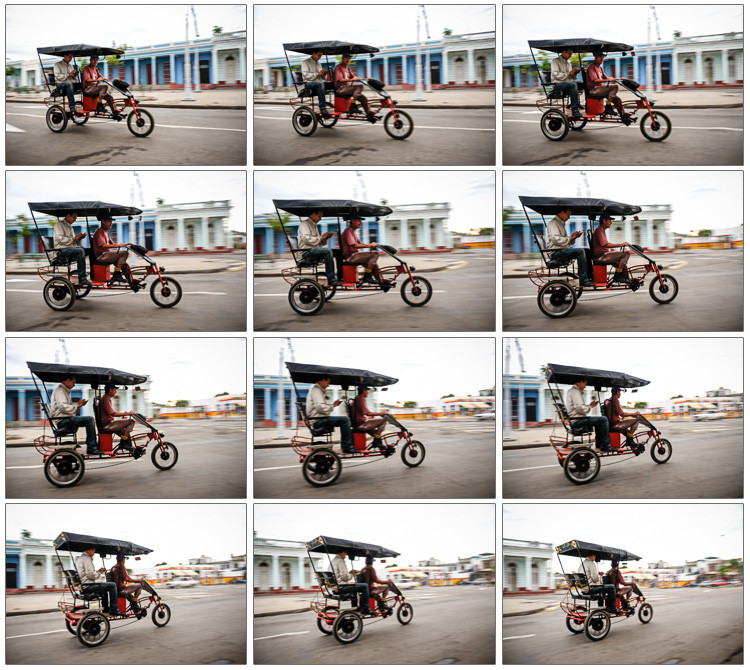
Continuous focusing is best for moving objects, particularly ones moving away from, or toward the camera. Pressing the shutter button part way down in this mode will engage the autofocus, but it will never give you focus-lock. Instead it continues to adjust focus on the subject, as it moves. This is ideal for sports, quick moving toddlers, pets, etc., anything where there is action. This mode is best combined with a zone, or multiple-point focus (more on that below).

Auto Focus Mode
This setting is supposed to be the best of both worlds. The camera will pick either Single or Continuous focus mode for you, based on its assessment of the subject. The problem is – just like any auto setting – there is a chance that the camera will get it wrong, and you’ll end up with a blurry photo. Unfortunately I can’t think of any pros that I know that use this mode – I certainly don’t. It’s usually the worst of two worlds, and frequently more shots are out of focus, than are sharp. So you’re best off to select one of the two modes above. Some cameras have a quick switch button to toggle back and forth between them (my Canon does) or you can do a custom setting for each. Once again, consult your user manual to see what your camera can do.
Note: if you don’t have the paper user manual, or can’t find it, just do a google search for the name, model number and the words “user manual” for your camera and you should find a copy of the PDF. Download it and put it on your smartphone so you have it with you at all times as reference. It’s also searchable, which makes finding particular things like customizing settings easy.
Manual Focus Mode
This one should be fairly self-explanatory, but be clear that Manual shooting mode and manual focus are NOT the same and do not have to go together. To focus the camera in this mode you just need to turn the focus ring on your lens. This mode is handy for doing things like macro photography, some night photography, or for times when you want to use autofocus and then lock it (do so by switching to manual focus to disengage AF as in when doing night photography).
- Choose the right Focus Point setting
- When you look through the viewfinder on your camera you will likely see several dots or squares. As you press the shutter button part way down, one or several of them, will light up or become highlighted. Those are your focus points, and which one(s) light up indicate where precisely the camera will attempt to focus.
There are three common options for setting up your focus points (your camera may even have more, but you know what I’m going to say next – read the manual).
Single Focus Point
One single point is selected by you, and the camera focuses only in that spot. This is the best choice for non-moving subjects. You have more precise control over where focus is set, which is really important when you’re using a large aperture and very shallow depth of field.

If you also choose the centre point, it will usually give you quicker and more accurate focus in tough situations. The centre point is a cross-type focus point (means it looks for contrast both horizontally and vertically) where as in many cameras, most or all, of the other points see contrast on only one axis (vertically). Check your user manual once again, to see which type of points your camera has outside of the centre. But know that if you aren’t sure, you can always just use the middle one to be safe.
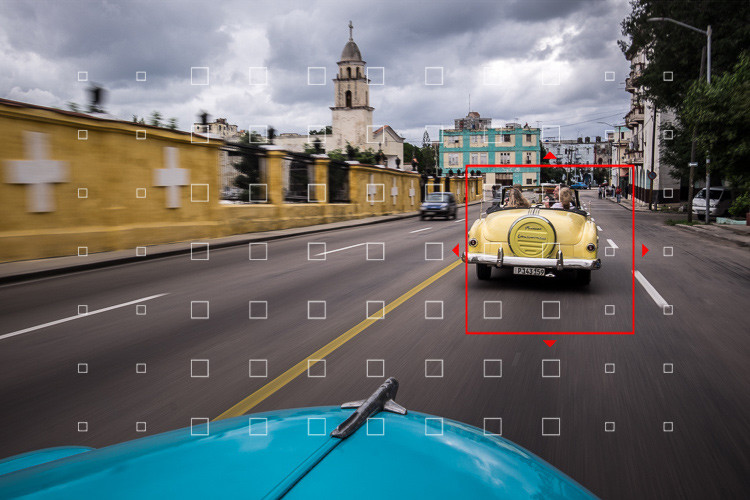
Zone or Multi-Focus Point
In this setting, an set area of focus points, or a zone you set up, are used to find focus. It’s the best option for moving subjects as it’s harder to get a single point on a moving target. Ever try photographing a toddler using single point focus? It’s frustrating at best, and you get few, if any, good results at worst. Try zone or multi-point instead, and the camera will look within those points for the subject. Results will vary from camera to camera, and some are better at this than others – so if shooting sports or moving targets (kids, pets, etc.) is a priority for you in your photography, look for a camera that gets good reviews for fast focus.

Auto Focus Point selection
This option has the camera choosing which point to focus on for you. Some cameras are getting smarter now, with things like Face Detection, but what often happens is the closest object to the camera ends up being the sharpest. But, if that is not what you intended – if you wanted that pretty flower behind the fence sharp, and the fence in front blurry – the camera gets it wrong.

Honestly, the only time I personally use this setting is when I hand my camera to someone else to take a photo of me. I put it on auto everything, and hope it works out. I trust the camera to get it right, more than I trust another person who doesn’t know my camera, to get the right focus point on me. I have more out of focus photos of myself than I care to discuss.
Most of the time my camera stays on single point focus. When I’m shooting something moving, then I may switch to zone. This should help you decide which is right for whatever you’re photographing.
- Choose the appropriate Drive Mode
- The next setting you want to learn is what Drive Mode to use. Once again there is a choice that is appropriate for stationary objects and one for moving ones.
NOTE: Even though the names are the same as Focus Mode, this is different and they both need to have your attention!
Single Shot Drive Mode
In this mode the camera will take a single exposure when you fully press the shutter button. Even if you hold it down, you will only get one photo. So, this mode is the best choice for non-moving subjects. Take a shot, review it, take your time, then tweak your settings and take another shot if you need to. You don’t need to high speed burst photos of a building – it eats up memory, causes editing nightmares later, and the building is not going anywhere.
Continuous or High Speed Burst Drive Mode
Pressing, and holding, the shutter button in Continuous or Burst mode will result in your camera shooting a series of images. Depending on the frame rate that your camera is capable of, that could be anywhere from 3-10 images per second! Clearly, this is the obvious choice for shooting moving subjects. It increases your chance of capturing the peak of action, and getting an image that’s sharp.
You can also increase your chances for success by trying something called back-button focus. I will write about that more in a future article – but if you want to try it check your manual to see how to set up your camera, so that instead of focusing with the shutter button, you focus with one on the back of the camera. It takes a bit of getting used to, but this is how the professional sports shooters do it. My friend who used to shoot for the local newspaper showed me this trick years ago, and I leave my camera this way all the time now.
Non-camera setting things you can do for sharper images:
The last three points are not camera settings but things necessary for nailing the sharpest photos in even the toughest situations. Let’s dig in:
- Use a large Aperture
- Okay, so aperture is a camera setting but this one is specific to focus problems, especially in low-light conditions. If you are shooting in dim light and are having a hard time seeing, so is your camera. If your camera can’t see, then it can’t focus.
So, by choosing the largest aperture possible on your lens – or better yet switching to one with a really big one like a 35mm or 50mm f/1.8 – it will let more light inside the camera. This will help your camera to see, and to focus better. This is why most of the expensive professional lenses all have large apertures like 24-70mm f/2.8, 70-200mm f/2.8, etc. But you don’t have to fork out the big bucks for those – get yourself a simple prime lens, with a large aperture. They are lightweight, relatively inexpensive, and easy to just keep in your bag for times you need more light.
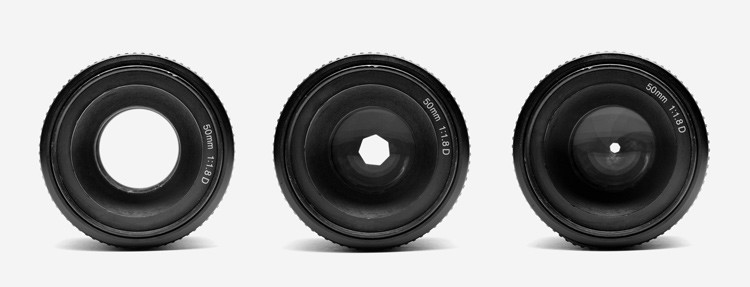
In the image above using the 50mm f/1.8 lens, you can see how much more light will go through the largest opening (f/1.8) as compared to the smallest (f/22). Even the one in the middle at approximately f/8, you can see how exponentially larger the one on the left is in comparison. It’s just like the pupil in your own eye – what happens when you enter a dark room? Your pupils dilate, or open up, really large. This is what you must do for your camera to help it focus.
- Focus on an area of contrast
- This is something I see beginners struggle with, and no one talks about it! In order for your camera’s autofocus to work, it must be able to detect contrast in the area you are pointing it at. Hence, why the centre point is more accurate, and why you cannot focus on a plain wall – it simply won’t happen.
So look for a well defined line, or a spot that has clearly dark and light areas, and aim your camera’s focus point there. If you’re having trouble, download and print out this target and take it along with you.

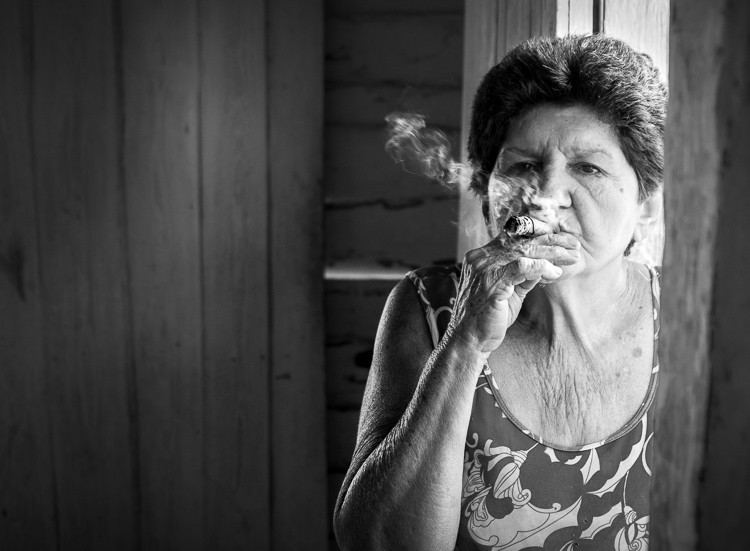
- Focus on the eyes
- Lastly, when you’re photographing a person, you always want to make sure that one thing is in sharp focus – their eyes. Even if you’re using a super shallow depth of field, and the eyelashes and ears are out of focus – that’s okay. As long as you have the eyes, the iris/pupil part, in focus – your photo will look sharp.
This is because not only are the eyes the windows to the soul, but that is the place where viewers of your image will look. Try an experiment where you focus on the ears instead and make the eyes out of focus – see how odd it looks?
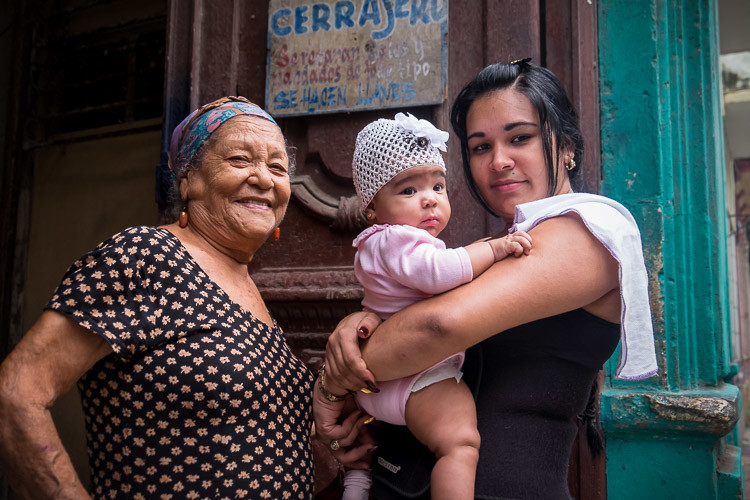
But what if the subject is turned a bit sideways and their eyes are not the same distance away from the camera? In that case, make sure the eye nearest to the camera is the one you focus on. Again, try it the other way just to see, but I think it looks odd.
Summary and action plan
Okay, now it’s your time to practice. Start by picking a non-moving subject and try the settings that I suggest for that. Then get yourself a moving one (kid, pet, traffic, etc.) and do those. Remember for both to make sure you focus in an area of contrast, and on the eyes if you have a human or furry subject (someone with a face).
Then really put it to the test by going to a dimly lit area. Use your largest aperture and all the tips for shooting in low-light (you can find more here: Tips for Low Light Photography). Review the tips again if you can’t remember.
Cheers,