If you are a traveler, you likely want to go to the must see places on your journey; those with the most historical significance, recognized worldwide by just one photo. But you want to make it look different than all the other photos you’ve seen of it. So how do you do that? Is it even possible to take an original photo of the Eiffel Tower or The Empire State Building?
While I haven’t made it to Paris yet (it’s on my list big time!) I have been to NYC and a few other famous places. So here are a few tips for taking more interesting photos of iconic landmarks.
Keep in mind even if you are not a traveler or it’s not in your budget right now, these tips apply when photographing anything. Let’s take a look.
- Try a super wide lens
- A wide angle lens will distort your images and add a sense of surrealism. Using a super wide lens (like 15mm on full frame, or 10mm on a cropped sensor) will even start to curve the edges of your frame and provides a completely different look than a normal or telephoto (long) lens.

In this image of the Brooklyn Bridge in NYC I got really close to the railing (in fact I was sitting on it) so it looks disproportionately large. The city in the background looks small by comparison so it makes the bridge look really large and imposing.
- Add some blur or motion
- Not everything has to be tack sharp and frozen in every shot. In fact adding some intentional blur eludes to a feeling of motion and make your image more dynamic. Motion can come in many forms such as: people walking by on the street while the buildings are still and sharp (use a tripod for this of course), panning a moving object as it passes by, or car light trails at night.

What about shooting from a moving object? Okay I admit, I got on the kids carousel in the middle of central park. The only other adults on it were ones that were holding really small children, so I’m pretty sure they all thought I was a bit weird after my third time around. I never got exactly the shot I wanted. I think if I’d have returned later in the day when the light wasn’t so bright outside the carousel then I would have succeeded. But I think I was on the right track, what do you think?

You can also add motion by intentionally zooming your lens during a long exposure (one second or longer works best). I wrote a more detailed article on this technique over on Digital Photography School.

Here’s the bridge again at night, this time with a zoom blur added. Night shots are great for this effect, especially if there are lots of little twinkly lights.

The carousel round two, zoom blur added. Obviously I wasn’t using a tripod for this shot (I probably would have been kicked off) so it’s not as steady as it could be but that’s part of the fun with this technique. Embrace some imperfections, in your photos and yourself while you’re at it. I heard a great phrase once, if you are a perfectionist and hold yourself to higher standards than anyone else does think of this – strive not for perfection, but for excellence. Isn’t that great? Excellence is pretty darn good, so how can you fault that.
- Do some nighttime shots
- I love doing night photography especially right at blue hour (just after sunset) when the sky is still a deep rich color and hasn’t turned into a completely black void. Timing is key for blue hour. Using a website or app like The Photographer’s Ephemeris, look up the sunset times in the area you’re traveling to (or home if you’re sticking around). Plan to get out and shoot the sunset, then just keep going and you’ll find blue hour.

Most tourists head inside after the light is gone and have dinner or move to indoor activities. But most cities come alive at night with lights, cars and action. Capture that with your iconic landmark for some photos most people aren’t going to go home with and pat yourself on the back for eating dinner late and getting the shot

The Bellagio fountain in Las Vegas is something everyone heads to see and take photos of, but it’s not nearly as interesting during the day. Return after dusk to see your landmark again and you may find it all lit up and sparkling just waiting for you.
- Add a human element
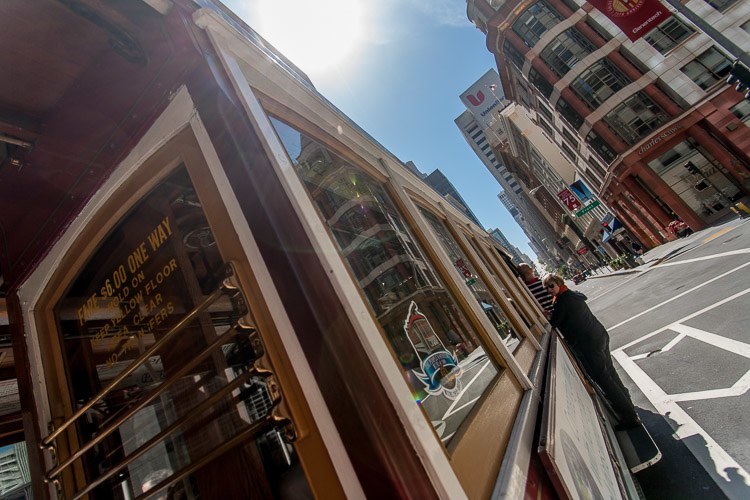
- I was literally sitting at a sidewalk cafe resting my wearing feet and enjoying a nice glass of vino when this streetcar rolled by. I couldn’t resist taking a photo of this guy taking my photo. Look at his expression in the second one and how much fun he’s having. I must have looked about the same to him I imagine. To me the packed to the rafters streetcar needs people to tell its story, it’s a people mover.


Think about it this way, cities are made up of people, lots of them. So taking photos of a city devoid of people actually makes it look a little empty and creepy. So unless you’re going for that spooky Halloween look, try adding some people into your shots. People add a sense of the place, what it’s like to live there, and also perspective.

Yes I’m hanging off the edge, holding on with one hand and shooting using the other. Don’t worry the strap was around my neck. You don’t need to see all of these people to know a bit about them. From the style of his shoes, and how they’re holding hands, you can imagine a whole love story and who they are. People have stories and help add them to your images.

This fellow was a student from Russia who had been studying for some months in NYC. It was his last night there in the Big Apple and he chose to spend it on the bridge watching the sunset and we got talking. I made this photo for him, we exchanged email addresses and I promised to send him the photo, which I did later. To me it just adds to my feeling about New York and sharing that moment with another human being, someone who was a stranger only moments before. I think there are a million stories like this in NYC which makes the photo more meaningful to me.

Oh, and get in some photos yourself! This is me with a cut and injured thumb, and that’s Machu Picchu behind me in the background.

Llama? Okay he’s not human but I think he’s pretty cute and they were everywhere in Peru even up at Machu Picchu. So I thought it was fitting to take this guy’s portrait with the iconic background behind him.
- Add depth but adding layers to your image
- The world is three dimensional, but you capture it with a media that only has two dimensions. So how you add depth to your images? You do that by adding something in front of your subject, or in the foreground. That usually means taking a step (or many blocks) back from your subject and thinking about the elements you can use to compose your photo in layers. Think of it this way if it’s confusing – you want something close to you, something a medium distance away, and something far away or in the background. If everything in your scene is the same distance from your camera the scene will come across as being very flat.


Look at the two examples above of Machu Picchu again. In the first image I’ve used something in front of the subject by framing it shooting through a window. The second image shows depth by having something behind the background much farther away. Let’s look at the same image without the part on the right. See the difference? The one above also gives you an idea of where this place is located (in this case only 8,000 meters up on top of a mountain that’s all), the one below could be anywhere.

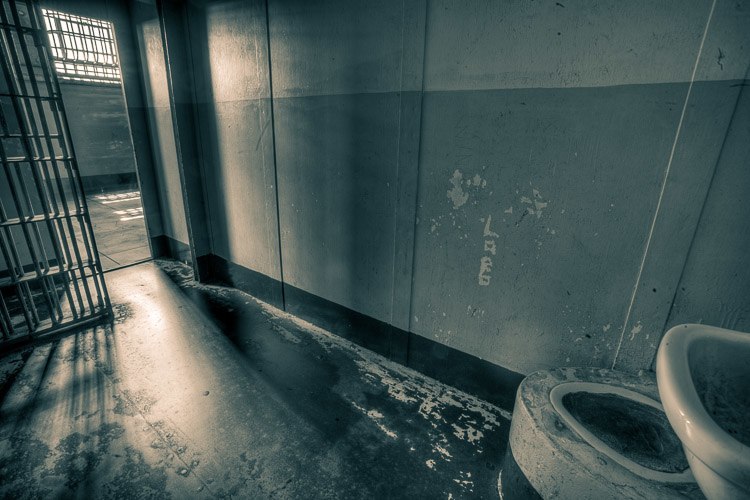
Shooting through door and windows can work really well to create that depth – just remember (VERY important) there has to be something interesting for the viewer to look at on the other side. In the example below you can see through the bars at Alcatraz and the blurred bars add that depth. It’s almost like you’re peeking in and seeing something you aren’t supposed to see.


Compare now to this image below. See how the bars are the same distance away, and as you can’t really see what’s going on inside the jail cell you feel more outside of it than the ones above.

This little window I stumbled upon inside the main cell block at Alcatraz. It was one of the few windows the prisoners had on the inside. I shot multiple exposures to capture the light both inside and outside, and merged them in an HDR 32-bit file to get this result. To me it speaks volumes about the separation between the prisoners and the city which is only a short distance away, but yet so very far at the same time. The window was tiny, less than a foot across, so it was like a teaser to the men in the prison – here it is, no you can’t have it!

I also removed the color from the walls inside to give it an even bleaker appearance, adding to the story. So remember you can use processing techniques to help realized the vision you have for your images. It’s not a fix, but an artistic license.
Sometimes the lighting can add depth and layers to your images too, so watch for it. Fog in particular can create a mysterious look where things disappear into the mist and distance object fade into nothingness. Backlighting, or creating a silhouette can work too. Be aware of light and when it works in your favour use it!

- Use a different perspective
- The standard perspective of most people is standing, at eye level. So if you do anything different for your photos they will automatically have more interest. Look up high, or get down on the ground, change it up and see what you can create.

This is the Chrysler Building in New York with the Empire State Building reflected into the one across the street. I had no idea that was there until I aimed my super wide lens (see tip #1) straight up. I had originally just wanted to photograph the interesting door on the Chrysler Building but when I noticed the reflection I worked it a little until I got the whole thing. It plays a little trick on the viewer and it often takes them a moment to realize that not only is that the sky at the top but what is in reflection.

For this view looking down we hiked up to the highest vantage point in Machu Picchu. It was literally completed fogged over when we arrived and we could see a big fat nothing. We sat down for five minutes and it was like the gods shined on us and opened the clouds and this scene appeared. It still takes my breathe away seven years later. It’s truly a magical place.

This streetcar came to the end of the line and everyone got out, including the driver. So I used the opportunity to go in with a wide lens and take a few shots of it empty. This is the going the extra mile tip (not mentioned above) so while my husband was off buying a coffee I was taking photos – as usual! Here are a couple more with different angles.
I got inside this open cell in Alcatraz. I wanted to get a feeling of what it was like to live inside this small space. I chose to do a split tone (using that feature in Lightroom) and do the dark tones in a cooler blue, and the lighter tones coming in the window and through the bars, in a warmer orange tone. For me that represents the cold feeling inside the cell and the warmth coming from the outside world.
The image below was taken from the outside of the streetcar taken by standing on the running board leaning out. They don’t go all the fast so it’s not nearly as dangerous as it sounds.
Bonus – combine a few of these tips together
Take a look over all the images above again. How many of them combine more than one of these tips? Quite a few. That is not an accident. The more things you can do to be different than the average point and shoot photographer, the more interesting your photos will be and your work will stand out.

I’ll leave you with this last shot of the fountain again. I’ve been to Las Vegas many times and I have way too many photos of the same fountain. So to do something different I combined some of the tips: shoot at night or blue hour, add motion (the moving water), add a human element, add foreground for layers (also the people). This shot is much more interesting to me than the one earlier of the same fountain. Perhaps because I’ve seen it so many times but if you are the owner of the Bellagio which would you want to promote your hotel? The one void of people, or packed house?
Action plan
Okay it’s your turn. Tell me if you have any other tips for photographing iconic landmarks in a unique way. Please share your images and comments below.
Cheers,