I’m a firm believer that anyone can improve their photography. Over the years I have worked with aspiring photographers who have gone on to become full-time pros. I’ve also worked with beginners who just want to improve their photos for themselves.
Regardless of your ambition, I’ve come to realize that with some very simple tips you can see an improvement in your photography right away.
So here are the most common bits of advice that I give to beginner photographers.
1. Get Closer
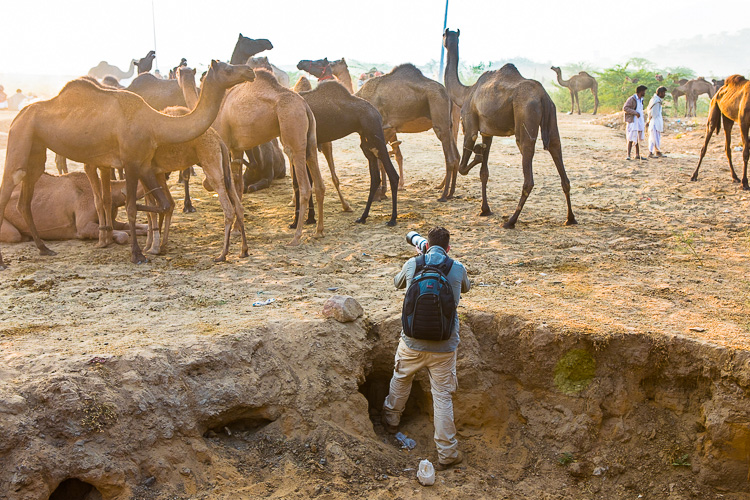
The wonderful group of photographers we had in India for our photo tour will probably tell you that they got fed up of me saying this – “get closer”.
The famous war photographer Robert Capa once said, “If your photos aren’t good enough, you aren’t close enough”. Sure, zoom lenses these days can mean you can snap a photo of someone from across the road. But often these types of photos lack intimacy and connection with the subject.
There is a time and place to do that, like in wildlife photography. No one is suggesting that you should get up close to a crocodile for example. But if you are photographing a person, get closer to be able to engage with them. Their eyes, their expression even the wrinkles on their face will work much better in photo close-up.
Often the main reason that beginning photographers stay back is due to shyness. “What if the person I’m photographing sees me?” they ask.
Well, think about it. The worst that could happen is they ask you not to take their photo. Is that so bad to stop you from even approaching them?
2. Don’t be Afraid to Crop
Sometimes all that is missing from a composition to take it from being just an OK photo to being a great one is the way that it is cropped. It’s so tempting when photographing anything, to try to capture everything in the scene.
Sometimes that works and you end up with a great photo. At other times you will need to crop your photo in a way to ensure the focus of the person looking at the photo will be on what you want them to see.
By cropping a photo, you can remove distracting elements so that your main subject isn’t lost in the overall composition. There are two ways that you can do this. Either when you are taking the photo or in post-production (like in Photoshop or Lightroom).
The benefit of doing it when you are taking the photo is that you are then not reducing the overall size of your image. For example, if you crop into a photo too much in post-processing and then want to blow it up for a large print, you may find that your photo is blurred. That is because you are having to enlarge a cropped photo.
But whether you decide to crop whilst taking a photo or in post-production, make sure you really think about it and don’t be afraid to crop if you must.

3. Take Your Time
This isn’t necessarily just beginner feedback but applies to any photographer even seasoned pros. We are all guilty of rushing things sometimes. But one of the best attributes you can have as a photographer is patience.
By just taking a few minutes to look at the scene and compose the shot in your head you might find that your end result actually looks better.
Unless you have a fleeting moment happening in front of you that requires you to work fast, then there’s no reason not to just slow down a little. Use the time to think about the composition and whether or not if it needs to be cropped.
Think about the light and how to utilize it best. Work out the settings that you need to use like your shutter speed and depth of field. If you are photographing a person you can even use this time to talk to them to build a better connection and rapport.
Try it out the next time you are out and about photographing. Set yourself a challenge to wait for a minute or two at any scene before taking a photo.
4. Look at the Entire Image
Have you ever looked at a photo and thought, “How did I miss that lamp post sticking out from behind the person’s head?” You’re not alone. Every photographer at some point has missed something that obvious right in front of them.
This is because it is often linked to the previous point (rushing to take a photo). By taking a bit more time, you can look around the scene more carefully. But even if you have taken the photo, when you look at it on the back of your camera try and look around the edges of your image and beyond your main subject. It is much easier to spot this whilst you have an opportunity to take another photo than retouching it out later.

5. Straighten Your Images
I must confess that this is the one bit of feedback I give that I find most strange. Surely anyone looking at a photo can tell if it looks straight or not? But I’m amazed at the number of photos I see by even some more experienced amateur photographers where the horizon line isn’t dead straight, for example.
This is usually one of the first things that I correct in post-production when I’m editing my photos. The reason is that by straightening an image you may find that it changes the composition and crop. So always check that your photos are straight and if not then make sure you fix them in the post-processing software of your choice.


6. Think About What You are Trying to Portray
One of the best ways to improve your photography is to learn how to detach yourself from the obvious scene in front of you. What I mean by this is that you should try to really think about what you are photographing and what story you want your image to tell.
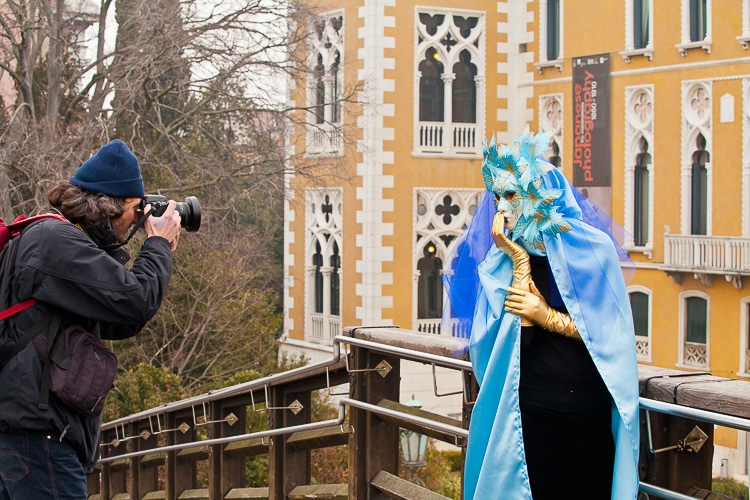
For example, the image below with the photographer tells a completely different story to the one without the photographer. It’s the same image just with the photographer removed.
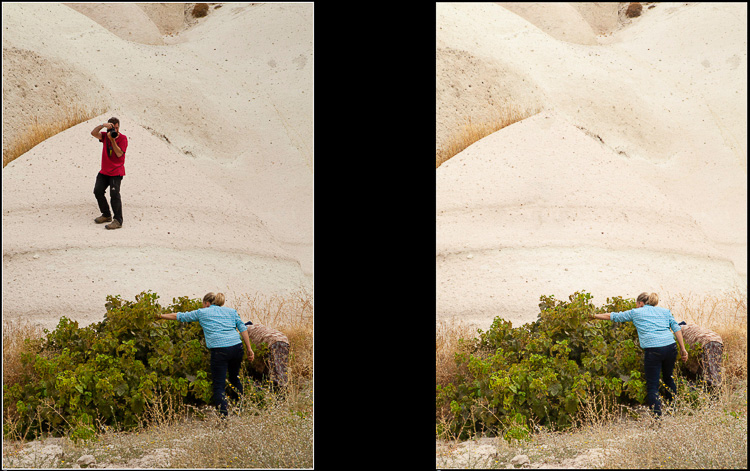
This is important because by thinking about what you are photographing and what story you are trying to tell, you can manipulate a scene by the way you capture it. For example, select a slow shutter speed in a busy street and it portrays the chaos and movement. Freeze the action and it could be showing two people having a conversation.
So, if you have taken note of point three above and are going to take your time, then you should be able to use that time to think about the scene in front of you. What can you do to tell the story you want to tell?
7. Photograph What You Love
Photography is a wonderful hobby to have. That sense of accomplishment when you capture a great shot is a fantastic feeling. But it should also be enjoyable and fun. Of course, you should experiment with photographing different genres but ultimately photograph what you love.
The more you enjoy what you are capturing the more likely you are to put the effort in which will, in turn, be reflected in your work.
These are some of the most common bits of feedback that I have given beginners over the years. Simply applying these to your photography will help make your photos better. But you should always look to practice and perfect your skills. As I said at the start, I really do think that with practice anyone can improve their photography including you.

 A professional writer and travel and landscape photographer, based on the outskirts of London, Kav Dadfar has a wealth of experience in photographing high-end stock shots as well as shooting assignments and commercial work.
He has photographed everything from restaurants and food to events and even the odd baby and wedding. But his real love is travel photography. His images have been used by the likes of Condé Nast, National Geographic, Wanderlust travel magazine, Lonely Planet, Rough Guides, American Express, TripSavvy, multiple National newspapers and many more.
Kav is part of our team of Digital Photo Mentor photo leaders. He leads the tour to Scotland and to Thailand with Darlene.