Like a lot of photographers, I hate spending time in front of the computer editing photos in Lightroom. Because what I love doing is taking pictures, I try to capture photos as best as I can when taking the actual photo.
But like it or not, editing is an essential part of the photography process. Every photo will benefit from some form of post-production. Sometimes that might just be a simple image straightening or cropping. Other times it will require more extensive work such as retouching.
To help you get your photos edited as quickly as possible, so you can get out shooting again, here are 7 simple Lightroom editing tips to improve your photos.
1. Correct the White Balance
Have you ever looked at one of your photos taken in bright sunshine and thought that it had a blue tint to it?
For all the advancements of digital cameras, they are still no match for your eyes. Whenever you see any scene in front of you, your eyes automatically adjust so that we see a clear picture in natural color.
Unfortunately, digital cameras cannot do that, so your images often need to be tweaked to capture the scene as you would have seen it.
There are two ways to do this:
- You can correct the White Balance when you are taking the photo OR
- Adjust it in post-production
For example, if you are photographing in a controlled environment like a studio where the light will be all the same, you can adjust the White Balance manually. But when you are out and about, this might not be efficient and could mean missing the vital moment.
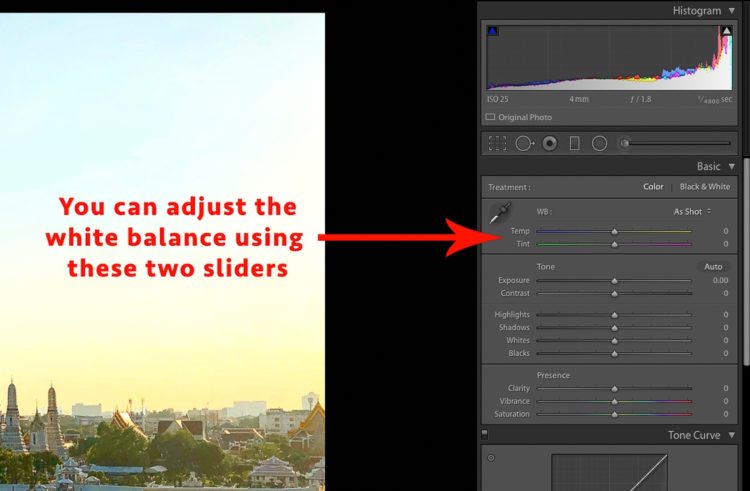
Thankfully, you can adjust the White Balance in Lightroom to give your image a more natural look.
There are two sliders that you can adjust. “Temperature” and “Tint”. Temperature determines how warm or cold your image looks (yellow or blue), and tint adds green or magenta (a pinkish tone). By combining these you’ll be able to get a natural look for your images.
For more on this read: How to Use a Gray Card for Custom White Balance and Metering
2. Adjust the Highlights and Shadows
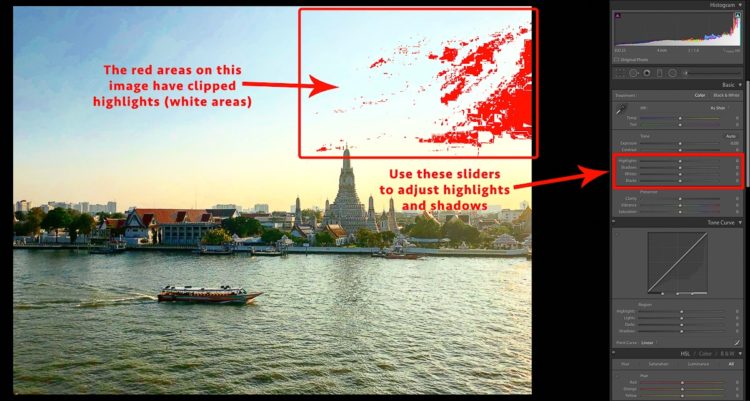
Often when I review work from aspiring photographers, the most common feedback I give is that their Highlights (Whites) or Shadows (Blacks) look like they are clipped.
This means that there are no pixel details in that area so the image has either pure white or black areas. Ideally, you should aim to avoid large areas where this clipping happens. Lightroom has a pretty good function to enable you to recover these most of the time.
There are of course occasions when the clipping is so severe that it can’t be recovered. This is especially possible in highlights. But even in dark areas where your shadows are clipped, brightening up those areas too much will leave you with excessive noise.
So the best solution for avoiding your highlights or shadows getting clipped is to get it right when taking the photo. But most of the time there is the option of doing it in Lightroom.
For more on this read/watch: Using the Basic Sliders in Lightroom and Photoshop – a Comprehensive Tutorial
3. Adjust the Vibrance and Saturation
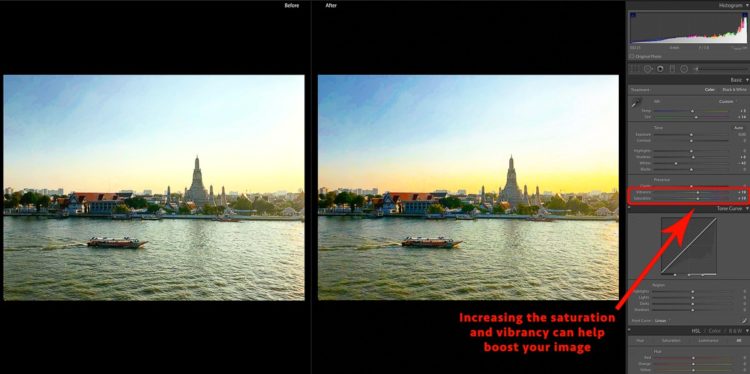
These neat tools in Lightroom can really help your photos pop by boosting their colors.
If and how much you use the Vibrance and Saturation sliders will depend on your personal taste, preferences, your subject, and how much the photo needs.
For example, for a sunset landscape shot you may want to boost the colors to give your image that wow factor. Whereas a portrait of someone might only need a very subtle boost.
Simply move the sliders along until you get the desired effect. Just be careful not to overdo it as too much saturation will make the image look fake.
4. Tweak the Contrast
If you find that your image looks flat, often a good remedy is to tweak the contrast.
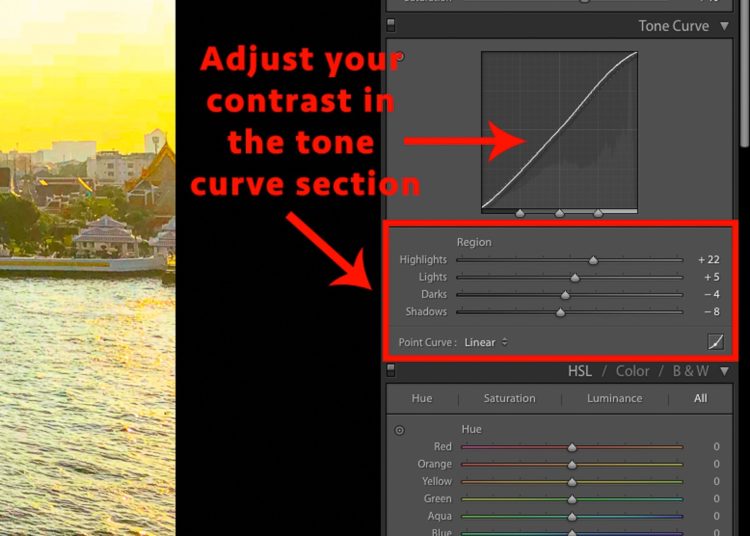
There are several ways to do this in Lightroom. First is the Contrast slider in the tone section.
Simply move the slider to the right to increase (or left to decrease) the contrast in the image. If you want more control, check out the Tone Curve section. You can either move the sliders or the line on the graph at various points to create the level of contrast that your image needs.
For more on this topic read: Clarity Versus Contrast and How to Use Them to Make Your Photos Pop
5. Straighten and Crop
If you do nothing else to a photo in the post-processing stage, the one thing that you should always do is ensure that it is straight.
This is especially apparent in any image that has a vertical or horizontal line such as a horizon in a landscape image. You should also look to fix images of buildings that suffer from converging lines (where the building looks like it’s falling over).
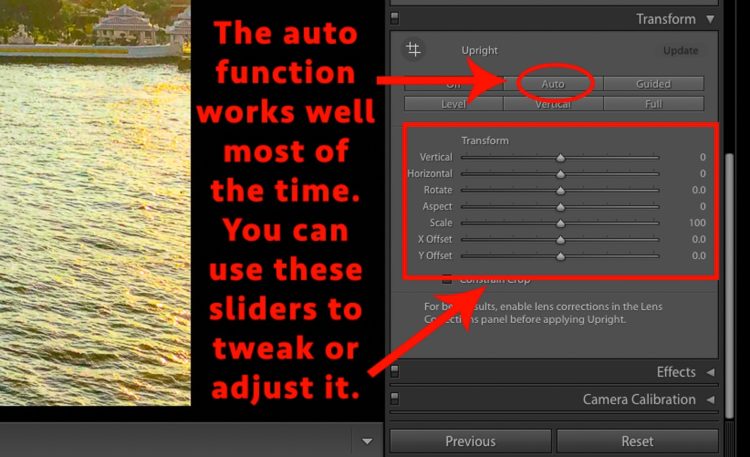
The latest version of Lightroom (Classic CC) has a good Auto option to straighten your image and fix uprights. Sometimes it needs tweaking or doing manually but in the vast majority of cases, it works well.
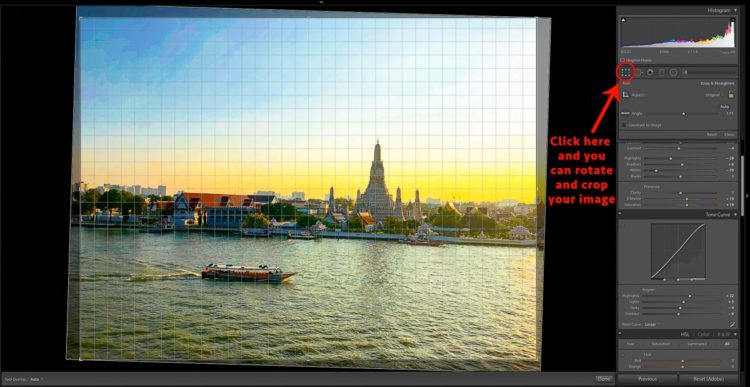
Once you have straightened out your image it’s also worth looking to see if you can crop it any differently.
The great thing about Lightroom is that it is non-destructive. That means you can always revert back to the previous version or even your original photo if you need to at any time.
6. Dodge and Burn
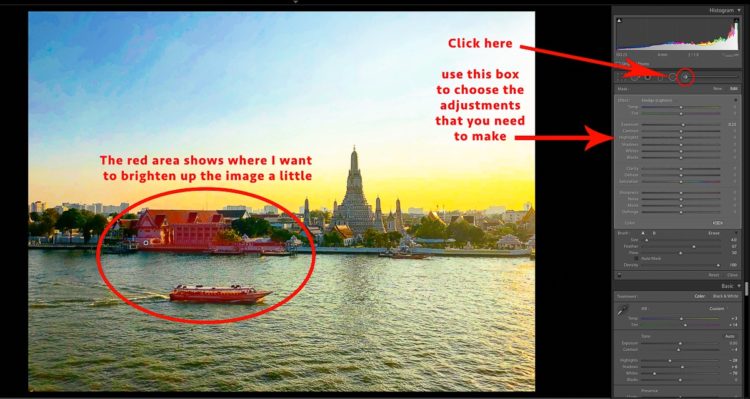
Sometimes you will find that a certain area of the image can benefit from brightening up or darkening. For example, it might be that you want to brighten a person in your scene while not changing the overall image.
Using the traditional sliders will brighten the entire image, these are called global adjustments. But if you select the Adjustment Brush (hit K on your keyboard to activate it) located under the histogram on the right-hand side, you can then selectively dodge (lighten) and burn (darken) only certain areas. These are called local adjustments.
Dial in the adjustments you want to make, the brush settings (keep the feather number high to blend the changes more naturally), and the brush opacity (keep it low to apply edits gradually just like if you were painting). Then simply adjust the brush to the size you need and go over the area that you want to brighten or darken with your mouse clicked.
More reading and a video here: Correct Your Images in Under 2 Minutes Using Lightroom
7. Remove Dust Particles
No matter how much you clean your lenses, there will always be occasions where you will end up with dust particles on the sensor or lens glass. These are especially evident in flat color areas like the sky. This is one of the main reasons that you should always check your work by reviewing it on your screen at 100%.
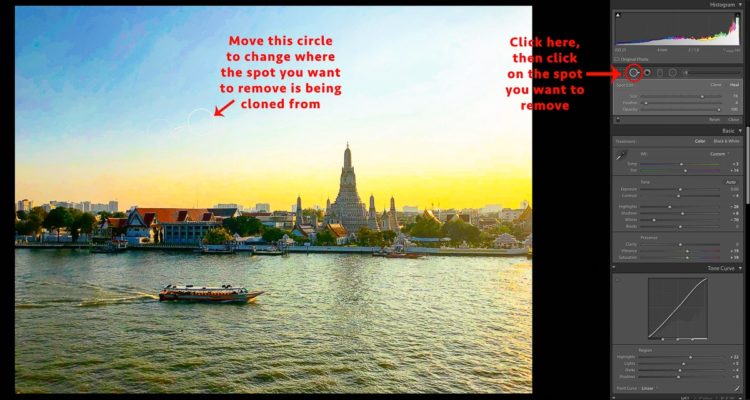
Select the Spot Removal tool (keyboard shortcut is Q) then click on the spot in your image.
Lightroom will automatically remove it by cloning another area onto the spot. You can adjust the source area (where it is cloning from) from by moving the circle that appears.
Note: You can also choose either Clone or Heal for this tool. Cloning is an exact copy of the source area, Heal attempts to blend the area you are fixing with its surroundings so you usually get a nicer, more natural looking result this way.
Conclusion
Lightroom is a great tool for photographers and is very easy to learn to use effectively.
The great thing about Lightroom is that it never actually changes the original image and all your changes are saved like layers on top of your image.
This means that you can always revert back to any stage or even the original file. So, if you find that you are not entirely happy with an image, have a go at tweaking it in Lightroom.
You might be surprised by the result.
For more, view our selection of photo editing training.

 A professional writer and travel and landscape photographer, based on the outskirts of London, Kav Dadfar has a wealth of experience in photographing high-end stock shots as well as shooting assignments and commercial work.
Over the years he has photographed everything from restaurants and food to events and even the odd baby and wedding. But his real love is travel photography and his images have been used by the likes of Condé Nast, National Geographic, Wanderlust travel magazine, Lonely Planet, Rough Guides, American Express, TripSavvy, multiple National newspapers and many more.
As a regular writer for various photography websites, Kav has written close to 150 articles on photography.