Whether you’re new to photography or more experienced, this article will help you avoid making 8 of the most common flash photography mistakes. If you can learn how to overcome these issues, and learn about using your flash properly, you’ll be on the way to becoming a flash master in no time flat!
But, speaking of flat, that’s one of the things that can happen if you’re using either the little pop-up flash on your camera, or a speedlight aimed directly at the subject – flat, dimensionless lighting. Keep reading to see how to fix that and many other common flash problems.
Here’s a list of the 8 common flash photography mistakes:
- Half the image is black or there’s a big black stripe across the bottom
- The subject looks like a deer in the headlights
- Harsh and flat lighting on the subject
- The subject looks like a devil with red eyes
- There is a spotlight on the subject and the edges are dark
- Harsh shadows on the background
- The background is a huge black void
- The subject’s eyes are too dark
#1 – Black stripe over part of the image
If you notice that half or part of your image seems to have a big black stripe or band across it, that is most likely a flash sync issue. It would look similar to the image below.
The issue is the the duration of the shutter speed is too fast and it is already partly closed by the time the flash fired. So the black band is actually the shutter itself that you’re seeing here.
Most cameras have a standard flash sync speed of 1/200th or 1/250th. If you aren’t sure what it is for your camera, check your user manual and look for “flash sync speed” or Google that phrase and your camera make and model.
The solution
To fix this problem all you need to do is one of two things.
- Use a slower shutter speed than the sync speed for your camera. So if that is 1/200th, shoot at 1/200th or slower (1/125th, 1/60th, etc.).
- Set your flash to High-Speed-Sync. Read more about that here: How to Use Your Flash – What all the Buttons and Settings Mean.

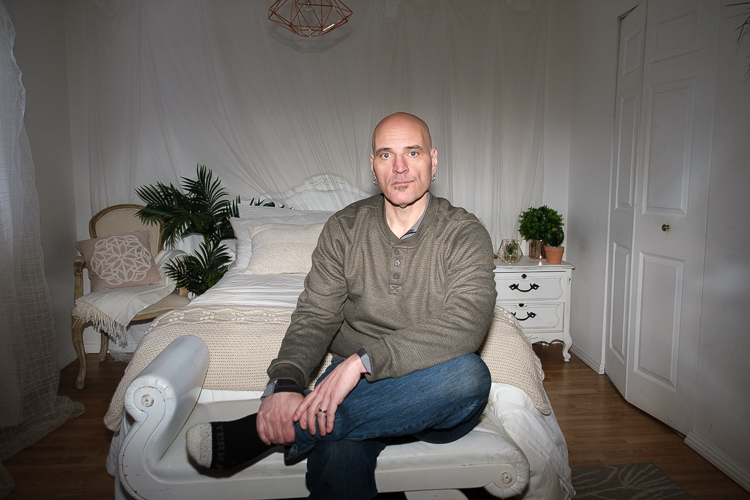
#2 – The subject looks overly flashed
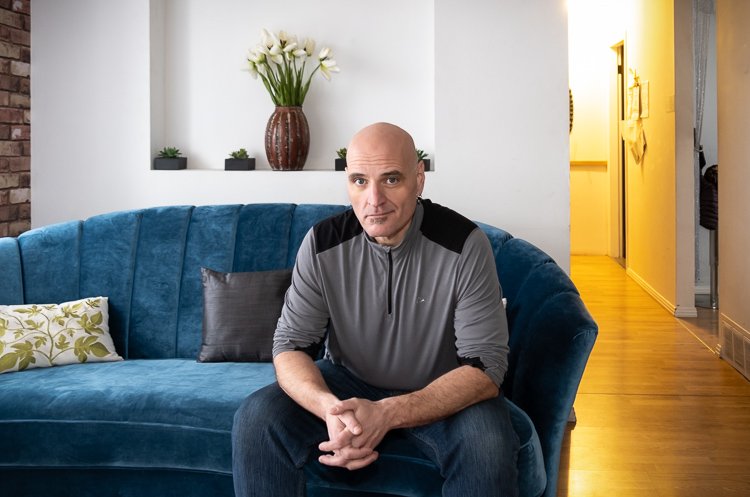
Having too much flash will make the subject look washed out, flatly lit, and create that “deer in the headlights” look that really isn’t desirable. This is what it might look like:
This is an issue of how much light in the image is coming from the flash, compared to the ambient or natural light in the scene. That might be daylight or man-made room lighting.
The problem occurs when you have equal amount or more flash than ambient lighting. In the image above, the flash is set to +1 Flash Exposure Compensation. That means the flash is 1 stop more powerful than the light naturally occuring in the room.
The solution
To solve this issue, you can either lower the flash power (if you’re shooting in Manual Flash Mode) or dial down the FEC (flash exposure compensation. If you are not familiar with these terms read up on them here: How to Use Your Flash – Tips for Total Beginners.
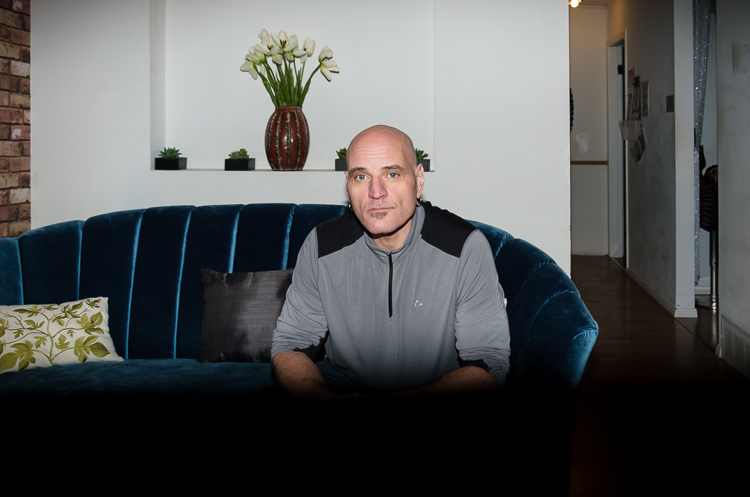
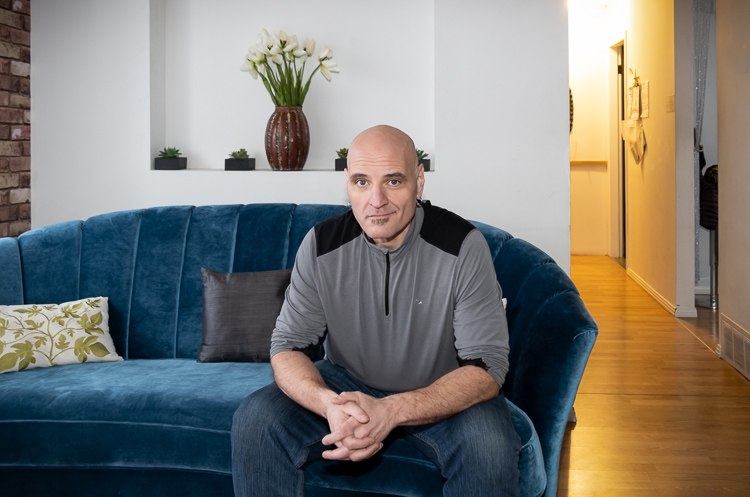
Look at the four images below. The first has no flash and the shadows on his face are fairly dark. I wanted to lighten them a bit so I added some flash. Each was shot at exactly the same exposure settings – the only change is to the flash compensation or power.
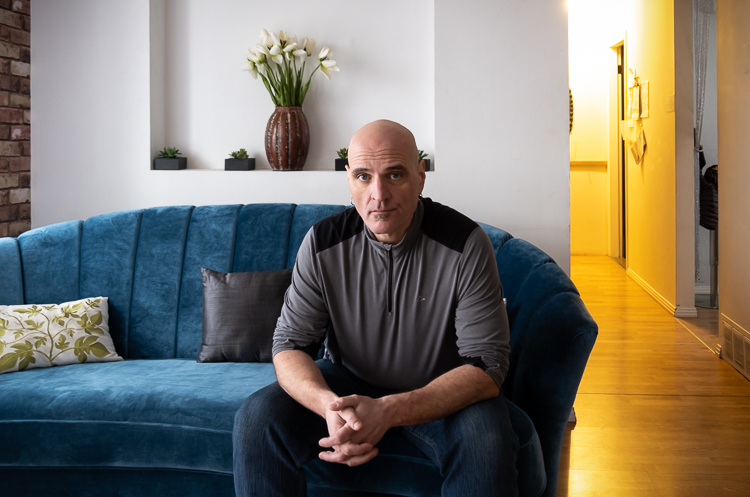
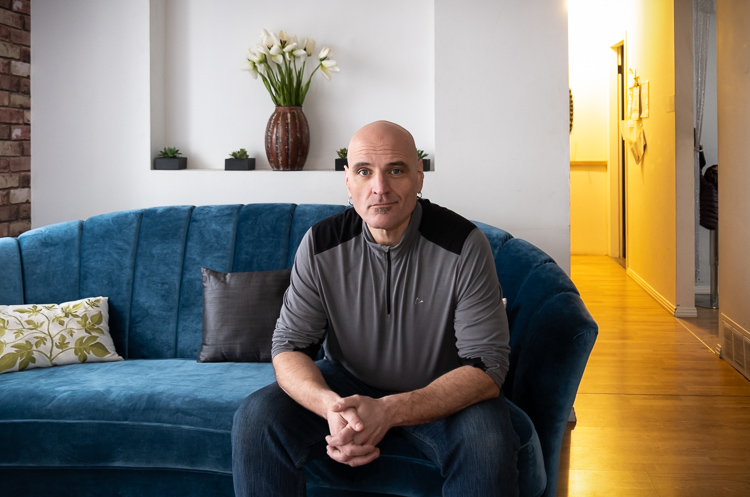
Can you see how the shadows have gotten progressively lighter with each flash adjustment? In the image above the shadows on his face have been almost completely obliterated and now there is a shadow under his chin from the flash – can you see it? That means the flash has overtaken the light in the room.
Also notice how much less texture appears on his shirt, even though he hasn’t changed positions. That’s the flash coming directly from the camera that flattens everything out. More on that in the next point!
#3 – Harsh flat lighting on the subject
Direct flash should only ever be used as a last resort if you have no other options. That’s why most pro cameras do not even have a built-in pop-up flash. We don’t use them. Even putting your speedlight on the hot shoe and aiming the flash directly forward is not ideal either.

Lighting that comes directly from the camera angle causes the subject to look flat, as you can see with his shirt in the image above. Flat light means no shape or dimension and the face also looks flat and it can make people look wider – nobody really wants that right?!
Another result of direct flash is harsh lighting. It’s very unforgiving and causes deep dark, hard shadows. Look at the shadow under his chin above.
The solution
The way to solve these issues is to change both the direction of light (where it comes from) and the quality of light (how hard/soft it is). Read more about that here: What is Quality of Light and How to Use it to Take Better Photos.
Getting the flash off-camera will fix the direction issue but to do that you’ll need a trigger to fire it. If you don’t have one of those another option is to bounce the flash off a wall, reflector, or ceiling. That will also fix the quality of light issue because the light source is then essentially the place where it is bouncing.

The quality of light can only be altered by changing the size of the light source. You can do that by using a large umbrella or softbox (24″ and larger) or by bouncing it as I mentioned above. Read more on this topic here: How to Use Bounce Flash for Better Photos.
NOTE: Those small plastic covers you can buy or that might come with your flash do NOT alter the quality because they don’t make the light bigger. All they do is bounce light all over the entire room and you end up with very flat, shadowless, directionless light. Again I’d only use something like that if you have no other options, nowhere to bounce the flash.
#4 – The subject has red-eye
Another draw-back of direct flash is that you can sometimes end up with a subject that appears more like a devil, with shining red eyes like the image below.
What you’re seeing is the flash literally bouncing off the back of the subject’s eyes and reflecting back as red. It’s more than a little spooky and not really something you want.
The solution
Once again the fix for this issue is to get the flash off-camera or to bounce it. Doing either of those things will ensure that you never give your subjects red-eye. Trust me, they’ll thank you!
#5 – The light isn’t even on the entire scene
Have you ever noticed a spotlight effect on your subject and the edges of the images were overly dark? Almost like the light isn’t being even distributed over the entire scene like this?
The issue here is usually a setting on your flash where it adjusts the zoom, or angle of coverage of the lighting coming from the flash. If the flash is set to cover only a narrow-angle but the lens is wide, this is the result.
The solution
This is a simple fix also. Just check that the zoom setting on your flash is set to auto (it should then detect the focal length and send out a beam of light sufficient to cover the same angle of view) or bounce the flash.

In image above, the flash was set to Auto Zoom and it adjusted to light the entire scene to match the lens. Read more about the zoom settings here: How to Use Your Flash – What all the Buttons and Settings Mean.
#6 – Harsh shadows on the wall
Another drawback of using on-camera direct flash is that it can create harsh shadows on the background. Have you ever gotten a result like the one below?

Again, this is caused by using the flash on the camera hot-shoe (or using the built-in flash) without any light modifiers or without bouncing the light. You can solve the shadow issue by moving the subject away from the wall or background, but that won’t fix the harsh lighting.
Just so it’s 100% clear:
IMPORTANT: Direct flash from the camera angle is NOT ideal for many reasons!
The solution
Once again, the solution to this problem is to modify the flash to soften it. That means using an umbrella or softbox, or bouncing the light off a nearby wall or reflector.


You could also use a small diffuser on the flash which will help somewhat but isn’t the ideal option. Always try and go for the very best solution but if that’s not possible do whatever you can to make it better.
CLICK HERE to see my recommended list of flashes and accessories.
#7 – The background is a big black hole
When you are shooting in a low light situation and the available light you have to work with is dim or almost non-existent, you have to be very careful not to use too much flash. The urge is to add a lot of light to the scene but what happens then is you have a very brightly lit subject, and a big black hole or void in the background.
Sound familiar? You might get an image that looks like the one below. That means the flash to ambient ratio is off again and you need to make some adjustments to your settings. But not to worry, all is not lost.
While I don’t know the settings used to create the image above, based on the results I would guess it to be a low ISO like 100-200, and a relatively small aperture like f/8 or so. Keep reading to see why I make those assumptions.
The solution
To solve this flash mistake you need to change your exposure settings so the camera can capture more of the ambient or available light in the scene.
In the image below, you can see that the background is a lot brighter which adds context and depth to the image. The black void is gone.

That was achieved by doing all of the following:
- Setting the camera to Manual shooting mode
- Setting the ISO fairly high, in this case to ISO 1600
- Choosing a lens with a large aperture, in this case, a 50mm f/1.8
- Opening the aperture as wide as it goes – again f/1.8
- Choosing a slightly slower shutter speed, 1/40th. Don’t worry too much about subject movement, the flash will freeze most motion.
- Putting the flash on TTL (through the lens metering) mode and leaving it set to zero flash exposure compensation.
All of those things combined allow the camera to capture more light. If you use a lower ISO and small aperture you can’t pick up as much ambient light (read: Tips for Low Light Photography). Just make sure you nail the focus and use the proper settings for optimal sharpness.
Read: How to Get Sharper Photos – 6 Essential Settings You Need to Know.
#8 – The subject’s eyes are too dark

Hopefully by now you’re getting the message about learning to bounce your flash, which brings me to the last common flash mistake, dark eyes. If your subject looks like they haven’t had enough sleep, or you can’t even see their eyes at all – then you may have bounced the flash in the wrong direction.
A common misconception that you may have heard from some other instructors or you may have deduced and tried yourself is bouncing the flash off the ceiling. While this can work and is often better than direct flash – it can result in an image like the one above.
It also depends on your subject and whether or not they have deep-set eyes. But this is an easy fix.
The solution
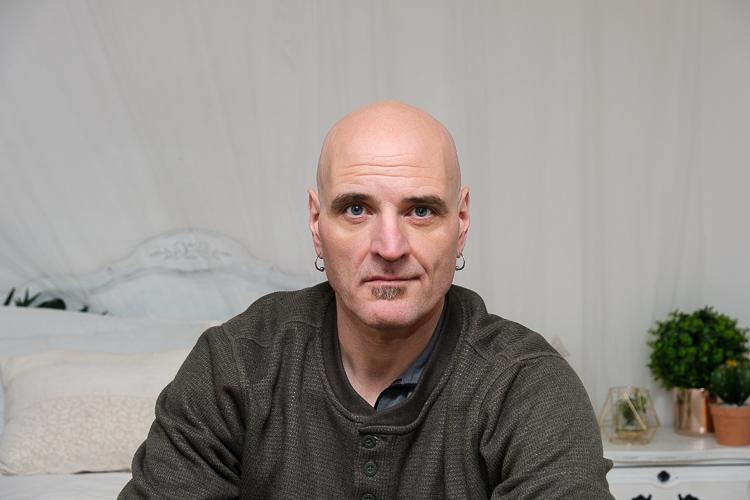
You have a couple of options here. If the ceiling is white or light colored and you can bounce off it anyway, just angle your flash a tiny bit backwards. It seems counter-intuitive but it works. Just by having the light coming from slight in front of and above the subject it puts more light into their eyes.

Look at the huge difference between the image above and the one just bounced straight up. See the little spots of light or white spots in his eyes? That’s called a catchlight – you want that! It’s the light reflecting back at you which means there is light hitting the eyes.
Your other option is to use the little white bounce card that’s built into your flash, or a larger add-on bounce card. With the flash aimed directly up, they just take a little of that light and bounce it forward – enough to add a sparkle to the eyes.
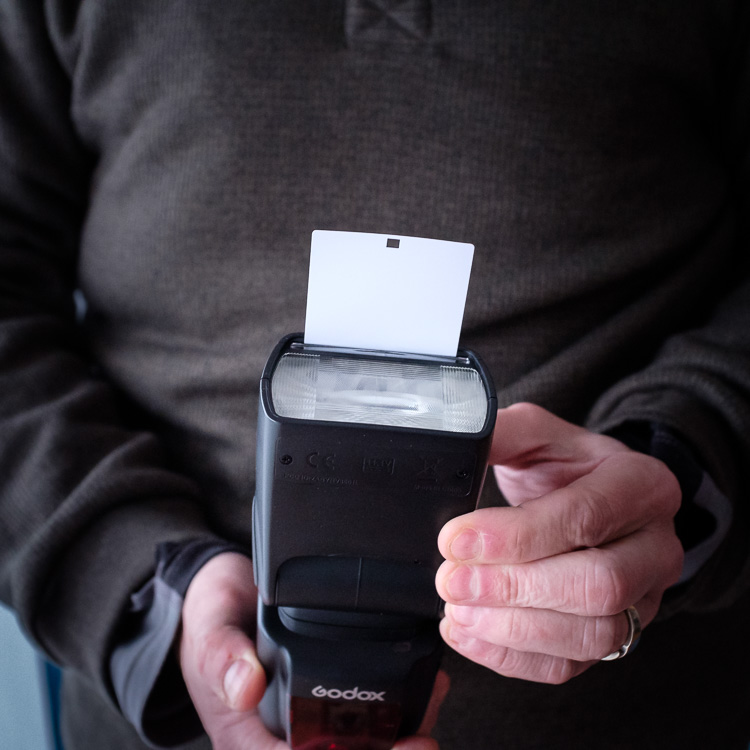
If you aren’t sure how to find this card, or if your flash even has one read more here: How to Use Your Flash – What all the Buttons and Settings Mean.
The image above in my opinion is acceptable, but I prefer the one bounced up and behind the camera. If you have no option to bounce to the side or back into another corner of the room behind you – up and back works well most of the time. That’s my go-to setup for events.
Conclusion
I’ve included links to three other flash articles throughout this tutorial. If you’re brand new to using flash or haven’t even bought on yet go through them in the following order – then come back here and read it again.
- How to Use Your Flash – Tips for Total Beginners
- How to Use Your Flash – What all the Buttons and Settings Mean
- How to Use Bounce Flash for Better Photos
My advice to you is NOT to be afraid of your flash or using it. Get it out of the box, figure out how to turn it on and go practice! If you have any questions please ask in the comment area below.
Cheers,
