Adobe Lightroom is a behemoth of photography software with enough functions and processes to make any photographer crazy. At the simplest level, though, Lightroom was created to help you do just three main things: sort your photos, post-process them, and export them. On Photography Life alone, we already have more than 100 articles about Lightroom — the equivalent of several books — and other websites have countless more. Clearly, it is an important topic to learn, whether you are just starting out or you are an advanced photographer. In this comprehensive guide, we will go over the process of using Lightroom for beginners, from start to finish, including tips on the topics that tend to confuse people the most.
This comprehensive article lays out all the basics, and it is divided into several different sections to make things easier to read. If there’s a specific term that you’re trying to find in this article, you might want to press Control F (or, for Mac, Command F) on your keyboard. If you’ve never used this shortcut before, it’s very useful, since it lets you search a webpage by the keyword you want.
Also, you can skip to the various parts of this article by clicking on the options here:
My goal was to write a tutorial that lays out everything a beginner needs to know about Lightroom, whether you have an older version (anything before Lightroom 6, such as Lightroom 4 or Lightroom 5) or the newest version (Lightroom 6 or Lightroom CC).
Hopefully, even if you start without any knowledge at all, you’ll end up with a medium- to high-level understanding of Lightroom’s most important concepts. So, it’s a long article.
Feel free to bookmark this page for later reference if you find some of these tips to be useful. Lightroom can be overwhelming at first, and the purpose of this guide is to simplify everything as much as possible.
1) What is Lightroom?
Lightroom is a post-processing and photo organization software. It lets you sort your photos, edit them, and export them at whatever size you need. Let’s dive into each of these three main functions:
1.1) Organizing Your Photos
The most obvious thing that Lightroom does is help you sort and organize your photos.
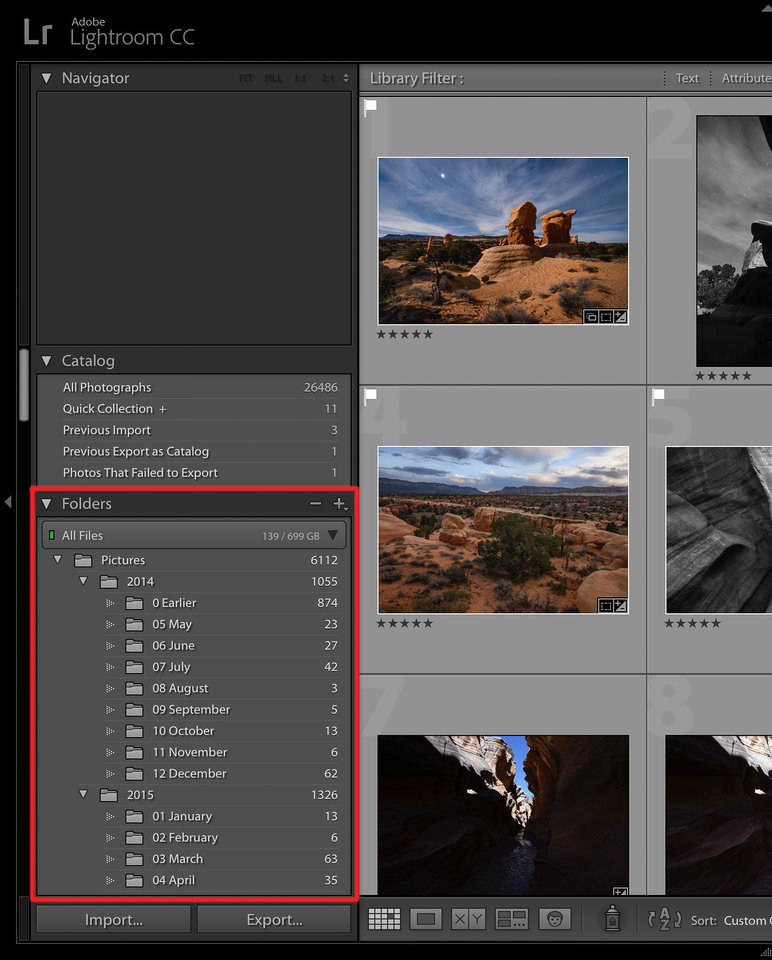
Each time you import images into Lightroom, you’re also seeing where they’re located on your computer (i.e., the file structure). This appears on the left-hand side of your screen. So, you might see something like this:
The photos that are already on your computer don’t automatically show up in Lightroom. If you want to add some of your photos to Lightroom, or you want to add an entire folder of photos, you’ll need to import them. I’ll cover more about the Import Dialogue later; it’s not something you need to know in detail yet.
Beyond simply telling you where your photos are located, though, Lightroom has many other ways to sort and organize your photos.
What if, for example, you take a photo that you particularly like, and you want to find it again in the future? Is there some way to mark it that makes it easy to locate later?
Of course! There are countless ways to do so. You could give it a five-star rating, you could flag it, you could add it to a “Best Photos” collection, and many more. Later on, I’ll go into detail about these different options, and how you can use them to sort and organize your photos however you want.
For now, just know that Lightroom is one of the main programs — in fact, the most popular one on the market — that photographers use to organize and sort their photos.
1.2) Editing Your Photos
Lightroom isn’t all about sorting your photos, though. Most importantly, it also lets you edit the photos that you take.
Lightroom doesn’t offer the same vast range of post-processing edits that other software options, such as Photoshop, do. Still, just because it isn’t as extensive doesn’t mean it’s not extensive enough. Many photographers can get by seamlessly with Lightroom’s post-processing features; personally, although I do own Photoshop, I use it more for graphic design work than photo editing.
Lightroom’s post-processing options cover all the main bases: brightness, contrast, color, sharpness, and many more adjustments. This also includes the ability to apply local edits — i.e., adjusting certain parts of the photo selectively, while leaving the rest untouched.
In short, Lightroom was designed to edit your photos. This isn’t simply a side feature that you can use from time to time rather than editing the photo in Photoshop; it’s intended to be the main tool you use for post-processing.
1.3) Exporting Your Photos
Most likely, you’re already somewhat familiar with the idea of exporting your photos.
Say, for example, that you’re trying to email a set of several photos to one of your friends. Since Gmail and other email services tend to have a file size limit — something like 25 megabytes — you may not be able to send full-resolution photos. One way around that is to shrink the file size of the photos that you send. Rather than 4000-pixel photos at 0% compression, you could send 1000-pixel photos at 20% compression instead.
That’s one of the things Lightroom does well. If you need to resize a photo for email (or anything else), it is easy to export a photo at whatever settings you want.
Exporting doesn’t delete the original copy of your photos. If you export a 500-pixel copy of a photo, it’s just that — a copy. It will have a different file name (or file type) from your original photo, and you can delete/modify/send it however you want without affecting the real version.
(In fact, if you try to export a photo in Lightroom without changing its name, location, or file type — something that normally would override the original — Lightroom won’t even let you.)
I export photos all the time: When I enter photo contests, text photos to people, upload images to my website, and so on. I just right-click on the photo in Lightroom, go to Export > Export, and pick all the settings I want for my final photo.
This isn’t the most well-known thing that Lightroom does, but, in the long run, you’ll end up exporting your photos all the time.
2) What Makes Lightroom Different from other Software?
This is one of the top questions I hear about Lightroom, and with good reason. Lightroom does not work how you might expect, and, in a few crucial ways, it is vastly different from other options on the market, including software like Photoshop.
Case in point: When you make a change to your photo in Lightroom, that change only shows up in Lightroom.
What do I mean by this? Say that you brighten a photo in Lightroom. You might be surprised to realize that, if you open the photo in any other software, it won’t look any brighter than normal. The actual, underlying file is totally unchanged.
This is a fundamental part of Lightroom, and it’s not a feature you can disable.
So, if Lightroom makes it impossible to actually edit your photos, and the edits are only visible in Lightroom, why would professionals ever use it?
In fact, this system has a lot of benefits.
First, to address the main concern most people have: Yes, there is a way to see your Lightroom edits outside of Lightroom. What is it? You already know the answer — exports.
When you edit a photo in Lightroom, the edits do only show up in Lightroom. However, when you export a photo — which, as I mentioned earlier, is one of the three most important things you can do in Lightroom — all the edits are present in the photo you’ve exported.
So, you can edit a photo all day in Lightroom to look exactly how you want, but you won’t see any of the changes if you open the file outside of Lightroom. The fix is simple: Re-enter Lightroom, right-click, click Export > Export, and export the photo how you want. The exported copy of the photo now has all the edits you just made. It doesn’t replace the original file, which is still sitting happily on your computer. Instead, it creates an entirely new photo, complete with all the export settings you chose (file type, pixel dimensions, compression, file name, and so on).
Why is this better than simply editing the actual, original photo? There are a few reasons, but here’s the big one: This type of editing is non-destructive. You’re never changing anything about your original file at all. (There are only three settings within Lightroom that do affect the original: renaming the photo, moving the photo to a new folder on your hard drive, and deleting the photo from your disk.) Lightroom makes it essentially impossible to accidentally ruin anything beyond repair.
The same cannot be said of, for example, Photoshop. If you open one of your photos in Photoshop, crop it, save the photo, and exit, your photo will be permanently cropped. There are ways around this — specifically, unchecking the “delete cropped pixels” option and saving as a .PSD file — but this isn’t an intuitive fix. It’s far too easy to edit the original photo by mistake. (See Photoshop vs Lightroom for more differences.)
Lightroom is great precisely because you’re never touching the original file. Lightroom is non-destructive editing software, and that is a critical feature for almost every photographer.
3) What is the Lightroom Catalog?
As you read about Lightroom, you’ll hear one term a lot: catalog.
Lightroom is a cataloging software.
What does that mean? In fact, this is exactly what I covered in the prior section: Lightroom doesn’t actually touch your photos.
Every single edit that you make to a photo; each five-star rating you give; every time you add a photo to a collection — all of those changes are stored somewhere other than the actual photo on your computer. Where? The Lightroom catalog file.
The Lightroom catalog is one file that contains each change and adjustment you make to every single one of your photos. It also doesn’t take up too much space on your computer; my Lightroom catalog file is only about 300 megabytes in size, yet it contains all the edits to each of my thousands of photos. Not bad!

The Lightroom catalog gets more and more complicated as you learn about it in-depth. If you want to use multiple catalogs, send a catalog of photos to someone else, or use the same catalog on multiple computers, things can be very tricky. I recommend reading our full article on Lightroom catalogs if you’re trying to do anything complicated, and our article on using Lightroom with multiple computers.
Luckily, you probably don’t need to do any of that yet. If you just want to add photos to a single Lightroom catalog, you already know enough to start.
By default, the photos on your computer (or memory card) won’t be a part of your Lightroom catalog — so, you need to add them yourself. How do you do this? To add a photo to your Lightroom catalog, you need to start at the Import Dialogue. Click to the next below, and we’ll cover that process.