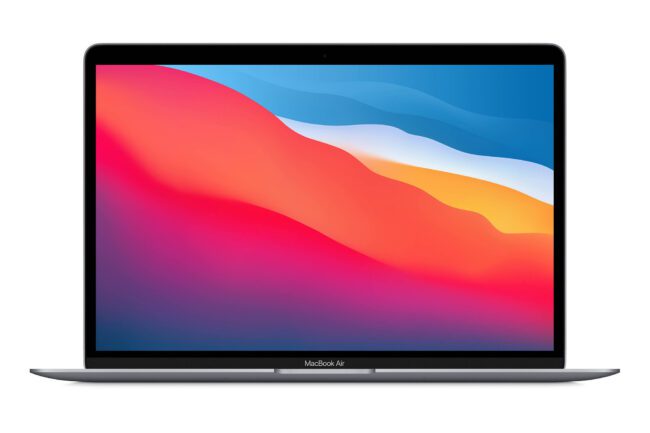
As a travel and landscape photographer, I want to be able to pack as light as possible. While my camera gear has been getting slimmer and lighter, thanks to the advancements in mirrorless camera technology, my computer needs have also grown tremendously in the past few years. I recently had a chance to test out the new Apple MacBook Air with Apple’s M1 Silicon chip and I wanted to see how it compares to my 15″ MacBook Pro for photography and videography needs. In this review, we will be taking a closer look at this machine and see how it compares to an older generation MacBook with an Intel processor.
Shooting with a high-resolution camera can put quite a bit of strain even on the latest and greatest computer hardware, let alone a compact laptop. While my 15″ MacBook Pro has been doing a fine job, it is by no means a travel-friendly machine. It barely fits into my camera bag, and the huge and heavy power adapter makes it painful to travel with when I really need to be productive on the road. I tried out a number of different options in the past, including traveling with the Apple iPad Pro, but all of them had their issues and limitations.
While I previously ignored the MacBook Air series laptops due to their relatively poor performance and RAM limitations, the new MacBook Air M1 that Apple revealed earlier this year caught my attention. Apple finally decided to abandon Intel CPUs on its laptops and computers, and move to its own ARM architecture dubbed “Apple Silicon”, which basically uses a similar processor as the one we have seen on Apple tablets and smartphones. The new 13.3″ Apple MacBook Air and MacBook Pro machines with M1 chip were revealed with a lot of typical Apple fanfare, promising much better performance, extended battery life, and practically fanless operation. I wanted to check what the hype was all about, and see if this new hardware truly lives up to its expectations. My interest was primarily in the MacBook Air. I did not want to order the 13.3″ MacBook Pro, because the specs were somewhat similar, and I would be still getting the Touchpad that I only grew to dislike over the years. Plus, the MacBook Air is completely fanless, lighter, and has a much smaller power adapter, making it easy to travel with.
Apple MacBook Air M1 Specifications
Let’s start out with the basic specifications of the Apple MacBook Air M1:
| Feature | MacBook Air M1 |
|---|---|
| Display Type | 13.3″ LED-backlid IPS panel |
| Display Resolution and Brightness | 2560×1600 (227 PPI), 400 Nits |
| CPU | Apple M1, 8-core CPU, 7 or 8-core GPU, 16-core Neural Engine |
| Battery | 49.9 WPH Lithium-Polymer |
| Battery Life | Up to 15 Hours Wireless Web |
| Power Adapter | 30W USB Type-C |
| Ports | 2x Thunderbolt 3 / USB 3.1 Gen 2, 1x Headphone |
| Unified Memory (RAM) | 8 GB, Expandable to 16 GB |
| Storage | 256 GB, Expandable up to 2 TB |
| Keyboard | Backlit Magic Keyboard with 12 Function Keys |
| Touch ID | Yes |
| Wi-Fi and Bluetooth | Wi-Fi 802.11ax Wi-Fi 6, Bluetooth 5.0 |
| Camera | 720p FaceTime HD |
| Speakers | Stereo Speakers, Dolby Atmos Supported |
| Dimensions (HxWxD) | 0.16-0.63 x 11.97 x 8.36″ (0.41-1.61 x 30.41 x 21.24 cm) |
| Weight | 2.8 lbs (1.29 kg) |
| Warranty | 1 Year Limited Warranty |
| Finish | Gold, Silver, Space Gray |
| MSRP | $999-$2049 |
The most basic configuration priced at $999 comes with an 8-core CPU / 7-core GPU processor, 8 GB of RAM and 256 GB PCIe NVMe SSD storage. A maxed-out configuration with 8-core CPU / 8-core GPU, 16 GB RAM and 2 TB SSD storage retails for $2049. Since you cannot upgrade any of the components in the future, it is essential that you pick the right configuration from the start.
I ordered the MacBook Air M1 with the following configuration, which I found to be good enough for photography needs:
- MacBook Air M1, 8-core CPU, 7-core GPU
- 16 GB Unified Memory (RAM)
- 512 GB SSD Storage
If you are wondering about the differences between the 7-core and 8-core GPUs, they are basically the same chip, albeit with slightly different performance characteristics. Since processor manufacturing is complex and can result in variances, when the final product is tested during the QA process, if it fails to meet the performance criteria of the given standard, the processor is basically downgraded or “binned” to a lower level.
I looked at some of the sample benchmarks and figured that I did not need the best possible GPU performance, which isn’t critical for photography and videography needs. Lightroom, Final Cut Pro and Premiere rarely keep GPU load at 100%, so the 7-core version should be good enough for most people. However, if you are planning to use this machine for gaming as well, you might consider the 8-core GPU instead. It appears that the 8-core GPU version throttles less under heavy, continuous load.
As for storage, while having a 2 TB configuration would be ideal, I typically carry more images with me on external SSD storage anyway. As long as the primary storage is large enough to keep my documents and my Lightroom catalog (which 512 GB is plenty for), I can keep my photos on a small SSD when traveling. I simply did not want to shell out $600 for the extra storage. If you don’t have budget limitations, I would certainly recommend getting the 2 TB model.
Initial Setup
Just like with all Apple hardware, setting up the MacBook Air M1 was a breeze. Once I unboxed it, I connected it to power and started it up. The macOS Big Sur went through the initial configuration, activated the device, set up my iCloud profile, Apple Siri, and the Touch ID system for unlocking the machine, and authorizing access/payments. You can skip through most of this during the setup process and configure it later.
For testing the laptop and benchmarking its performance, I immediately installed Adobe Lightroom Classic CC, Lightroom CC, Premiere Pro, and Final Cut Pro. I wanted to benchmark the machine for both day-to-day photo editing needs, as well as for video editing. All the relevant benchmarks are provided further down in this review.
Magic Keyboard and Trackpad
Apple has had a lot of problems with its Magic Keyboard with an integrated Touch Bar on its MacBook Pro machines for a number of years now. That’s my biggest gripe with my maxed-out 2016 MacBook Pro. The butterfly keyboard is loud, does not have a good tactile feel, and I dislike both the Touch Bar, as well as the arrow keys on the keyboard. Plus, my laptop does not have a real Esc key, something Apple added on later MacBook Pro generations. I am used to the real function keys of my iMac Pro keyboard, so transitioning between the two machines has always been a pain. Although the latest models of the MacBook Pro have gotten much better (real Esc key, inverted-T arrow keys, improved typing experience), Apple is still sticking to the Touch Bar on these laptops. I don’t like looking down on my keyboard, and trying to fiddle with app-specific functions and sliders is just not for me.
Thankfully, Apple still makes laptops without the Touch Bar, and the MacBook Air is one of them. The MacBook Air features a real keyboard with excellent feedback, real Esc and function buttons, and an inverted-T arrow key layout that is easy to use:
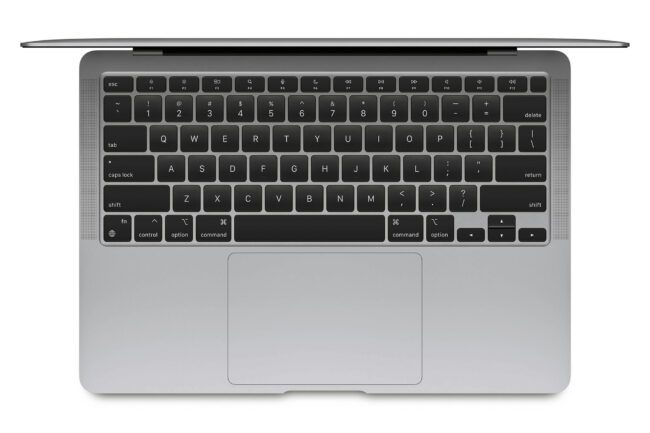
I am a big fan of this keyboard. I don’t have to hammer any of the keys, and the tactile feedback is excellent for any keyboard warrior.
The Trackpad is a class on its own. Apple has always delivered the best trackpad experience, and the MacBook Air M1’s trackpad is not an exception. All the default gestures are already set up, and if you need to customize the behavior, you simply visit the Trackpad menu within the Settings app and configure it to your taste. As usual, using the Trackpad is a breeze, especially for photo and video editing needs.
Connecting to an External Monitor
If you have an external IPS monitor that you want to connect to, the MacBook Air M1 supports a single external monitor in up to 6K resolution. Ideally, you want to have a monitor that has a Thunderbolt / USB Type-C input, but if yours does not have that, you can still connect to an external monitor using an adapter cable.
Limited Ports
The problem with the 13″ MacBook Air and MacBook Pro models is the lack of ports – these laptops only have two USB Type-C ports. Once you connect the first port to the power brick, you are only left with just one port to use, so if you have multiple things you want to connect to (such as external storage or a monitor), you will need to use a docking station or a USB hub. This is not an issue for me personally, as I am not planning to use an external monitor together with other devices, but it could be an issue for others who want to be able to do that.
This could also be a problem if you are planning to use external storage for storing photos in the field. The only way you can transfer photos from your camera is by either disconnecting the power cord (which works just fine, as long as the battery lasts until your image transfer has been completed), or by using a USB hub. Considering that the battery life on these machines is great (more on that below), disconnecting power is not a big issue for me personally. But if you have multiple devices you want to connect at the same time, keep this port limitation in mind. Personally, I have been using this generic USB hub for my MacBook Pro when I need to connect older USB devices and SD memory cards, but you can find many other similar products on Amazon that do the same thing.
Wi-Fi 6
The Apple MacBook Air M1 ships with the newest Wi-Fi 6-capable wireless chip that can provide up to 1.2 Gb/sec throughput. While this sounds great on paper, unless you have a Wi-Fi 6 capable wireless router or access point at home, you will not be able to take advantage of it. Still, I am happy that Apple decided to go with the latest and greatest Wi-Fi tech on this machine. Once Wi-Fi 6 becomes more mainstream in the coming years, you will be able to take full advantage of it. I was able to test the laptop with my older 802.11 ac wireless access point, and I managed to get up to 800 Mbit/sec speeds, which is more than good enough for most people’s needs.
Apple Silicon: M1 Chip
The biggest differentiating factor between the new MacBook Air M1 and its older model is Apple’s own silicon chip called “M1”. Apple decided to move away from Intel’s chipsets and CPUs, allowing Apple’s engineers to focus on designing their own. The M1 is an ARM-based system on a chip, which Apple used on all of the newly-announced 2020 13″ MacBook Air, 13″ MacBook Pro and Mac Mini computers. It is an extremely fast and efficient 8-core CPU (as you will see below). The 7-8 core GPU share the memory together with the CPU, which is why Apple refers to RAM as “Unified Memory”. That’s another reason (other than not being able to upgrade in the future) why you want to get 16 GB of RAM, since both the CPU and the GPU can use it heavily when running CPU and GPU-intensive applications.
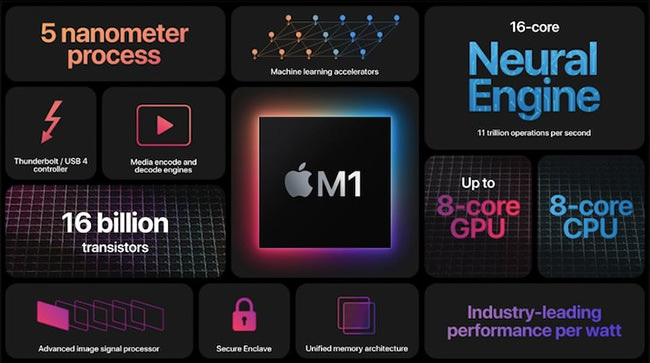
So what are the advantages of the M1 chip? Other than the superb performance, this chip is also much more power-efficient when compared to an Intel CPU. This allows Apple to optimize battery life, as well as minimize heating issues. As a result, Apple engineers were able to make the MacBook Air completely fanless. This is an amazing achievement because most laptops get quite hot under heavy load and have to engage their small (and often loud) fans. While the machine will throttle if you run a CPU / GPU-intensive task continuously for over 10-15 minutes (more on CPU / GPU throttling below), it is not as big of an issue as we have seen on many other laptops, including Microsoft’s Surface Pro.
The biggest issue with the M1 chip is software support and compatibility at the moment. While most applications will function just fine under Rosetta 2 emulation, you might encounter performance and stability issues with older software. Good luck trying to run Windows via Boot Camp – it is not even an option at the moment. However, with Apple already releasing a bunch of software updates to support the M1, as well as third-party software vendors like Adobe and Microsoft also rolling out updates with native app support, things are already starting to look great. However, if you are running specific software that you would like to run natively without any software emulation, then you are better off waiting for a few more months.
So far, my experience with the MacBook Air M1 has been very positive, and all the apps that I normally use have been running great, even via Rosetta 2 emulation. Your mileage might vary.
Lap Comfort
Thanks to the much cooler and more power-efficient 10W chip, the fanless MacBook Air produces very little heat, making it an amazing laptop for lap use. I used it heavily for all kinds of tasks, including running Lightroom Classic CC. Aside from one spot in the middle of the laptop getting warm, the laptop was always relatively cool to touch, which is a big deviation from my MacBook Pro that gets uncomfortably hot after just 30 minutes of moderate use. Additionally, since the laptop does not have any vents under it, you don’t have to worry about blocking air circulation!
If you are like me and you prefer to have a laptop for extensive lap use, the MacBook Air M1 is extremely comfortable.
Apple MacBook Air M1 CPU Performance Benchmarks
Let’s take a look at how the MacBook Air M1 performed in Geekbench 4.4.1 Pro.
Geekbench 4 Performance Benchmark
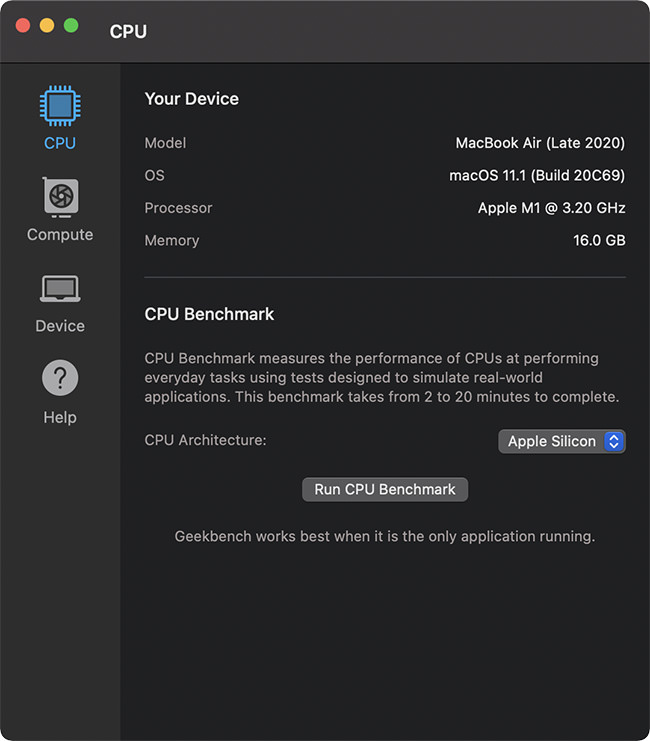
Here is a screenshot of the Device tab that shows some technical data:
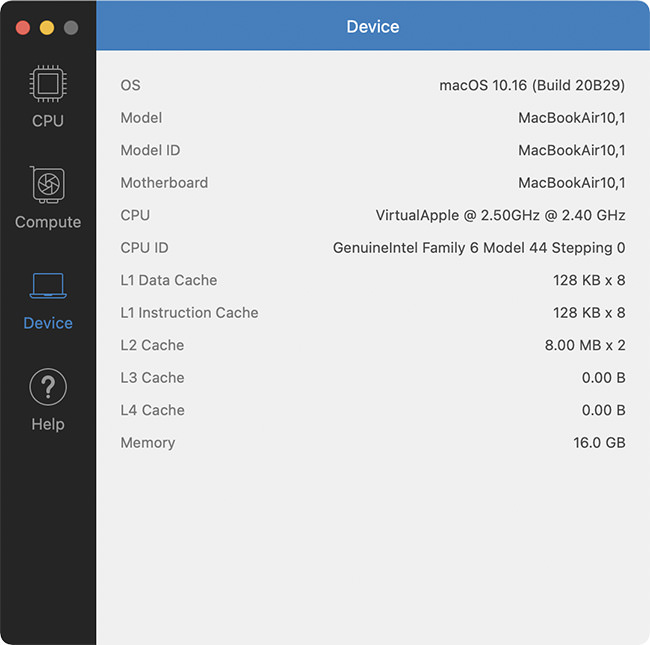
As you can see, Geekbench identified the CPU as “VirtualApple”, since it was running it in Rosetta 2 emulation mode.
Here is the benchmark result of the CPU:
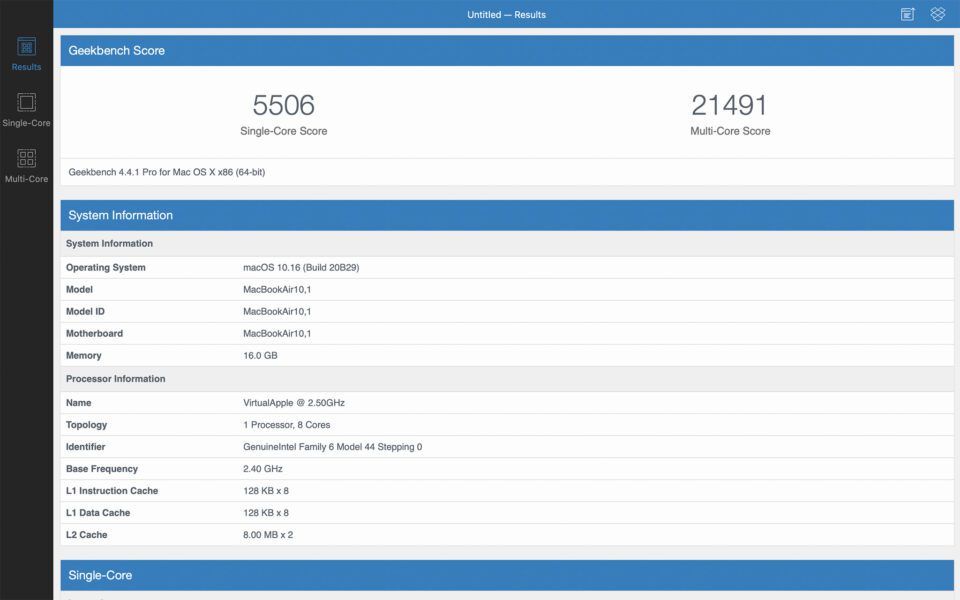
Simply Wow. To get an idea of what this score means, take a look at the CPU benchmark from my beefed-up 15″ MacBook Pro 2016 running Intel Core i7-6920HQ:
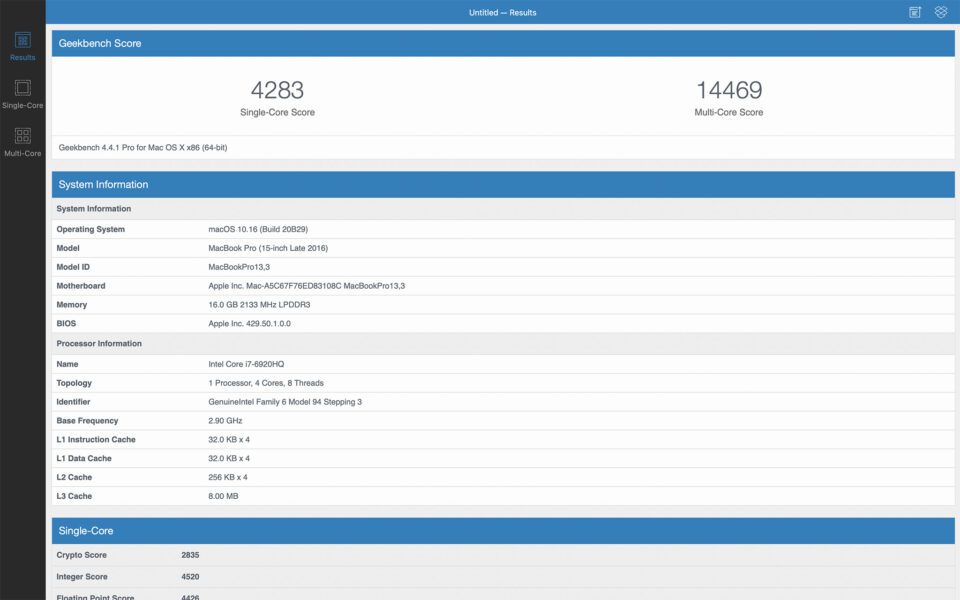
Basically, this little laptop destroyed my much pricier MacBook Pro in both single and multi-core CPU benchmarks!
Geekbench 5 Performance Benchmark
Considering that Geekbench 4 is quite old and has no native support for the M1 chip, I decided to download the latest Geekbench 5 version and give that a shot. The software identified the hardware properly, as seen below:
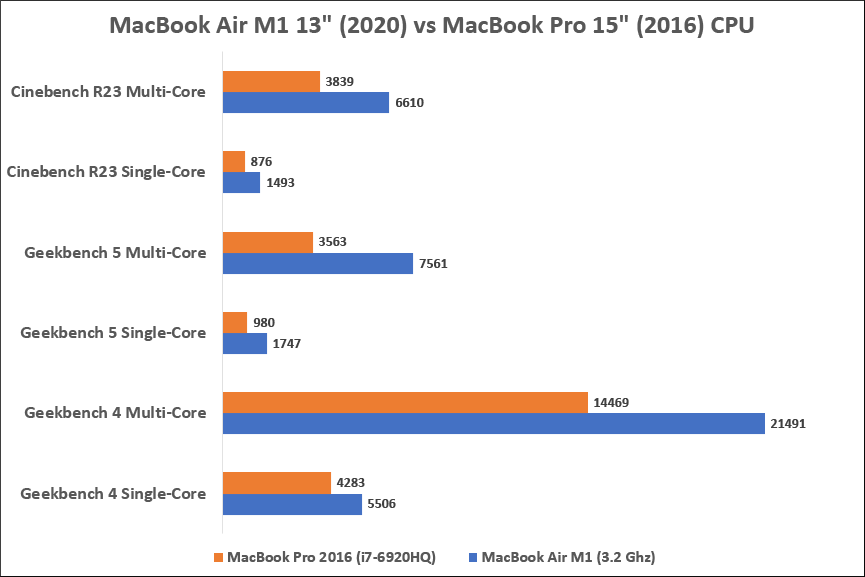
The result from Geekbench 5 was similar to Geekbench 4 – the MacBook Air M1 performed noticeably faster compared to my MacBook Pro 2016. The single-core CPU performance showed 1747, while the multi-core CPU performance was 7561 (Geekbench 5 shows lower figures compared to Geekbench 4). This is the best of three tests I ran on each machine. In comparison, my MacBook Pro scored 980 for single-core and 3563 for multi-core CPU performance. That’s a massive performance difference:
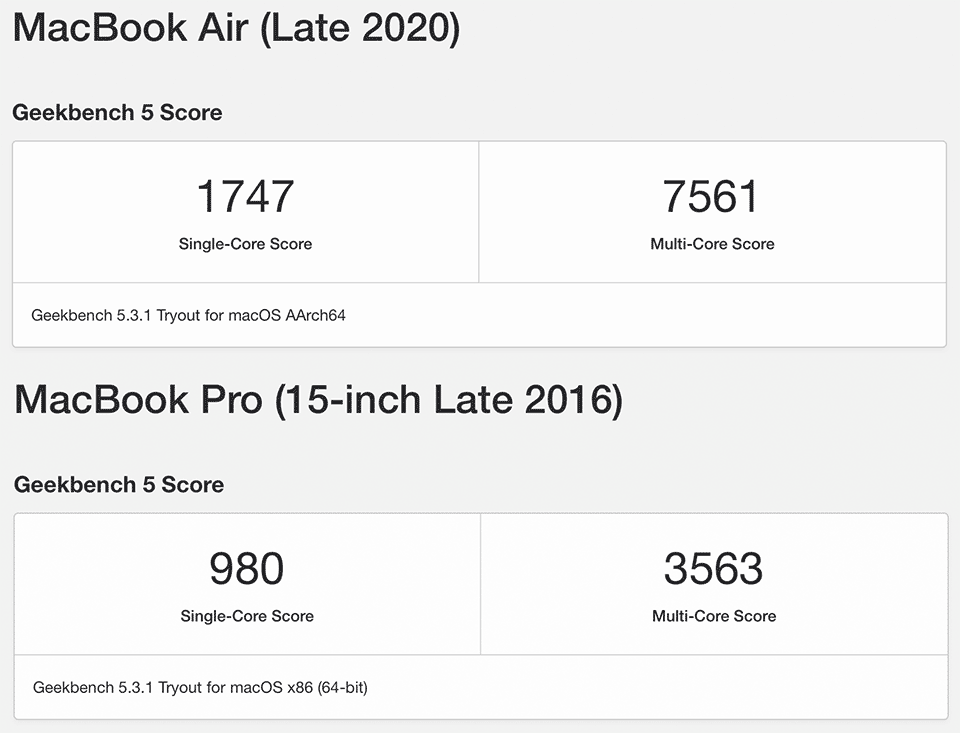
I am obviously not comparing apples-to-apples here, as my MacBook Pro 2016 is quite dated by today’s standards. Unfortunately, I don’t have the latest MacBook Pro 2020 to compare it with, but it was still interesting to see how this much less expensive laptop could easily outperform a high-end laptop from a few years ago.
Cinebench R23 Performance Benchmark
Compared to Geekbench, I personally like Cinebench much better, because it can really stress-test a computer, especially with its timed option that runs for 10 minutes. Let’s take a look at how Cinebench results compare between the two computers:
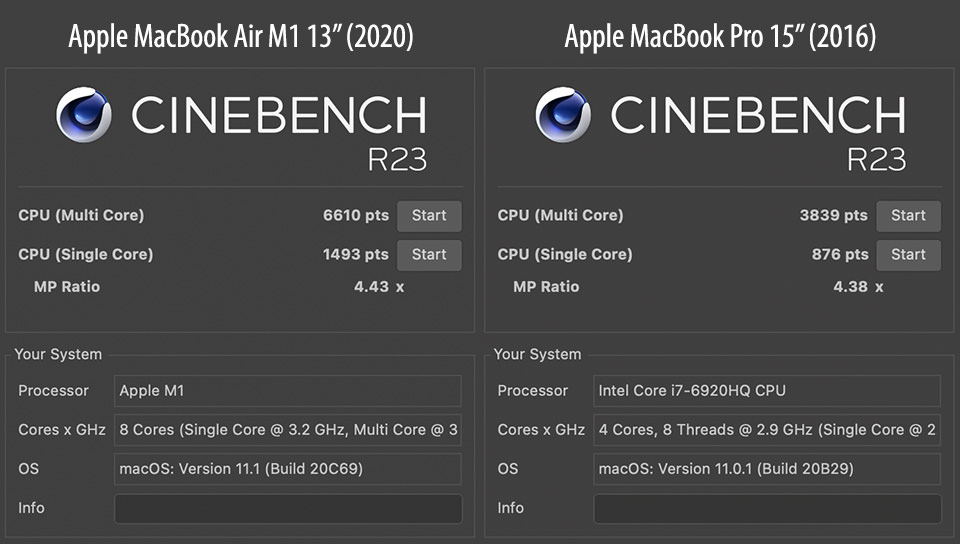
Once again, the MacBook Air M1 showed very impressive results. My copy showed 1493 points for single-core and 6610 points for multi-core CPU performance. In comparison, my dated MacBook Pro 2016 only scored 876 points for single-core and 3839 points for multi-core CPU performance. And by the way, my MacBook Pro sounded like it was going to take off when running the multi-core benchmark – the fan was quite loud! The MacBook Air only felt warm to the touch in one particular spot under the laptop. It was otherwise much cooler in comparison.
Just for the fun of it, I ran the same benchmark on my iMac Pro. While my iMac Pro (2017, 3.2 Ghz 8-core Intel Xeon W) outperformed the MacBook Air in multi-core CPU performance, scoring 9836 points, its single-core performance was noticeably worse at only 1013 points! Basically, this thing is a beast that can outperform some seriously good machines out there!
Here is a summary of the above benchmarks, charted:
These are obviously impressive results, but what about GPU performance? Let’s take a look.
Apple MacBook Air M1 GPU Performance Benchmarks
How good is the built-in 7-core GPU? Here is what Geekbench 4 and 5 were able to measure:
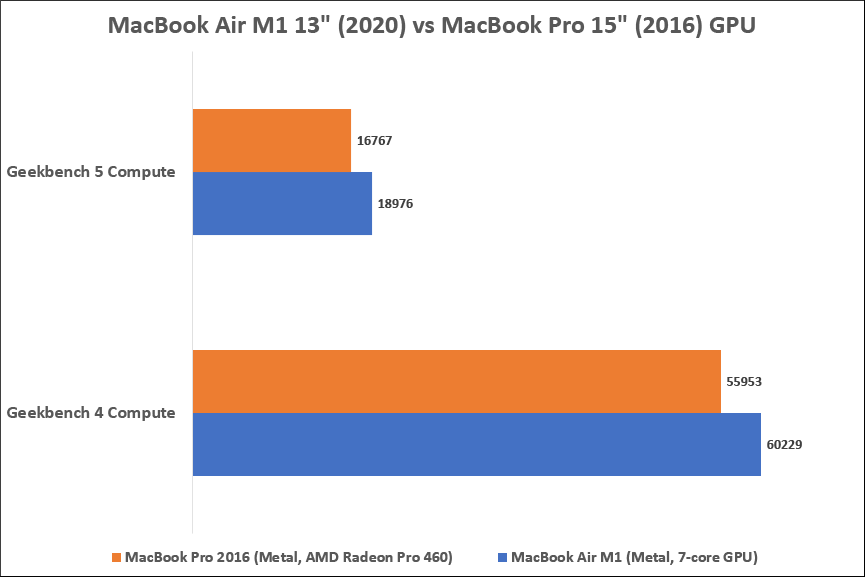
Note that I picked the AMD Radeon Pro 460 GPU on the MacBook Pro 16″ 2016. As you can see, Apple’s inferior 7-core GPU is able to beat MacBook Pro’s dedicated GPU – both Geekbench 4 and 5 confirm this. When I tried to measure the performance of the Intel HD Graphics 530 that is part of the Intel Core i7 CPU on the MacBook Pro, it scored only 20857 on Geekbench 4 – far worse when compared to the GPU chip on the M1 or the AMD GPU on the MacBook Pro.
CPU / GPU Throttling
The fanless design of the MacBook Air is excellent. Like I pointed out above, the machine only got slightly warmer to the touch when running the two 10-minute tests in Cinebench. The machine cooled down right after the tests, as expected. However, when running a longer stress test, if the ambient temperature is high and the machine does not cool down, it automatically engages CPU and GPU throttling to save the machine from burning out.
Interestingly, no matter how long I ran the tests, the throttling that I saw only negatively impacted the performance by 5-10% max under heavy load. As a comparison, running a single multi-core test in Cinebench R23 resulted in a score of 7164 when the CPU was not throttled, whereas that figure stayed in the 6600 range when I tested the machine repeatedly with 10-minute benchmark jobs.
Right after stress testing was stopped, it only took a few minutes for the CPU to get back to normal speed. If you are planning to play GPU-intensive games or run CPU-intensive tasks for hours on end, you might want to consider the MacBook Pro M1 13″ instead, as it has a built-in fan that kicks off when the CPU is overloaded. As a result, it does not throttle the CPU or the GPU and gives you maximum performance. I personally don’t see myself doing anything like that, so it is not a problem. Running Lightroom Classic CC and post-processing images do not result in any sort of unusual CPU / GPU spikes, so you don’t have to worry about any throttling issues.
Application Performance Benchmarks
For this section of the review, I performed a number of different tests using Lightroom Classic CC, Final Cut Pro, Premiere Pro, and iMovie.
To test the MacBook Air M1’s Lightroom Classic CC performance, I imported 100 high-resolution images from the Fujifilm GFX 100, then tested file export speed using all 100 images. In the export window, I selected “Resize to Fit”, set 2048 pixels as my output resolution, then checked “Sharpen For” and picked “Screen” and “High” sharpening amount. This put quite a bit of load on the CPU since each 100-megapixel image had to be read, resized to lower resolution, then sharpened. It is important to note that Lightroom Classic CC has not yet been optimized for the M1 chip, so the below test results are with Rosetta 2 emulation.
For Final Cut Pro, Premiere Pro, and iMovie tests, I imported a large 21 GB video file that was shot in 4K resolution. The video file was resampled with a maximum quality setting in the original 4K resolution. In addition, I ran the BruceX performance benchmark in Final Cut Pro to see how fast it would render a high-quality 5K video with Apple ProRes file output.
Here are the test results:
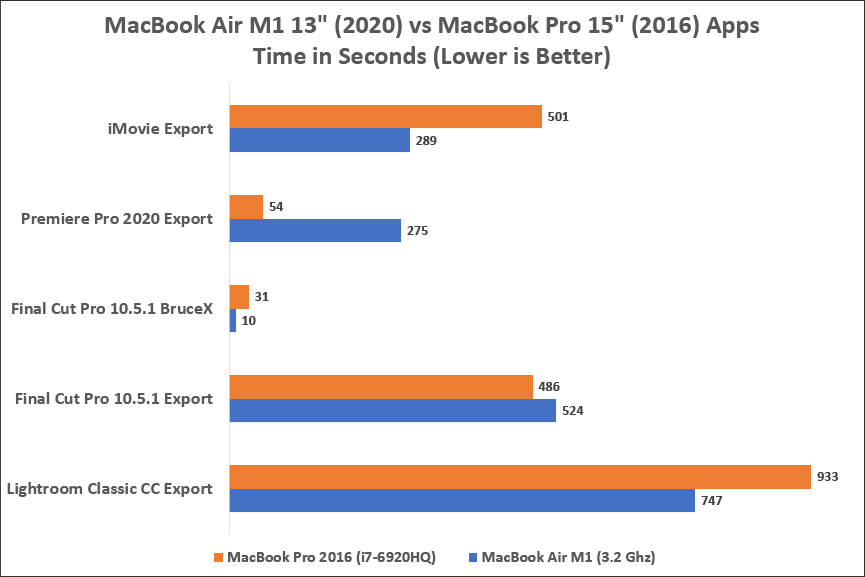
Without a doubt, these are very impressive results. As you can see, the MacBook Air M1 was able to outperform my MacBook Pro 2016 by a huge margin when using native apps that are optimized for Apple Silicon. iMovie was roughly twice faster. Rendering BruceX 5K video in Final Cut Pro 10.5.1 was basically three times faster. Even Lightroom Classic CC exported noticeably faster when downsampling and sharpening 100-megapixel images.
When I tried to export the 21 GB file in Final Cut Pro, things were a bit different, most likely due to the heavy IO activity in addition to high CPU / GPU usage. The MacBook Air M1 here was a bit slower compared to the MacBook Pro, but not much. I suspect it slowed down a little due to CPU and GPU throttling.
The big difference was with Adobe’s Premiere Pro, which basically sucked on the MacBook Air M1. Since the app had to run through Rosetta 2 emulation, it was painfully slow. As you can see from the chart, it was 5x slower in comparison – not a good result! For now, I would recommend avoiding Premiere Pro for video editing – Final Cut Pro and the beta version of DaVinci Resolve both support Apple Silicon, so you should use those instead. Adobe promises a big Apple Silicon update next year, so we will have to wait for that big update to roll out. For now, the only Adobe app I am aware of that natively supports the M1 chip is Lightroom CC. Running Lightroom CC is very snappy on the M1, so I suspect all other apps will show similar, if not better, performance when they are finally released.
What about other apps? Google has already released its Apple Silicon-enabled version of Chrome, which works very well. However, considering how fast Safari opens compared to Chrome or any other browser, I mostly ended up using Safari for my web browsing needs. All other macOS apps that come with Big Sur have already been optimized for the M1, so they all perform extremely fast.
Other apps that have not been ported over yet have to be used with Rosetta 2 emulation. As I have already pointed out earlier, most of them work just fine, but you might need to wait until updates are released to take full advantage of the vast performance differences.
Storage Performance Benchmark
Apple laptops and desktops have very fast PCIe NVMe-based SSD storage. With the release of the newest laptops, it appears that storage has gotten even faster than before. Check out the below disk speed tests that I performed using the Blackmagicdesign benchmark:
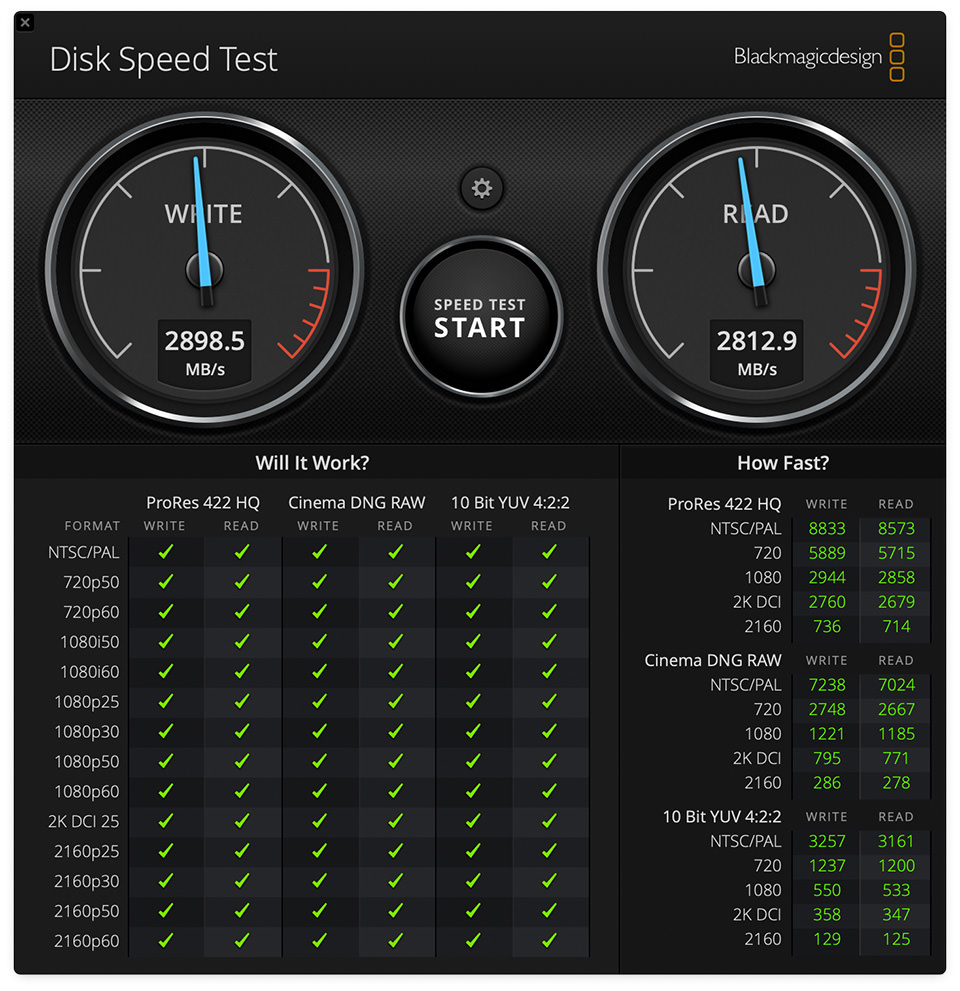
I was able to get roughly 2899 MB/sec write and 2813 MB/sec read speeds, which is pretty incredible! The storage on the MacBook Air M1 easily outperforms my MacBook Pro 2016, as can be seen below:
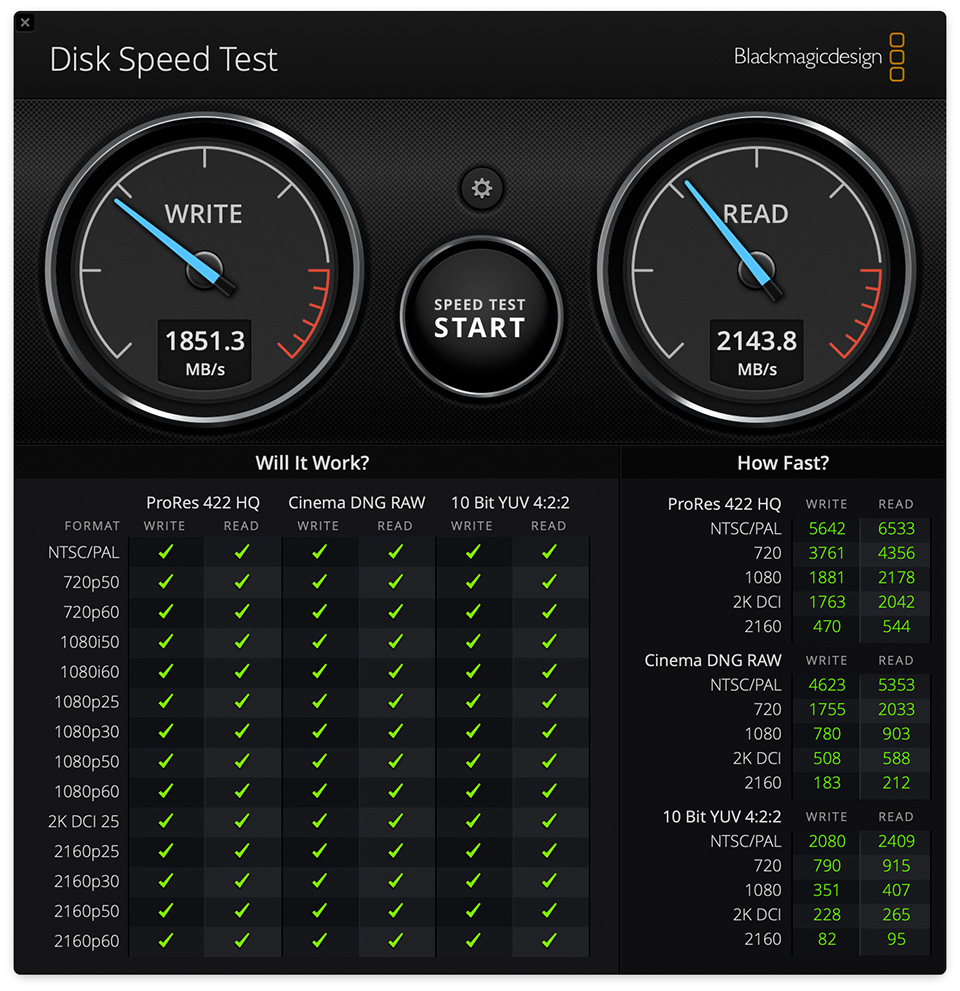
Ouch! My MacBook Pro 2016 only scored 1851 MB/sec write and 2144 MB/sec read speed. That’s a big difference in performance, especially when it comes to write speed. My iMac Pro fared a little better with roughly the same write speed, but its read speed was still inferior by about 400 MB/sec.
Battery Life
As I have already pointed out earlier, Apple’s M1 CPU is very power-efficient, which prolongs battery life quite a bit, even when using power-hungry applications. While my MacBook Pro only lasts a few hours at best (even less when I use Lightroom, Photoshop, or Premiere extensively) before I have to plug it into power to charge, the battery on the MacBook Air M1 lasts so much longer! The difference is very obvious, especially for doing normal tasks like surfing the web, responding to emails, and occasionally editing an image. Without a doubt, Apple engineers did an amazing job with the battery life on these machines.
Summary
As you can see from this review, the M1 chip is a real game-changer for Apple. Despite its small footprint and a fanless design, the MacBook Air M1 is clear proof of Apple’s success with its new architecture, which obliterates not only Apple’s very own Intel-based laptops but also some of their higher-end workstation-class machines. I was surprised to see the MacBook Air beat my much more expensive iMac Pro 2017 in single-core performance, and the difference in multi-core performance was not that drastic either. This is a big deal, especially considering that many apps still can’t take full advantage of all the CPU and GPU cores that are available to use.
The biggest surprise, however, is in the price. Considering that Apple typically charges a high premium for its laptops and workstations, seeing a $1K laptop perform as well or better than some of the best $2-3K machines out there is very impressive. From this standpoint, the MacBook Air M1 does not really have any competition, even on the PC side. As a comparison, Microsoft’s Surface Pro 7 with Core i7 CPU, 16 GB of RAM and 512 GB storage costs $1,600, while the same configuration MacBook Air M1 comes out at $1,400 – $200 cheaper. And based on the various benchmarks that I have seen so far, the Apple MacBook Air M1 is also noticeably faster in comparison. The same goes for Dell’s XPS 13, which also retails for $1,600 with similar configuration and performance characteristics as the Surface Pro 7. Seeing Apple beat its competition in all key areas, including pricing, is simply unprecedented.
Every once in a while, we see real breakthrough products that change the way we do things. The new Apple M1 is such a product, and Apple is certainly heading in the right direction. Why pay a premium to Intel and AMD, if the company can design its own chips much faster and cheaper? If the first-generation M1 chip is such an impressive piece of engineering, imagine the possibilities in the future…
Where to Buy
B&H Photo Video is one of the largest resellers of Apple products. Their selection of MacBook Air M1 laptops includes the cheapest base model for $999, as well as higher-end custom configurations and colors. You can also purchase the MacBook Air M1 directly from Apple.com.
Apple MacBook Air M1
- Features
- Build Quality
- Handling
- Battery Life
- Size and Weight
- Packaging and Manual
- Ease of Use
- Speed and Performance
- Stability
- App Compatibility
- Value
Photography Life Overall Rating
