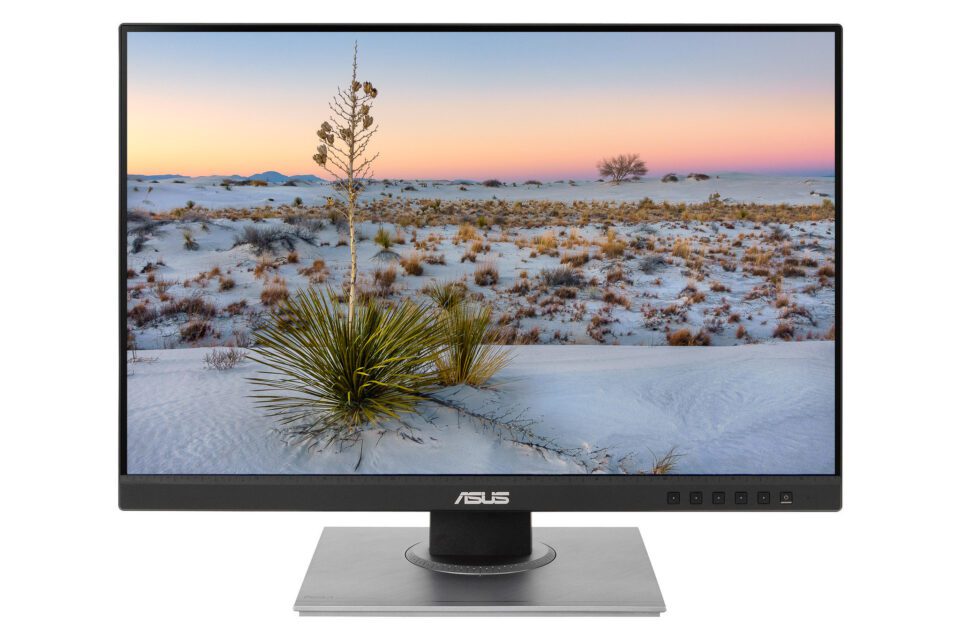
ASUS has been known for making quality PC components, but few people know that the company also makes mid-range and high-end monitors for professional photographers, graphic artists, and content creators. Specifically, the “ProArt” line has been designed for those who want high-end IPS displays for accurate color reproduction. The ASUS ProArt PA278QV represents the lower end of the line. With its sub-$300 price, this is one of the cheapest 27″ IPS budget monitors on the market. I recently had a chance to test this monitor out to see if it is something I can recommend to our readers. In this review, we will take a closer look at the PA278QV and see whether it should be considered for photo editing needs.
ASUS makes two variants of its budget-friendly ProArt displays: the 24″ version (PA248QV), and the 27″ version (PA278QV). While the monitors slightly differ in resolution (1920×1200 on the 24″ and 2560×1440 on the 27″), most of the baseline features, as well as the panel types are the same. Both have 8-bit panels capable of reproducing up to 100% sRGB and Rec.709 color spaces and have “Calman Verified” factory calibration with color accuracy below ΔE ASUS ProArt PA278QV Specifications
| Description | Specification |
|---|---|
| Screen Size | 27″ |
| Resolution | 2560×1440 (WQHD) |
| Pixel Pitch | 0.2331mm |
| PPI | 108 |
| Aspect Ratio | 16:9 |
| Panel Type | IPS |
| Color Depth | 8-Bit |
| FRC | No |
| Viewing Angle (Vertical / Horizontal) | 178° / 178° |
| Response Time | 5 ms |
| Refresh Rate | 75Hz |
| Color Gamut | sRGB 100%, Rec.709 100% |
| Delta E | ≤ 2 (average) |
| Color Modes | sRGB Mode / Rec. 709 Mode / Scenery Mode / Standard Mode / Rapid Rendering / User Mode 1 / User Mode 2 / Reading Mode / Darkroom Mode |
| Uniformity Compensation | No |
| HDR | No |
| Gamma | 1.8 – 2.6 |
| HDCP | 1.4 |
| VESA Wall Mount | 100x100mm |
| Display Screen Coating | Matte / Anti-Glare |
| External Colorimeter Support | Yes |
| Color Calibration Software | Third-Party |
| Factory Calibration Report | Yes |
| Input Ports | HDMI (v1.4), Mini DisplayPort 1.2, DisplayPort 1.2, Dual-link DVI-D |
| Other Ports | PC Audio Input (3.5mm), Earphone Jack (3.5mm), 4x USB 3.0 Ports |
| Built-in Speakers | Yes (2x2W) |
| Power Consumption (On / Sleep) | 18.6W / 0.5W |
| Dimensions (With Stand) | H: 382mm ~ 532mm, W: 615mm, D: 226mm |
| Net Weight (Panel Only) | 4.96 kg |
| Net Weight (With Stand) | 7.72 kg |
| Tilt | -5° / +35° |
| Swivel | -90° / +90° |
| Pivot | -90° / +90° |
| Height Adjustment | 0-150mm |
| Manufacturer Warranty | 3 Years |
| Price (MSRP) | $299 |
The specifications of this monitor are fairly basic. With its 8-bit non-FRC panel, it is not directly comparable to any of the wide-gamut monitors on the market. It is clearly a budget option, and a step above the most basic monitors with TN panels. Its biggest appeal is its potential for decent color accuracy, something you will not find on a typical gaming monitor. So it would be foolish to try to compare it to any high-end monitors from Dell, HP, NEC or EIZO. The monitor isn’t even shipped with software – you have to use third-party calibration tools.
The big question is, how usable is this monitor for editing content? To answer this question, I decided to first evaluate factory calibration, then proceed with fine-tuning the monitor with DisplayCAL software. The results are provided further down in this review.
Monitor Setup and Build Quality
Setting up the monitor was a breeze. Once I took the monitor out of the box, I simply had to attach the one-piece stand, then tighten the screw on the base. There is a single rectangular cable management hole for connecting all the cables, including power. Speaking of which, the monitor has plenty of connectivity options. Aside from the traditional HDMI, DP, and miniDP inputs, there is also an input for DVI:
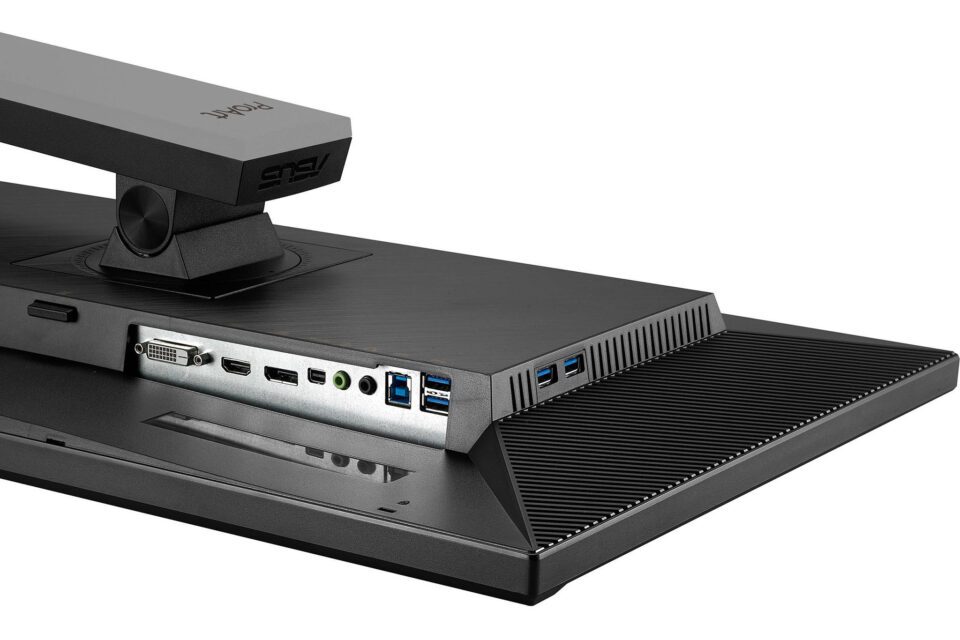
Not sure why these are even provided on new monitors (considering how old DVI is now), but I guess there are still some people out there using video cards with DVI connections. Sadly, there is no USB Type-C / Thunderbolt port, so if you want to connect this monitor to a Mac, you will need to use an adapter. I connected the ASUS ProArt PA278QV to my iMac Pro with a miniDP to Thunderbolt adapter, which worked out pretty well.
The monitor also comes with a single USB 3 upstream port, which provides connectivity for the 4 USB 3 ports – two right next to it, and two on the side of the monitor. Interestingly, the monitor also has two built-in speakers, although they are not particularly good with only 2W output.
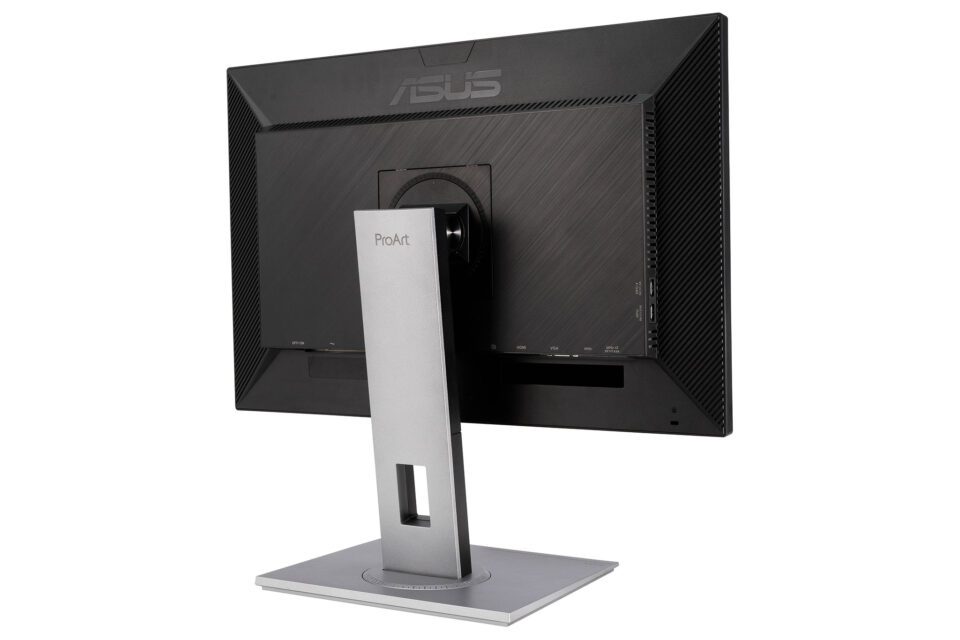
I don’t have any complaints about the build quality of the monitor – it is all-around excellent. The monitor itself looks sleek thanks to its thin bezel, and the gray stand base looks quite beautiful. The screen can rotate up to 90 degrees in either direction of the base, and it tilts and swivels very nicely as well to accommodate most viewing angles and positions. The on-screen display (OSD) is easy to navigate and use, providing plenty of options for fine-tuning the monitor output.
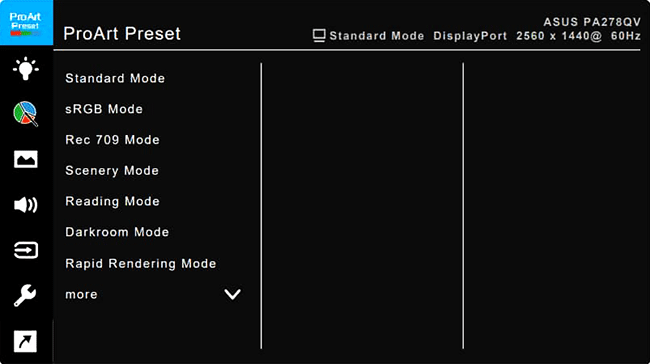
The buttons are standard push-style buttons, not touch-sensitive ones that you find on some modern monitors. For all the normal modes, you can easily adjust color settings, brightness, and contrast levels. Most of the adjustments are turned off in sRGB mode though because it is factory-calibrated for particular brightness and color settings. The screen has a matte coating that does a good job at reducing reflections and glare.
Initial Impressions
After I connected the PA278QV and turned it on, my iMac Pro immediately recognized it and added it as a secondary monitor. I was then able to configure the monitor settings and adjust the screen resolution, along with the refresh rate. At the time of writing the review, the monitor was tested and calibrated on macOS Big Sur v11.0.1, which worked out without any issues.
Firing up a white document, I scanned the screen for any potential damage, green / magenta tinting, and dead pixels. Everything looked good, and the monitor looked pretty uniform to my eye. This was a pleasant surprise because even higher-end monitors from BenQ typically show signs of tinting on the sides. I was expecting to see some tinting issues after prolonged use, but so far, I have not noticed anything. Perhaps I was lucky to get a good sample – let me know if you have any serious tinting issues on yours.
Overall, the initial impressions were quite positive – I honestly thought this monitor was going to be full of issues and compromises, but it does not appear to be the case. Now keep in mind that when dealing with budget monitors, sample variation can be all over the place, because these monitors do not go through the same level of quality assurance process as their high-end counterparts. That’s why I always recommend our readers to inspect their monitors before they decide to keep them.
Factory Calibration Accuracy
The ASUS ProArt PA278QV came with a factory color calibration testing report, with a “Calman Verified” stamp on it. The report included the serial number of the screen, test equipment used, as well as the achieved color accuracy. My sample showed a delta of 0.27 on average for different shades of gray and colors, which is pretty impressive. The worst offenders were grays and blues, which showed up to 0.8 delta. There was a separate report for gray-scale tracking (color temperature), as well as gamma value. Unfortunately, there were no other reports provided, such as color and brightness uniformity, and that’s a given, considering that ASUS says nothing about the uniformity of the screen – not at this price point. The big question is, how accurate is the color report?
To measure factory calibration accuracy, I fired up DisplayCAL and ran it through the verification process. I chose the factory-calibrated sRGB profile from the screen, then picked it as a simulation profile in DisplayCAL. I used the X-Rite i1Display Pro colorimeter for testing. Below are the results:
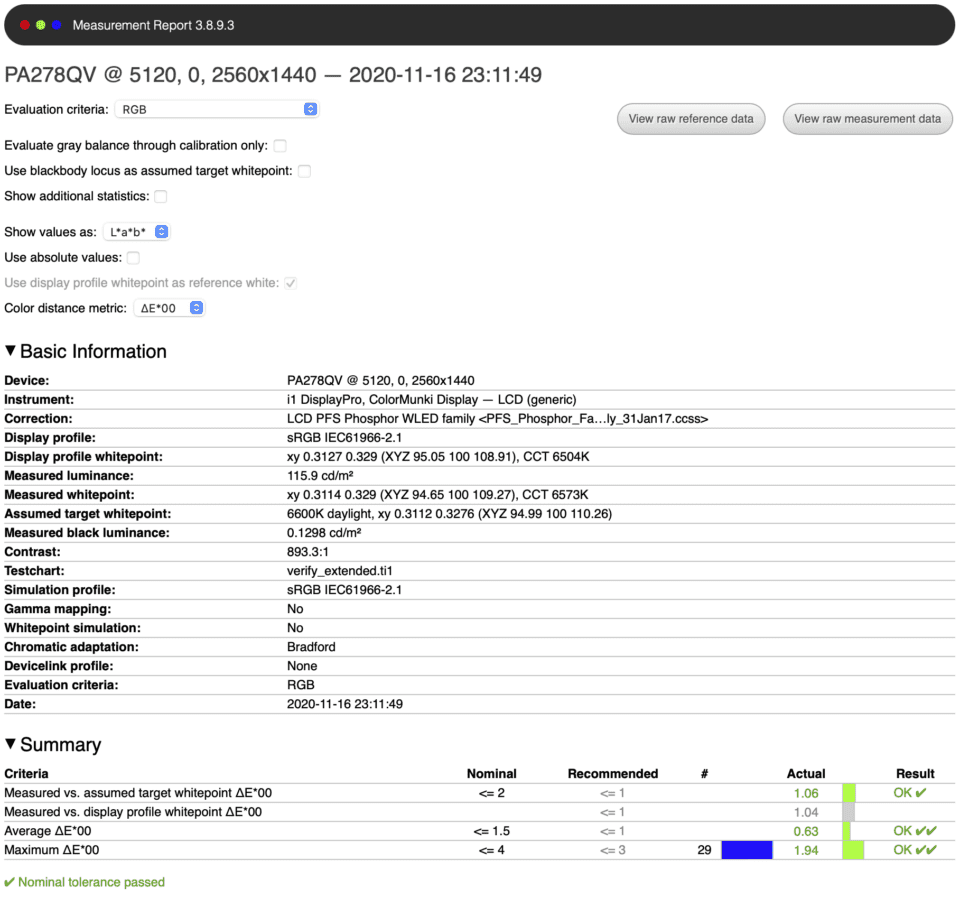
As promised, the maximum delta was indeed below 2, which is pretty impressive. The worst offenders were the blues and the blacks, but other than these, all colors averaged below 0.8 – not bad for the monitor and its factory calibration!
DisplayCAL Software Calibration
To see what the display panel is capable of, I decided to run another layer of color calibration through DisplayCAL software. My goal was to calibrate the sRGB profile further, in order to make the display more accurate.
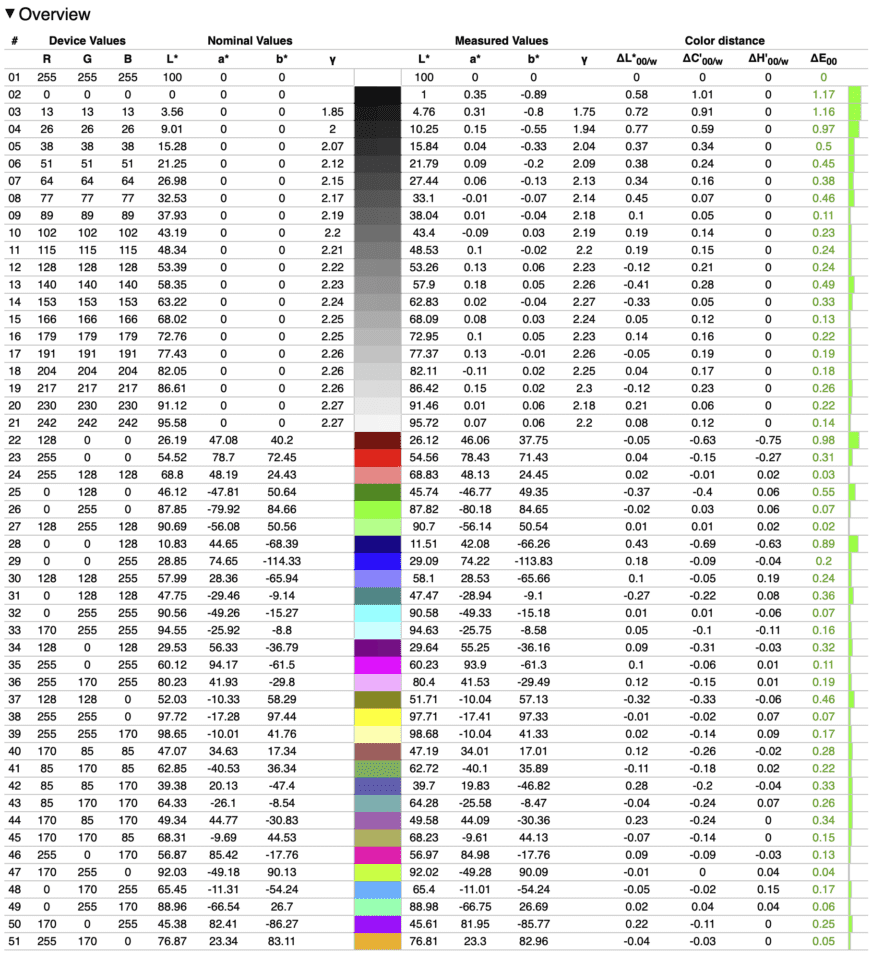
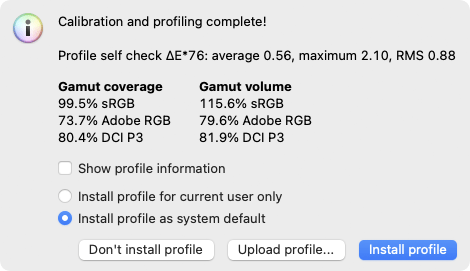
For the “Correction” drop-down, I chose the “LCD PFS Phosphor WLED family”, which seemed to yield the best results. I picked 6500K target whitepoint, 2.2 gamma, and medium calibration speed. In the Profiling tab, I selected Single curve + matrix and Extended testchart that resulted in 175 color patterns, which was good enough for the calibration process. I went ahead and clicked “Calibrate & profile” to start the process. Once the interactive display adjustment came up, both RGB and brightness levels were set up nicely, right in the middle. The calibration process took about 20-25 minutes. Below is the final measurement report for the monitor:

That’s actually pretty excellent. I was able to achieve 0.55 delta on whitepoint, 1.17 maximum delta on the blacks, and 0.3 delta on average. Here is a detailed report of all measured colors:
Interestingly, this is actually better than the results I have seen from much more expensive monitors out there!
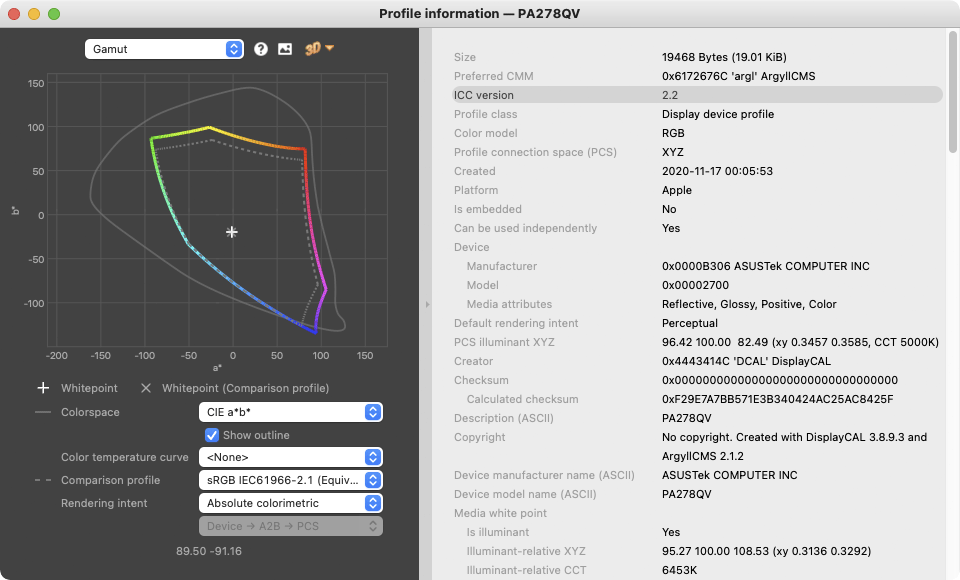
Here is a visual representation of the sRGB gamut coverage:
And here is the profile imformation:
Next, I performed calibration tests for the Rec.709 color profile and I was able to achieve very similar results, with delta staying below 1.50 maximum.
Evaluation of Uniformity
I decided to test the uniformity of my ASUS ProArt PA278QV sample to see how good or bad it is. I selected a 5×5 grid in DisplayCAL and measured each part of the square, placing the X-Rite i1Display Pro colorimeter in the middle of each one. Below is the result, showing DeltaC deviations:
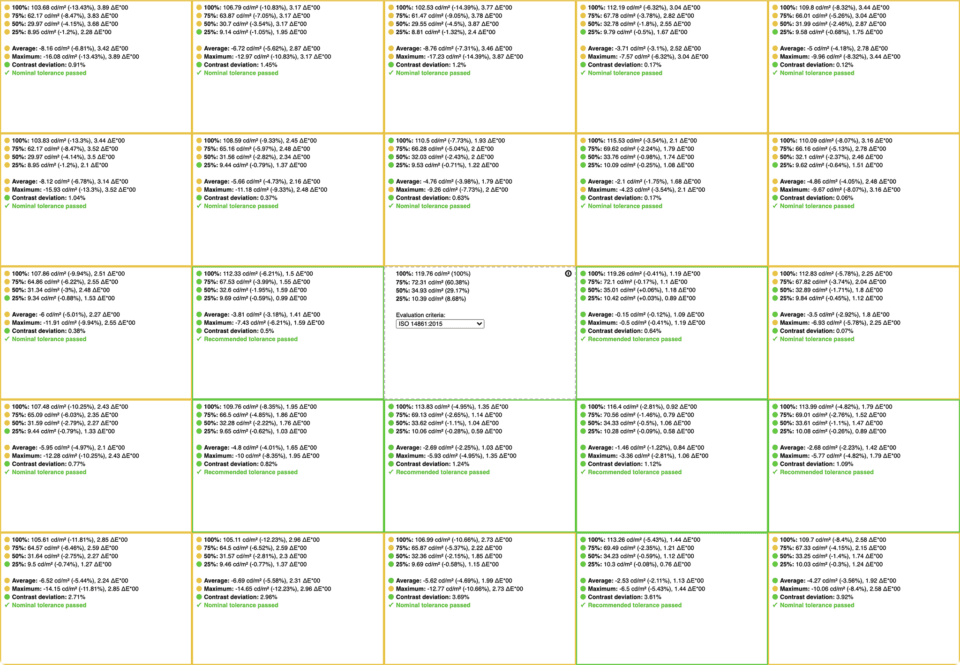
This is decent for a budget monitor but definitely not great. The top left and right parts of the screen were barely below the threshold, and the bottom parts didn’t do great either. Keep in mind that this is what you normally get with most budget options on the market. Unless you are ready to move up to high-end monitors from companies like NEC and EIZO that offer good overall uniformity and uniformity compensation features, most other monitors are going to struggle in this department.
Summary
Considering its price, the ASUS ProArt PA278QV is a surprisingly good monitor. While it might not have a wide-gamut panel that offers 4K resolution, hardware LUT calibration, or other features like HDR, it is a solid 27″ monitor with great calibration potential. Its factory calibration is fairly accurate for both sRGB and Rec.709 color profiles, and if you have a reliable colorimeter like the X-Rite i1Display Pro, you can get even better results from this screen. It has excellent build quality and a sleek design with minimal bevels, and unlike most other budget options on the market, it has a versatile mount that allows it to swivel, tilt, and pivot, in addition to being able to adjust its vertical height. It has wide viewing angles and practically no tinting issues to worry about. The OSD is easy to navigate and use, and you can tweak the monitor output in many ways.
Being a low-end monitor, it certainly has some weaknesses worth pointing out. First of all, while its connectivity options are great, I do not see the point of continuing to integrate DVI into monitors when the whole world has already switched to miniDP / DP and USB Type-C / Thunderbolt. I wish ASUS integrated a Thunderbolt port instead of DVI into the PA278QV – it would have been far more useful, especially for Mac users. Second, while it does a good job covering sRGB and Rec.709 color spaces, it only covers close to 70% of AdobeRGB color space. This is decent for most photographers out there, but certainly limiting for those who want to be able to work with more colors. Lastly, you certainly have to pay close attention to the potential tinting and brightness uniformity issues when looking at low-end monitors. While my sample was quite decent, other panels might have severe deviations that might present problems when displaying images.
If your budget is tight and you cannot afford a high-end wide-gamut monitor, the ASUS ProArt PA278QV is an excellent choice that I can certainly recommend. However, if you need to work in a consistently color-accurate environment and you are looking for a solid monitor with good uniformity, my recommendation would be to take a closer look at other higher-end ProArt monitors ASUS has to offer, and compare them to the best in the industry from HP, Dell, NEC, and EIZO.
For more information about this monitor, please see the ASUS ProArt PA278QV page on Asus.com.
Where to Buy
If you are interested in this monitor and would like to purchase it for your needs, please consider buying it from our affiliate links below in order to support our efforts.
ASUS ProArt PA278QV Monitor
- Features
- Build Quality
- Resolution
- Color Uniformity
- Brightness Uniformity
- Connectivity Options
- Ergonomics
- Power Consumption
- Factory Calibration
- Calibration Potential
- Value
Photography Life Overall Rating
