Erez Marom is a professional nature photographer, photography guide, and traveler-adventurer based in Israel. Visit his official website to see more of his work. In this tutorial, Erez shares the story behind his popular image on 500px, “Spot the Shark”, and he’ll be giving away a few of his tips and tricks on how to capture and process icy landscapes–with a step-by-step workflow. Read on, and get inspired!
by Erez Marom
It’s Shark Week! And what would be more fitting than talking about my only image of a shark! Or, more exactly, a “shark” image in a block of ice.
“Spot the Shark” is a personal favorite of mine, and it’s also one of my most popular shots. In addition, I’m extremely honored to have been approached by National Geographic Books to have this photo in an upcoming release. I think the image is successful because it has a lot of attractive traits. The almost-monotone colors, the fullness caused by the ubiquitous receding water patterns, and of course, the shark image formed out of ice!
I’d like to reveal the story behind the image—how I shot it and how I processed it at home, sharing my workflow with you. I hope you find this article helpful, and perhaps even inspiring.
First things first. I took this image in early January 2013, during a late morning. I was guiding my first of two Land of Ice workshops that year, and we had finally arrived at one of the most popular spot in Iceland: Breiðamerkursandur, the ice beach. When the participants were comfortable shooting by themselves, I went around and explored a bit. I took quite a lot of images, but I eventually only kept three or four good ones. This is one of them.
Look closely. Can you spot the ice shark? The most fascinating thing about this image for many—the ice shark—is something I only noticed back home, believe it or not. It’s really funny to think that the very thing that made this shot so popular was an accident!
SETUP AND EQUIPMENT
The day was pretty gloomy in terms of weather, with lots of heavy clouds and just a small amount of color coming from between them. There was very little natural contrast, a fact I’d have to deal with later when post-processing, but there was a lot of ice spread everywhere on the beach. This fact helped a lot: I had the privilege to shoot at a place where the beach was very moderately sloped, which had a crucial function in the look of the image.
Now here’s the secret to the beautiful receding water patterns: when the slope is moderate, incoming waves return to the ocean very slowly, and this allowed me to compose, stick my tripod deep and hard into the sand and take the shot while there was still a lot of water around me. A long exposure captured the motion of the water to add a lot of content between the main subjects.
I used my Canon 5D Mark III and a Canon 16-35mm f/2.8L II. I also used a Lee Pro Glass 0.9 solid ND to prolong the exposure and a 0.9 soft-edge graduated ND to balance the lighter sky. I took the shot at ISO 100 and f/16, and the exposure lasted 4 seconds – a bit on the long side but perfect for these specific conditions. Had the slope been greater, I’d have opted for a shorter exposure to get good details in the water patterns.
POST-PROCESSING
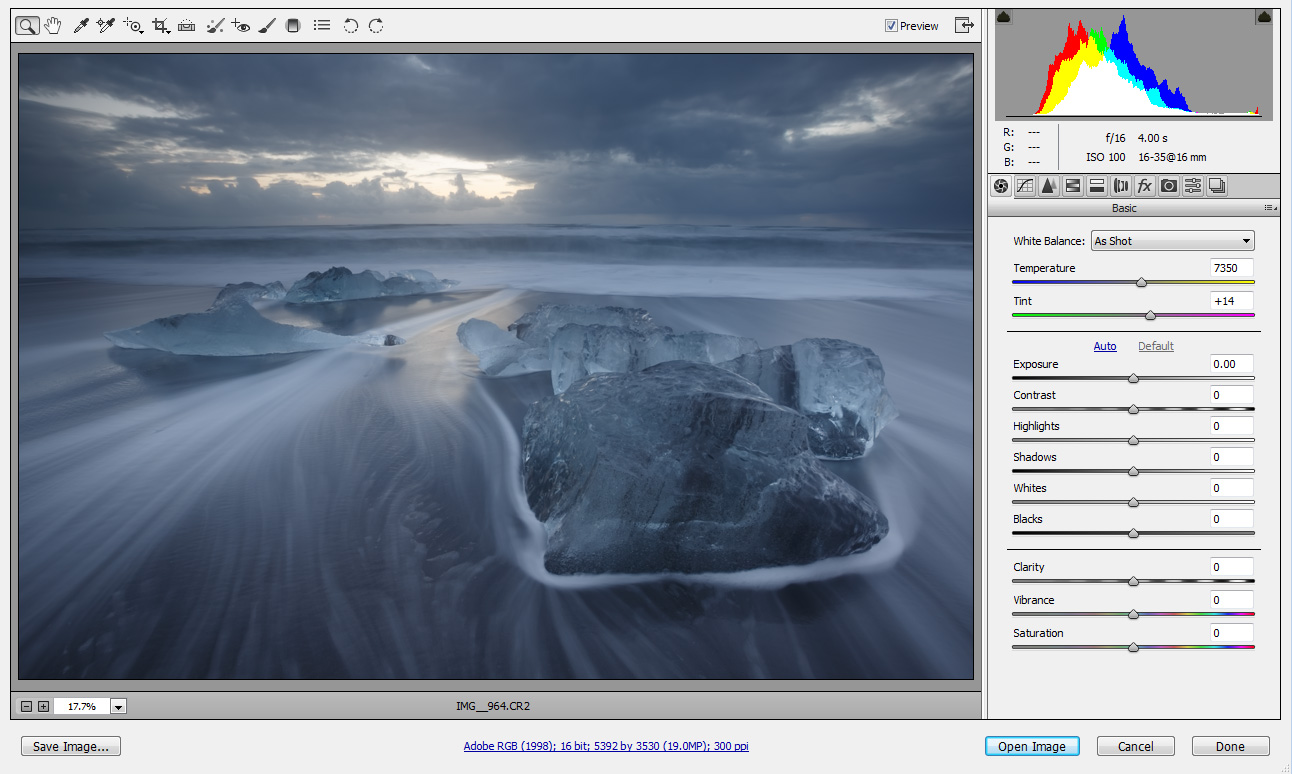
Most of the PP work on this image was done on the RAW file using Adobe Camera Raw (ACR). Contrast work was critical like I mentioned before, and I needed quite a few local adjustments to get the image just right. Here is the untouched RAW file:
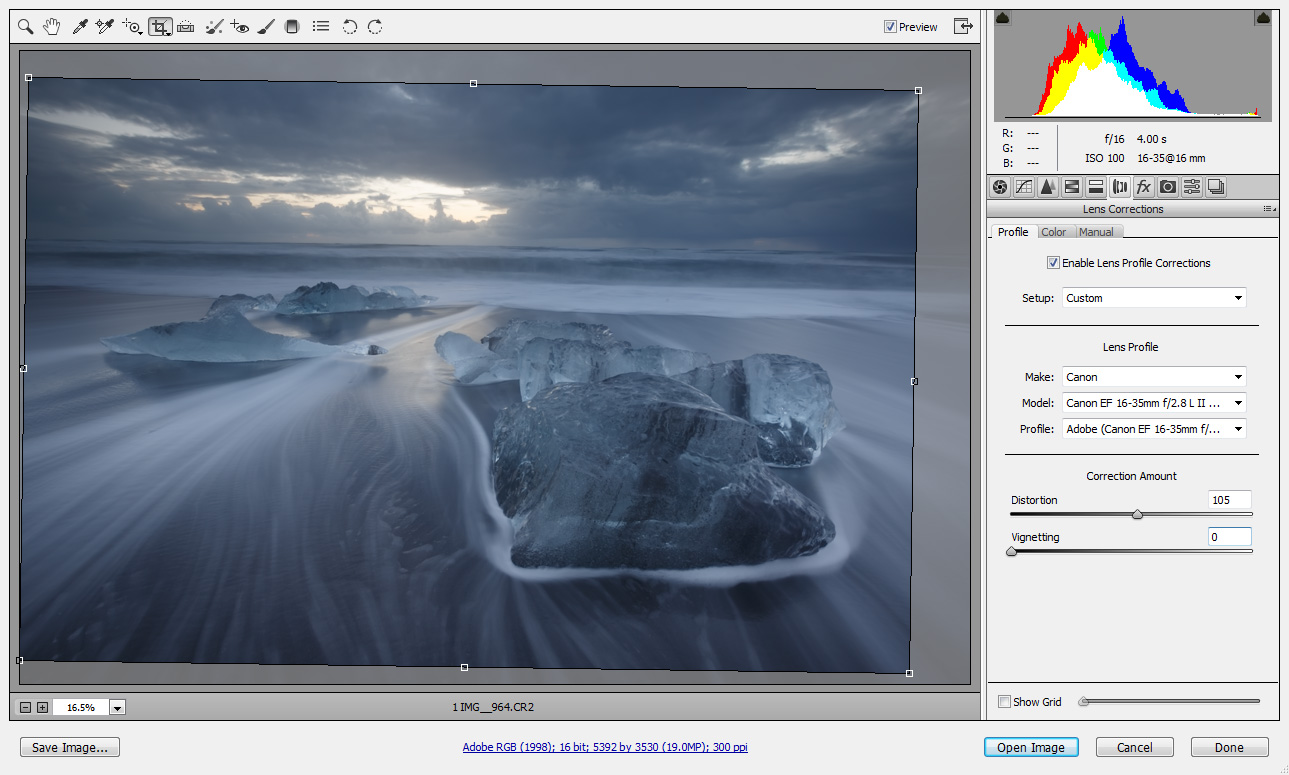
First, I fixed the lens aberration and straighten the horizon. I used ACR’s automatic lens aberration correction option, and used the straighten tool to have the horizon right. While I was at it, I cropped the image to balance the composition.
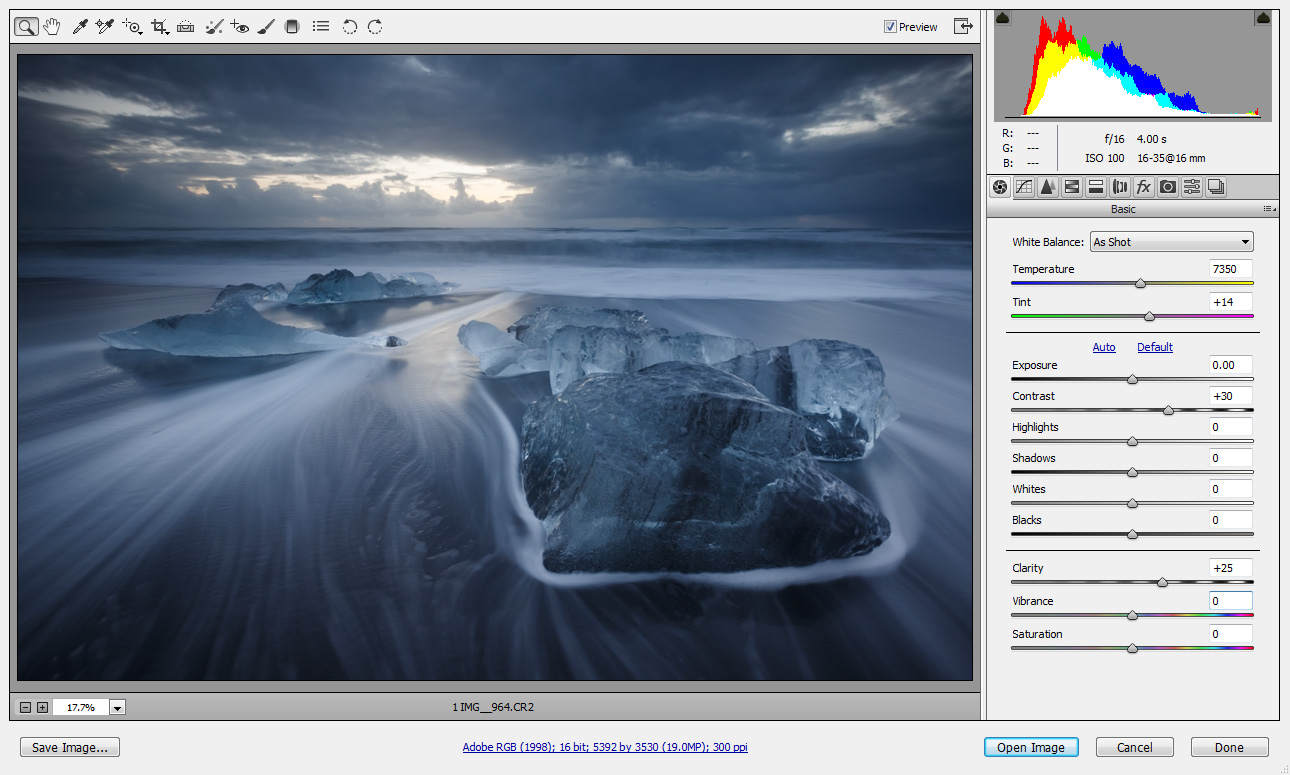
Next, I needed to add some initial definition throughout the image. I did so by boosting contrast and clarity in ACR.
All further corrections are local. I’ve done quite a few local corrections, but most of them fix very minor issues and so I won’t be discussing them here. I do, however, wish to go over the important local adjustments.
The main thing I did here is to increase local contrast in the areas which needed it. The most important detail to bring out is the receding water patterns. I therefore boosted contrast and especially clarity in all the areas containing these patterns, as shown below.
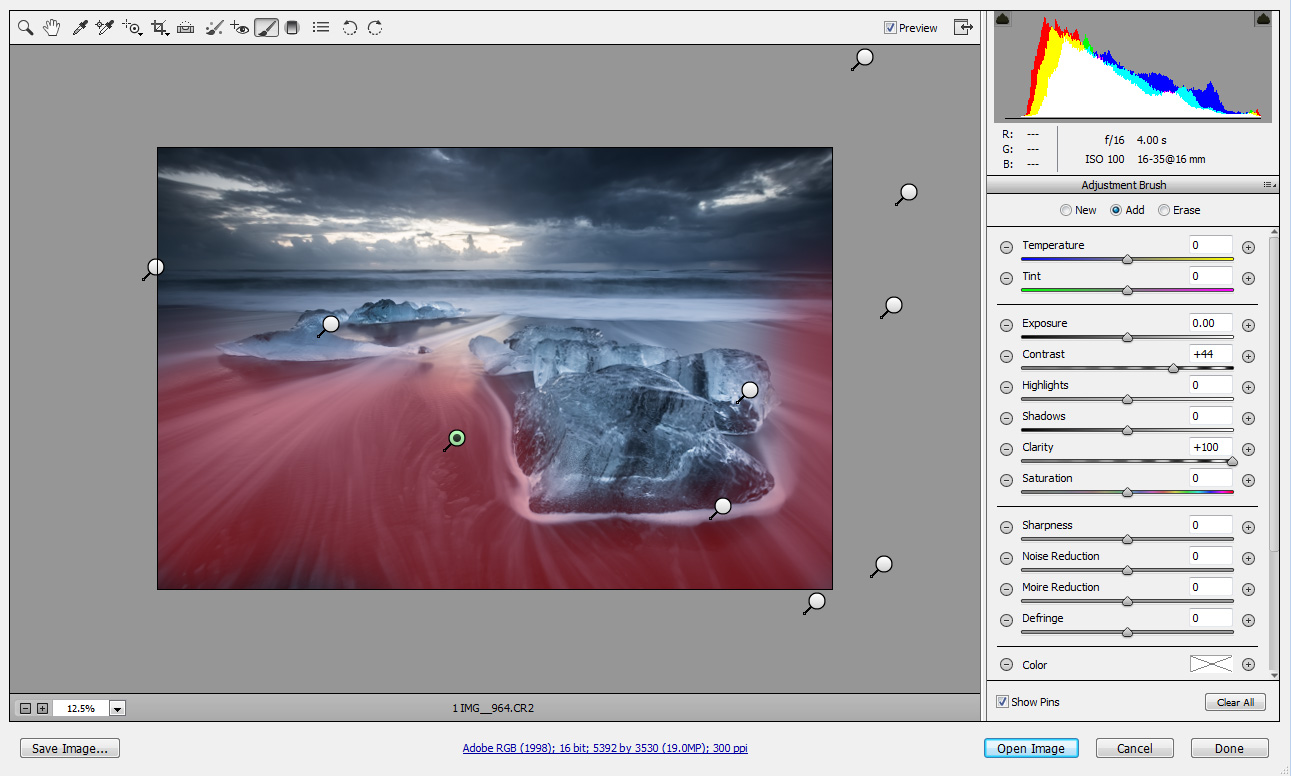
The ice needed a different treatment. To bring out its diamond-like qualities, I had to brighten it. I also increased contrast and clarity in the ice. The parameters might seem exaggerated, but remember that I had very little contrast to begin with.
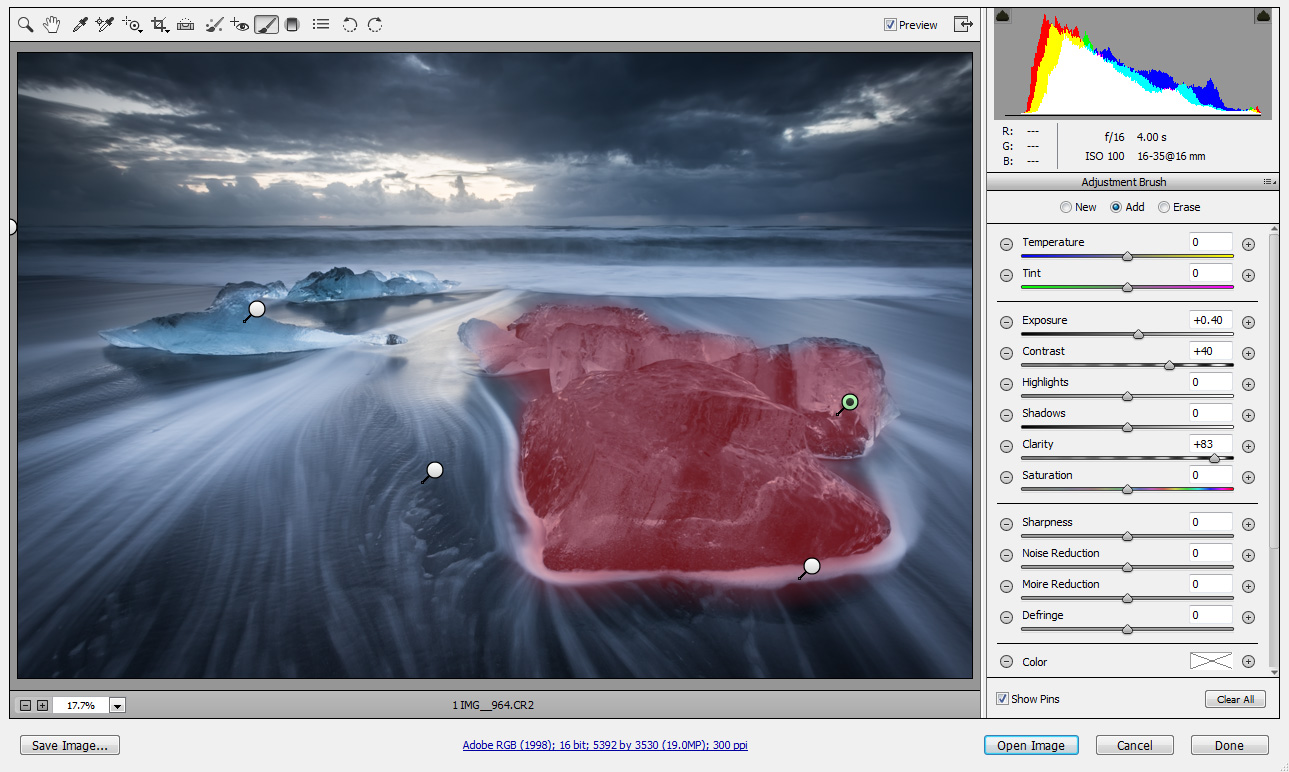
A very similar adjustment was made with the left part of the ice – the “shark” and its surroundings. I had to brighten it even more to make it more prominent – after all, it is the focus of the image, small as it may be.
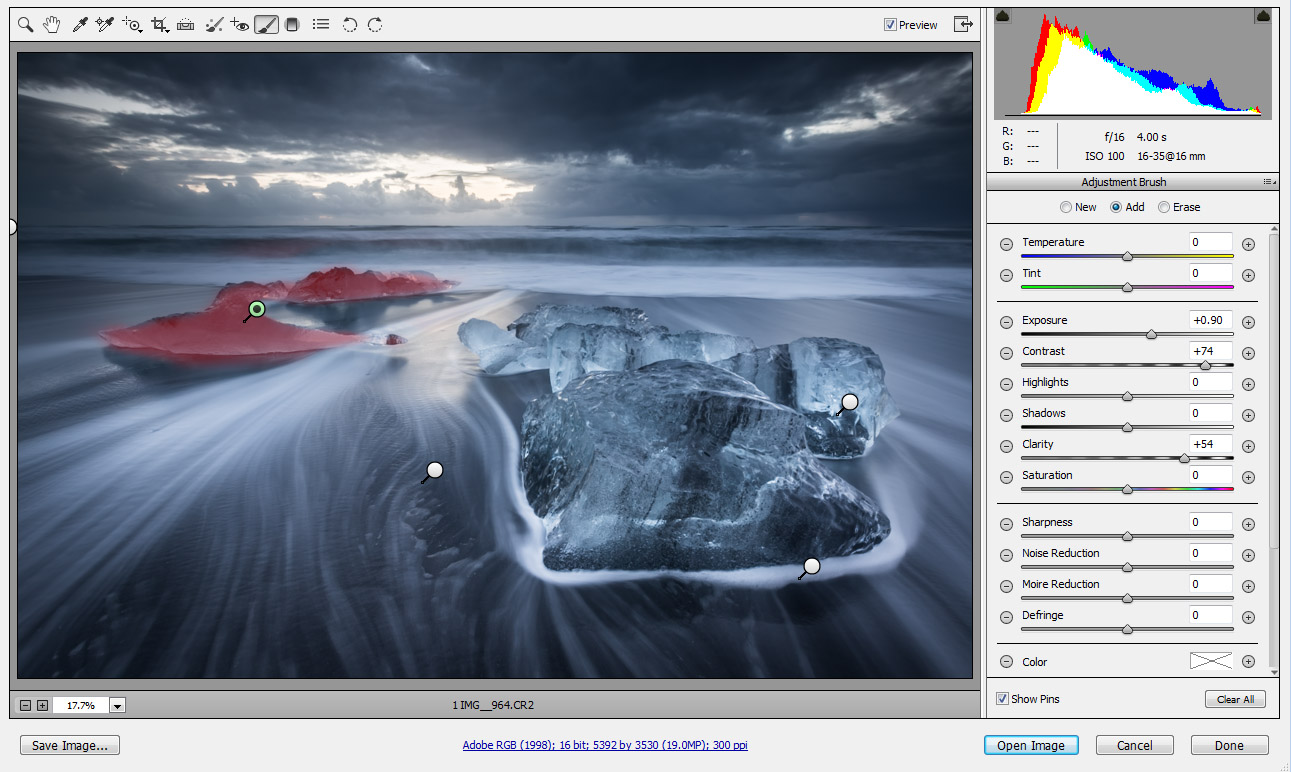
All other local corrections you can see above are much less significant, and were used to create some vignetting as well as fix some minor local issues.
There wasn’t much left to do here. The only thing I needed to take care of in Photoshop was the slight imbalance in the histogram: as you can see above, it lacks blacks. This was very easily fixed when I uploaded the image to Photoshop, created a levels adjustment layer and boosted the input levels to stretch the histogram a bit to the left. This small change makes a big impact on the appearance of the image.
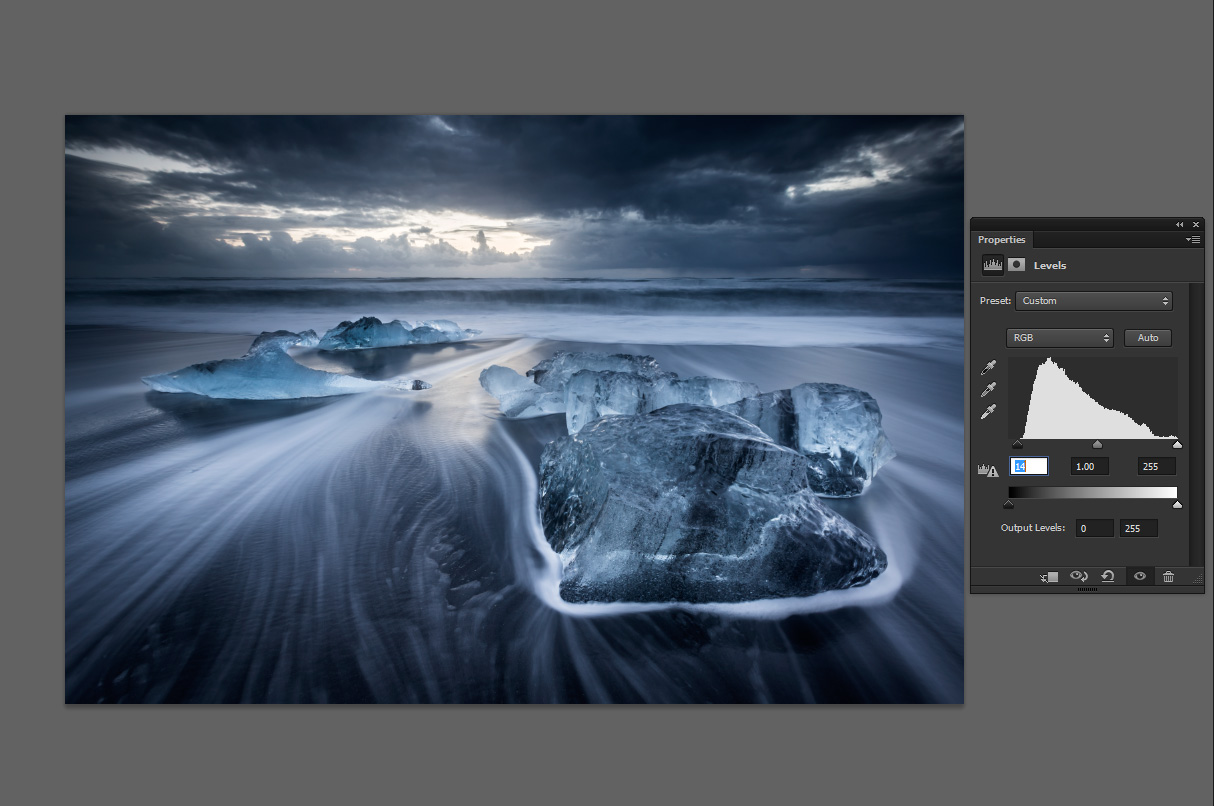
All that was left to do was save the image, perform size reduction, and some sharpening and I was done.
If you’d like to experience and shoot some of the most fascinating landscapes and wildlife on Earth with Erez Marom as your guide, check out his unique photography workshops below:
Land of Ice in South Iceland (December/January) – view trailer
Winter Paradise in North Iceland (December/January) – view trailer
Northern Spirits in Lofoten Islands (January/February)
Desert Storm in Namibia (March)
Follow Erez on Facebook, Google+ and 500px.
You can also subscribe to his mailing list for updates.