Have you ever wanted to learn everything about aperture? Not just the basics — every single effect aperture has on your photos? Although you can find that sort of information scattered across a handful of sources online, I don’t know of any resource that combines everything into one single place. That can make things difficult if you’re trying to get the big picture of how aperture works. So, here, we’ll explain everything aperture does to your photos, from sharpness to sunstars, and tell you exactly why each effect matters.
Before diving into too many specifics, here’s a quick list of what aperture affects in photography:
- The brightness/exposure of your photos
- Depth of field
- Sharpness due to diffraction
- Sharpness due to lens quality
- Starburst effects on bright lights
- Visibility of camera sensor dust specks
- The quality of your background blur (bokeh)
- Focus shift on some lenses
- Ability to focus in low light (under some conditions)
That’s more than you might think! Clearly, aperture matters in many different areas of photography. Below, I’ll go into all these factors and how they work in practice.
1) Introducing Aperture
If you don’t yet know what aperture is, this article may be a bit too advanced for now. I recommend that you read our introduction to aperture and f-stop to start, and then jump back to this article when you’re ready.
Essentially, in case you aren’t familiar with it, your aperture is simply a hole in your lens that lets light pass through (very similar to what pupils do in your eyes). It looks something like this:
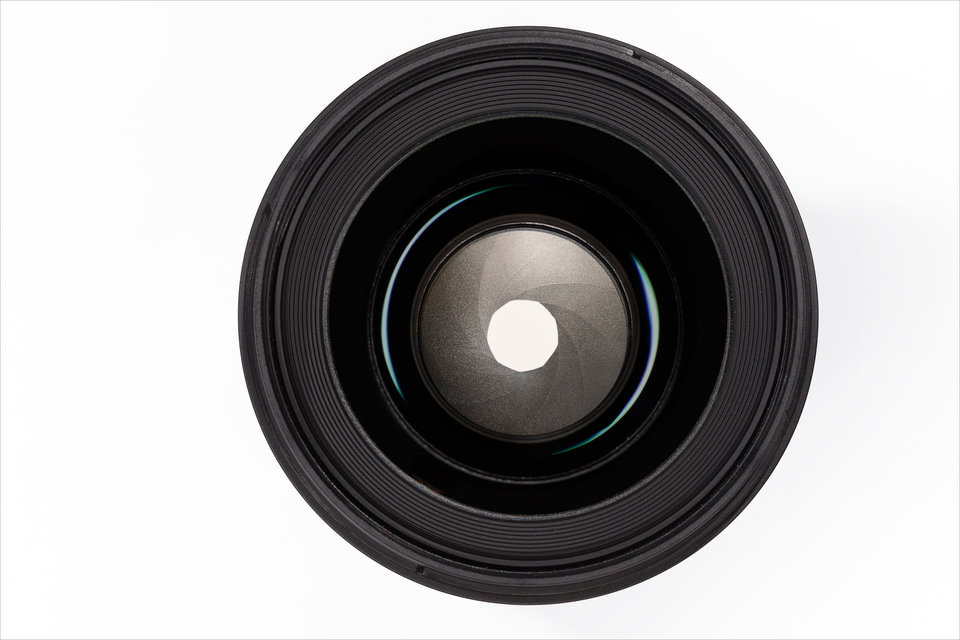
People typically write aperture in f-stops (or f-numbers). An example of an f-number is something like f/1.8, f/4, f/5.6, f/16, f/32, or almost anything else. Since it’s written as a fraction, an aperture of f/2, for example, is significantly larger than an aperture of f/16 (just like how the fraction 1/2 is larger than the fraction 1/16).
That’s aperture in a nutshell. Not surprisingly, the aperture you choose has several effects on the way your photos look. Below, we’ll cover everything you need to know.
2) Brightness / Exposure
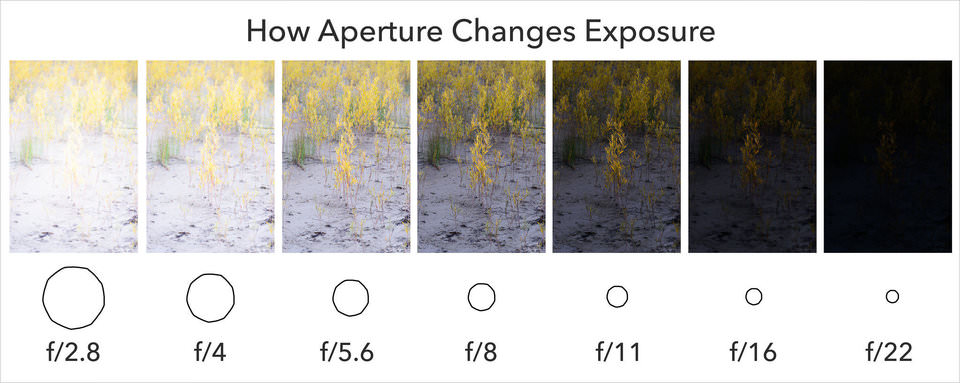
The most obvious effect of aperture is that it changes the brightness — or, the exposure — of your photos. Unsurprisingly, a large aperture lets more light pass through your lens, resulting in a brighter photo (which is also why our pupils grow larger when it’s dark.)
If you put your camera in manual mode, you’ll notice this effect very clearly. A large aperture like f/2 will result in a much brighter photo than, for example, f/16.
Aperture isn’t the only setting that changes your brightness. We’ve covered exposure settings before. So, if you want a brighter or darker photo, you shouldn’t necessarily resort to changing your aperture. (In fact, for landscape photography on a tripod, I prefer changing my shutter speed instead, whenever possible.) However, when you do change your aperture, you’ll clearly see the exposure of your photo change as well.
3) Depth of Field
Depth of fieldh is a crucial part of photography. It is, quite simply, the amount of your photograph that appears “acceptably sharp,” or in focus. What does that mean? Take a look at the two photos below. Here, clearly, the depth of field is very different:

As you can see, the photo on the left has a thin (or shallow) depth of field, meaning that only a tiny sliver of the scene appears in focus. The photo on the right, however, has a large depth of field, with the lizard’s head and tail appearing equally sharp.
Note the aperture values below each photo. As you can see, a large aperture like f/4 will result in a relatively thin depth of field. Small apertures like f/32, on the other hand, have a much larger depth of field, with more detail visible from front to back.
For portrait photography, you can get really interesting effects by using a large aperture like f/4, or something even larger, like f/2 or f/1.4. You’ll end up with your subject’s face perfectly sharp, while the background is out-of-focus and dreamy.
For landscape photography, you’d probably rather use a small aperture, in the range of f/11 or so. That way, you can capture both the foreground and the background in focus simultaneously.


4) Diffraction
So, if you’re a landscape photographer who wants everything as sharp as possible, you should use your lens’s smallest aperture, like f/22 or f/32, right?
No!
The f/32 photo in the prior section looks fine, but that’s because I didn’t zoom in. So, let’s zoom in:
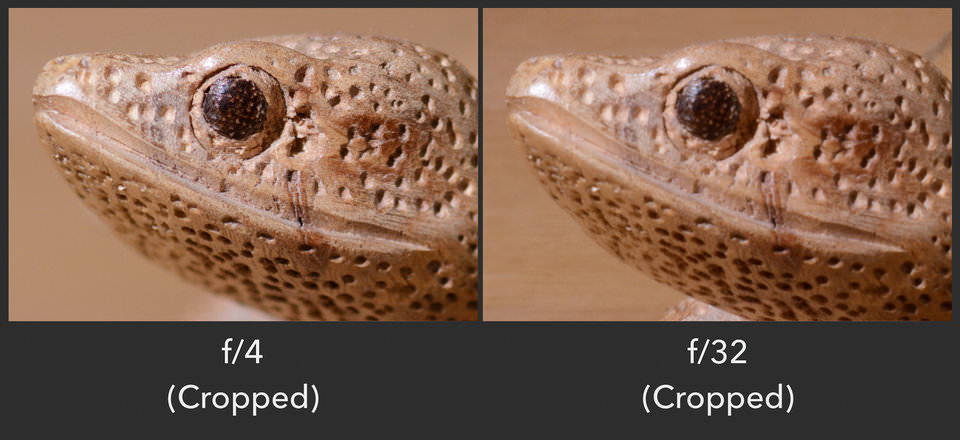
Here, you’re seeing an effect called diffraction. Physics majors will know what I’m talking about, but diffraction is a foreign concept to most people. So, what is it?
Diffraction is actually quite simple. When you use a tiny aperture like f/32, you literally squeeze the light that passes through your lens. It ends up interfering with itself, growing blurrier, and resulting in photos that are noticeably less sharp.
When do you start to see diffraction? It depends upon a number of factors, including the size of your camera sensor and the size of your final print. Personally, on my Nikon D800e, I see hints of diffraction at f/8, but it’s not enough to bother me. I actually use even smaller apertures like f/11 and f/16 all the time. However, I try to avoid f/22 or anything beyond it, since I lose too much detail at that point.
Diffraction isn’t a huge problem, but it exists. Don’t be afraid to take pictures at f/11 or f/16 just because you lose a little bit of sharpness. In many cases, the added depth of field is worth the tradeoff.
Side Note
If your camera has a smaller sensor, you’ll see diffraction sooner. On aps-c sensors (like the Nikon D3400, Nikon D5500, Canon Rebel cameras, Sony A6500, and many others), divide all these numbers by 1.5. On micro four-thirds cameras (like those from Olympus and Panasonic), divide all these numbers by 2. In other words, I don’t recommend using f/11 with a micro four-thirds camera, since it’s equivalent to f/22 with my full-frame camera.
5) Lens Aberrations (Sharpness)
Here’s a fun one. For some reason, everyone wants to take sharp photos! One of the ways to do so is to minimize the visibility of lens aberrations. So, what are lens aberrations? Quite simply, they are image quality problems with a photo, caused by your lens.
Although most problems in photography are because of user error — things like missed focus, poor exposure, or distracting composition — lens aberrations are entirely due to your equipment. They are fundamental, optical problems that you’ll notice with any lens if you look too closely, although some lenses are better than others. For example, consider the image below:
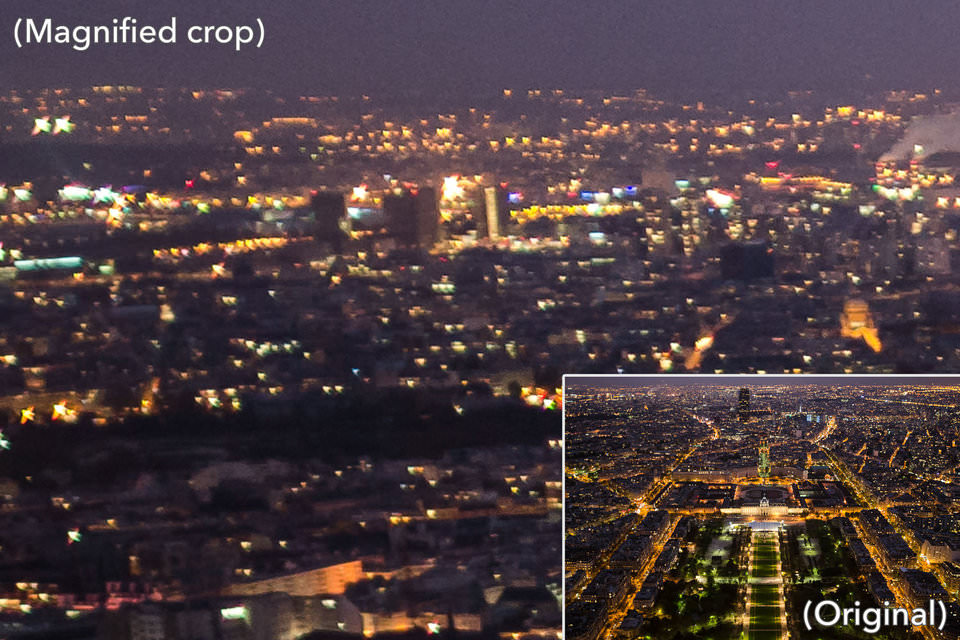
What’s going on here? In this crop, most of the lights look smeared rather than perfectly round. On top of that, the crop just isn’t very sharp. That’s lens aberration at work! The lights didn’t look this blurry in the real world. My lens added this problem.
Aberrations can appear in several different forms. For example, it’s likely that your lenses are blurrier at certain apertures, or in the corner of the image. That’s also due to lens aberrations.
This article would be way too long if I explained every possible aberration in detail: vignetting, coma, astigmatism, color fringing, and more. Instead, it’s more important to know why aberrations occur, including how your aperture setting can reduce them.
It starts with a simple fact: Designing lenses is difficult. When the manufacturer fixes one problem, another tends to appear. It’s no surprise that modern lens designs are extremely complex.
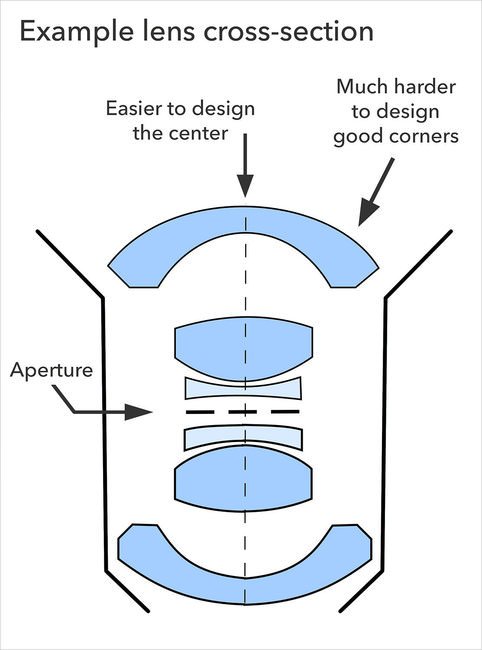
Unfortunately, even today’s lenses aren’t perfect. They tend to work fine in the center of an image, but everything gets worse near the edges. That’s because lenses are especially difficult to design around the corners.
Here’s a diagram that explains what I mean:
And that brings us to aperture.
Many people don’t realize a simple fact about aperture: It literally blocks the light transmitted by the edges of your lens. (This doesn’t lead to black corners in your photos because the center regions of a lens can still transmit light to the edges of your camera sensor.)
As your aperture closes, more and more light from the sides of your lens will be blocked, never making it to your camera sensor. Only the light from the center area will pass through and form your photo! As the diagram above shows, this central area is far easier for camera manufacturers to design. The end result is that your photos will have fewer aberrations at smaller and smaller apertures.
How does this look in practice? See the photos below (heavy crops from the top-left corner):
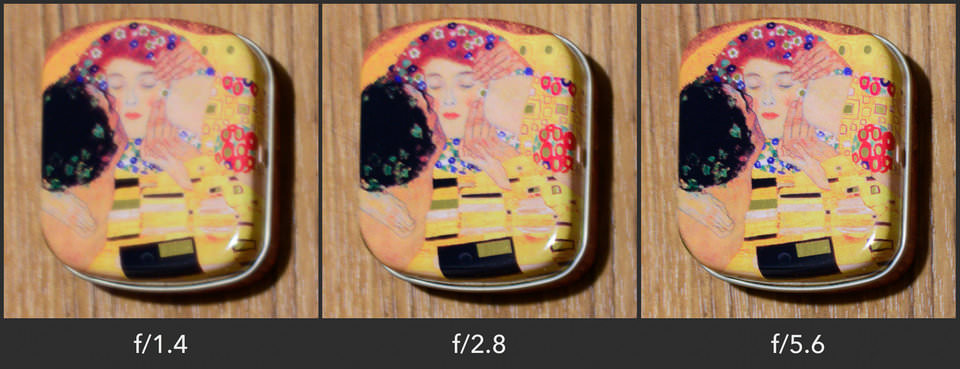
What you’re seeing above may look like an increase in sharpness, but it’s really a decrease in aberrations. The end result? At f/5.6, your photo — taken with an aperture that has less visible aberration — is much sharper than at f/1.4.
Here’s a key question, though: How does this balance out with diffraction, which harms sharpness in the opposite direction?
In practice, most lenses are sharpest around f/4, f/5.6, or f/8. Those apertures are small enough to block light from the edges of a lens, but they aren’t so small that diffraction is a significant problem. However, you’ll want to test this on your own equipment.
Of course, you can still take good photos at large apertures like f/1.4 or f/2. Portrait photographers sometimes pay thousands of dollars to get a lens exactly for that purpose! I’ve taken successful photos at everything from f/1.4 to f/22 — photos that wouldn’t be possible if I always used f/5.6.
Side Note
Some types of aberrations don’t change much as you stop down, or they may even get slightly worse. Axial chromatic aberration, for example — color fringes near the edges of your frame — often work that way. This is normal. It happens because a small aperture doesn’t inherently reduce aberrations; it simply blocks light that has passed through the edges of your lens. So, naturally, if the edges aren’t the source of your problem, you won’t see an improvement by stopping down.
6) Starbursts and Sunstars
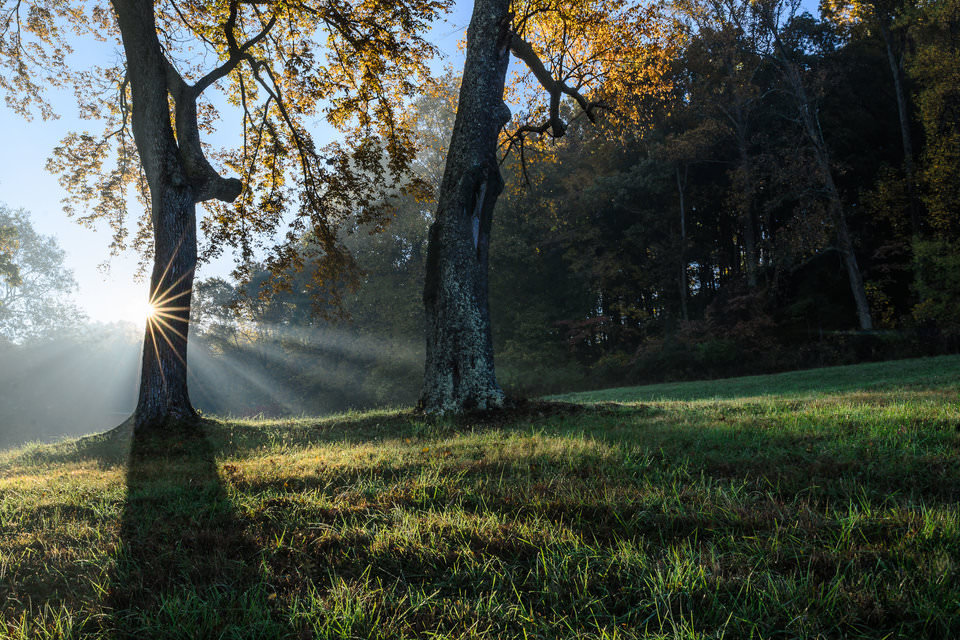
Starbursts, also called sunstars, are beautiful elements that you’ll find in certain photographs. Despite the odd names — one, a type of candy; the other, a type of starfish — I always try to capture them in my landscape photos. Here’s an example:
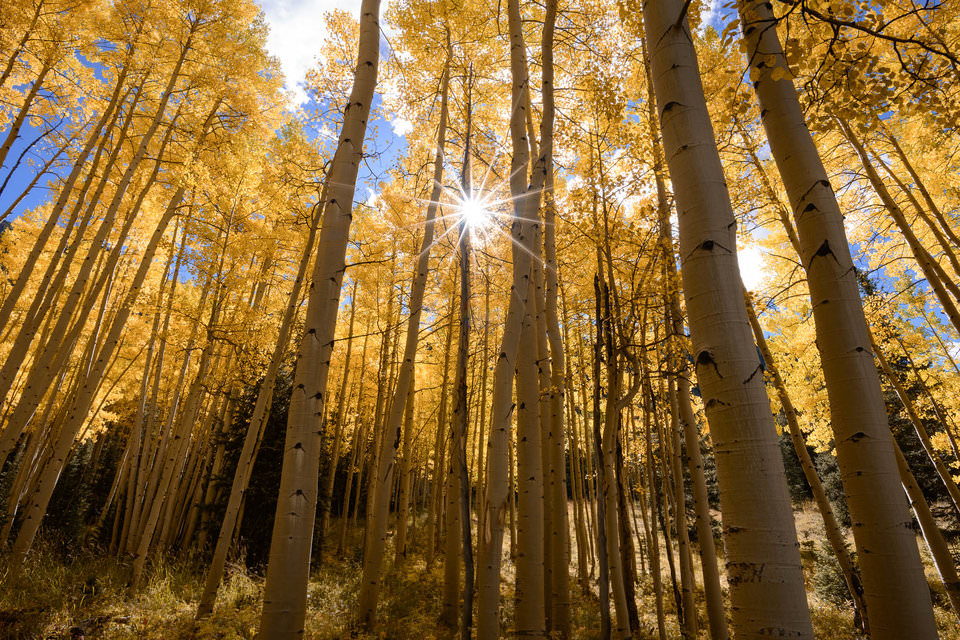
How does this work? Essentially, for every aperture blade in your lens, you’ll end up with a sunbeam. This only happens if you photograph a small, bright point of light, such as the sun when it is partly blocked. This is fairly common in landscape photography. If you want the strongest possible starburst, use a small aperture. When the sun is in my photo, I typically set f/16 purely to capture this effect.
Also, the starburst effect looks different from lens to lens. It all depends upon your aperture blades. If your lens has six aperture blades, you’ll get six sunbeams. If your lens has eight aperture blades, you’ll get eight sunbeams. And, if your lens has nine aperture blades, you’ll get eighteen sunbeams.
Wait, what?
That’s no typo. For lenses with an odd number of aperture blades, you’ll get twice as many sunbeams. Why is that?
It sounds strange, but the reason is actually quite simple. In lenses with an even number of aperture blades (and a fully symmetrical design), half of the sunbeams will overlap the other half. So, you don’t see all of them in your final photo.
Here’s a diagram to show what I mean:
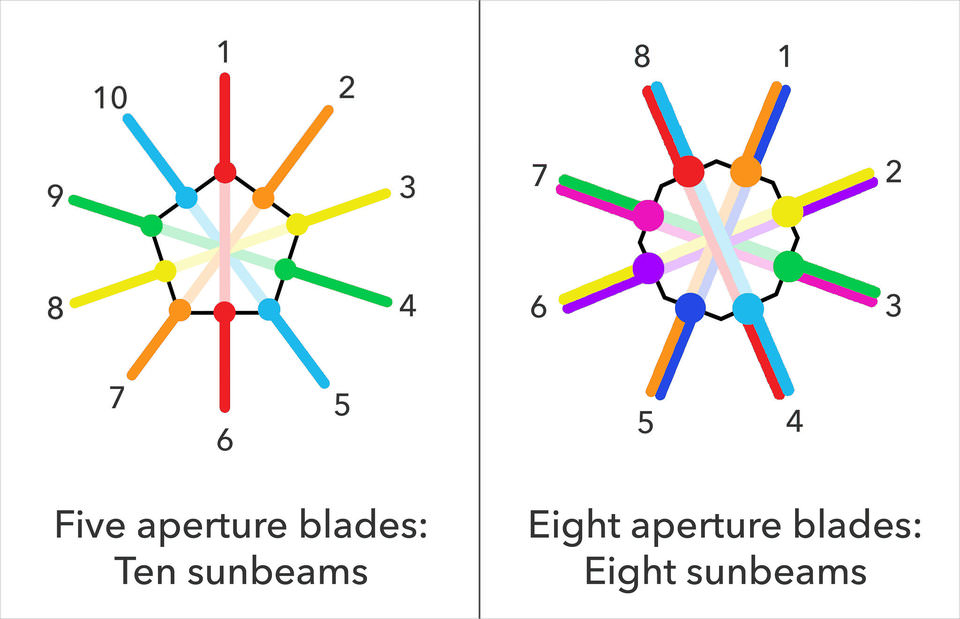
Most Nikon lenses have seven or nine aperture blades, resulting in 14 and 18 sunbeams respectively. Most Canon lenses have eight aperture blades, resulting in eight sunbeams. (I took the photo at the top of this section using the Nikon 20mm f/1.8 lens, which has 7 aperture blades. That’s why the image has 14 sunbeams.)
It’s not just the number of blades that matters, though — their shape is also important. Some aperture blades are rounded (which results in a more pleasant out-of-focus background blur), and others are straight. If your goal is to capture good starbursts, straight aperture blades typically produce more defined rays of light.
Again, some lenses are better than others in this regard. For the best results, find a lens that’s known to have good starbursts, and then set it to a small aperture like f/16. That’s going to give you the strongest definition in your starbursts.
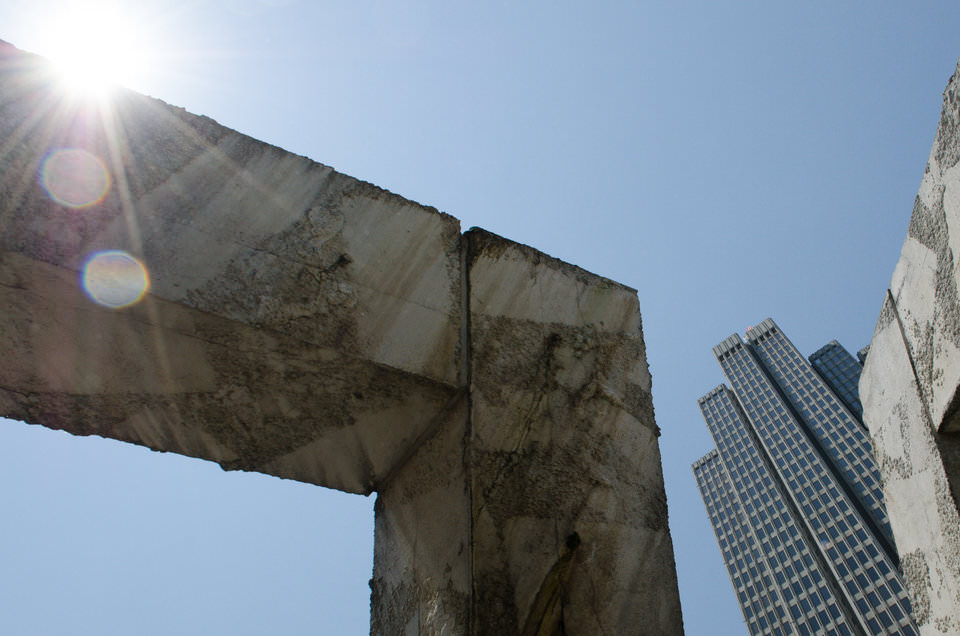
Finally, there’s one last related effect that I wanted to mention briefly (since this article is about every effect aperture has). When you shoot into the sun, you might end up with flare in your photographs, as shown below. Depending upon your chosen aperture, the size and shape of this lens flare may change slightly. This isn’t a big deal, but it still exists.
7) Shooting Through Things
When you shoot through things — fences, dirty windows, plants, and even water droplets on your lens — you’ll probably be disappointed by photos taken with a small aperture.
Small apertures like f/11 and f/16 give you such a large depth of field that you may accidentally include elements that you don’t want to be in focus! For example, if you’re shooting at a waterfall or by the ocean, an aperture of f/16 could render a tiny water droplet on your lens into a distinct, ugly blob.
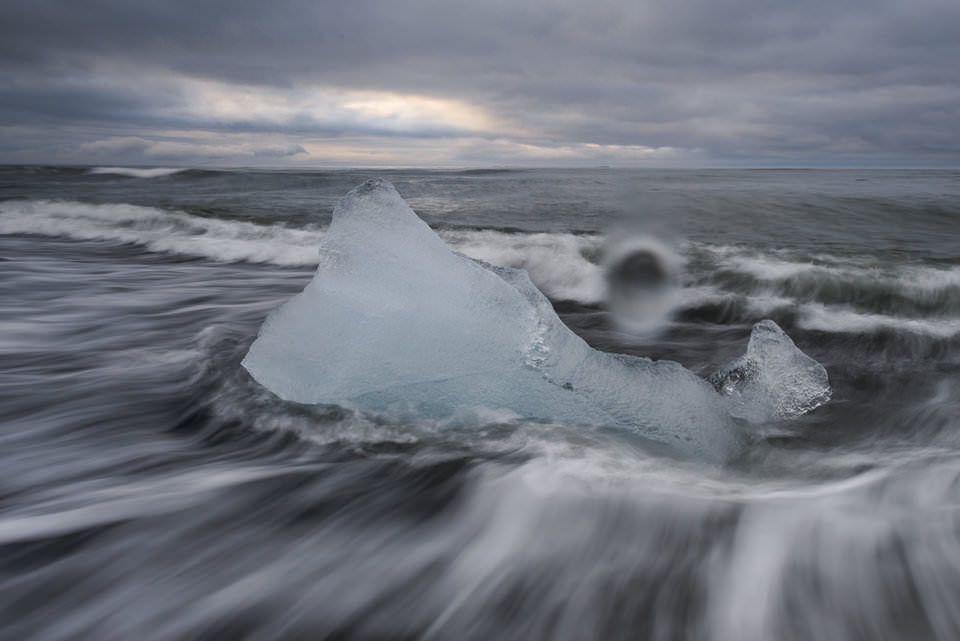
In cases like that, it’s better just to use a wider aperture — something like f/5.6, perhaps — in order to capture the water droplet so out-of-focus that it doesn’t even appear in your image. (In this particular case, you could simply wipe the droplet off, but that’s not possible if you’re shooting through something like a dirty window.)
Side Note
You might have realized that this section is really just an extension of depth of field, and that’s true! However, it’s a bit of a special case, so I decided to separate the two.
Another example of shooting through things is when a piece of dust lands on your camera sensor. Unfortunately, as you change lenses, this is very common. Dust specks on your camera sensor will show up very clearly at small apertures like f/16 or f/22, even if they’re invisible at something larger, like f/4. Luckily, they’re very easy to remove in post-production software like Photoshop or Lightroom, though it can be annoying if you have to remove dozens of them from a single photo. That’s why you should always keep your camera sensor clean — but, if it’s not clean, you should be wary of using small apertures.
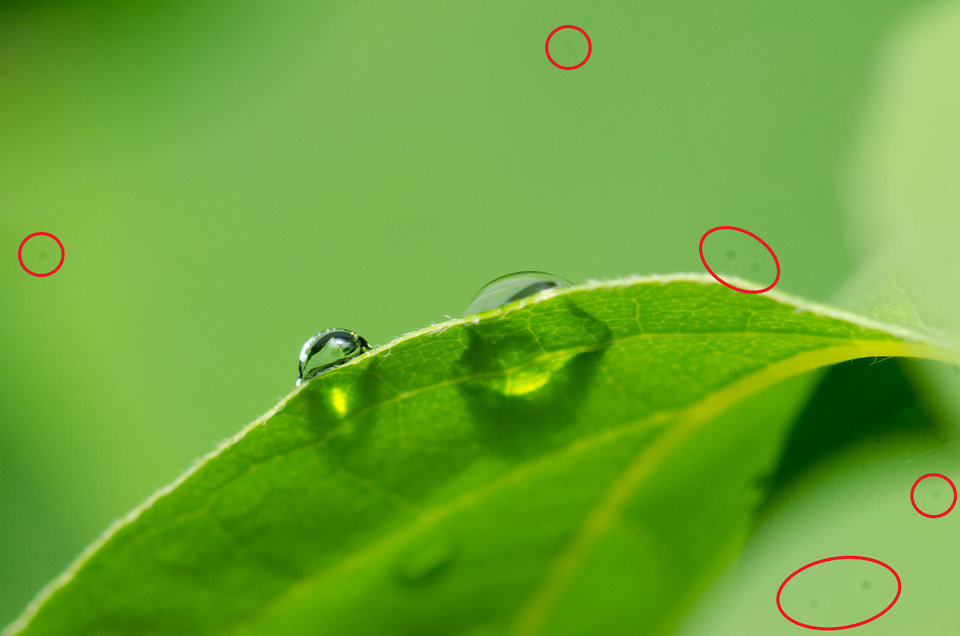
This is why you should always keep your camera sensor clean. And, if you happen to be taking pictures through other elements, keep this tip in mind as well — use a medium or wider aperture to make them less visible.
8) Changes to Your Bokeh
I almost forgot about this one, since, as a landscape photographer, I rarely take photos with out-of-focus backgrounds.
What is bokeh? It’s simply the quality of your background blur — not a tricky topic. If you take a lot of portraits or wildlife photos, you’ll end up with strongly out-of-focus backgrounds in most of your images. Naturally, you want them to look as good as possible! Different aperture settings will change the shape of your background blur. Why’s that?
The background blur of your photographs always takes on the shape of your aperture blades. So, if your aperture blades are shaped like a heart, you’ll end up with heart-shaped background blur. Most of the time, that would qualify as distracting bokeh, although it’s kind of cute in this photo of two fake tortoises:

What makes this interesting is that, on some lenses, aperture blades change shape significantly as they open and close. Although not all lenses are this way, large aperture settings (such as f/1.8) often have rounder background blur than smaller aperture settings. You’ll also get more background blur at large apertures, since your depth of field is thinner.
Other lenses may be better at slightly smaller apertures, or they may have other, odd problems with background blur at wide apertures (such as choppy background blur in the corners). If bokeh is something that matters to you, you’ll want to test this on your particular lenses. Take some out-of-focus photos of a busy scene, each using a different aperture setting, and see which one looks the best. Most of the time, it will be the lens’s widest aperture, but not always.

9) Focus Shift
With certain lenses — even if you’re in manual focus, and you don’t move your focus ring — your point of focus may shift as you use smaller and smaller apertures.
Obviously, this isn’t ideal. How do you tell if your lens has problematic focus shift? It’s pretty easy. Here are the steps:
- Put your camera on a tripod, and set your lens to manual focus.
- Find an object with small details that extends backwards, and focus at the center of it. A table typically works well, potentially with a tablecloth.
- Be sure: When you zoom in on a photo you take, you should see pixel-level details, as well as portions of the photo that are clearly out-of-focus.
- Take a photo at your lens’s widest aperture, and then at progressively smaller apertures. (You don’t need to take a photo every 1/3 stop; something like f/2, f/2.8, f/4, f/5.6, and f/8 is good enough.) Be sure not to move your focus ring, and double check that you are using manual focus.
- On your computer, zoom into 100% on these photos and see if the sharpest point of focus moves continuously farther back as you stop down. The more it moves, the worse your focus shift issue is.
You’re done!
If your lens has extreme levels of focus shift, you’ll want to compensate for it:
- With your widest aperture, just focus like normal.
- With wide to medium apertures, around f/2.8 to f/5.6, enter live view (already using your intended aperture), then focus. Manual and autofocus both work fine.
- With small apertures like f/11 or f/16, your depth of field will be large enough to hide most focus shift problems, so just focus like normal.
Side Note
When it comes down to it, focus shift is just another type of lens aberration. The edges of your lens may not focus light the same as the center, so, by stopping down — again, blocking light from the edges — your focus point changes slightly. That’s the underlying reason for this effect.
10) Ease of Focusing
The autofocus system on your camera doesn’t work well unless it receives plenty of light.
Usually, this won’t be a problem. Even if you’re using a small aperture like f/16, your camera will still use a large aperture — say, f/2.8, if your lens lets it — to focus. It only stops down to f/16 once you actually take the photo.
However, that’s not always possible.
For example, if the largest possible aperture on your lens is pretty small — something like f/5.6 or f/6.3 — your camera won’t be able to use a large aperture to help it focus. This is one reason why Nikon’s expensive 70-200mm f/2.8 zoom lens still focuses successfully in low light, while cheaper lenses (say, the 70-300mm f/4.5-5.6) start to miss focus more easily in the dark.
So, your lens’s maximum aperture matters for focusing more easily. Whether you’re shooting at f/2 or f/16, your camera focuses at the same aperture both times (aside from certain cameras in live view, or if you have an old lens with an all-manual aperture).
This effect might not matter to you if you’re a landscape photographer, but others may find it pretty important. At the very least, you’ll enjoy the brighter viewfinder that comes from lenses with a large maximum aperture — and it’s never bad to have some extra low-light focusing capabilities.
11) A Chart of Everything Aperture Does
When you learn the information above, you’ll know everything aperture does to your photos. However, that won’t happen instantly.
Understanding all the effects of aperture can take some time. Practice is your best friend. Go outside, take some photos, and get a feel for aperture yourself.
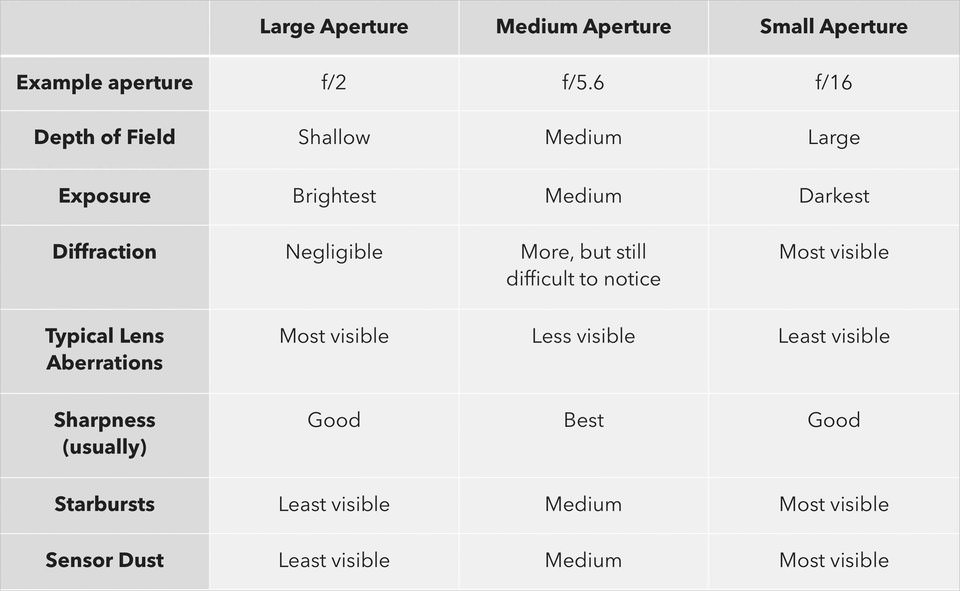
If it helps, I compiled the main information in this article into a chart:
12) Conclusion
Aperture doesn’t have to be complicated.
Yes, it affects several different parts of your photo, but you’ll get the hang of everything fairly quickly. A small aperture makes your photos darker, increases depth of field, increases diffraction, decreases most lens aberrations, and increases the intensity of starbursts. A large aperture does the opposite.
Soon, this won’t be something that you even need to think about; you’ll remember it all naturally. Personally, if I want a starburst effect in my photos, I immediately know to use an aperture of f/16. When I need as much light as possible, I set a larger aperture like f/2.8 or f/2 without a second thought. It doesn’t take too much practice to get to that point.
As always, it’s best if you learn all this for yourself. Find something spectacular to capture, and put your new knowledge into practice. The more photos you take, the more you’ll learn. Aperture is no exception.