Today we’re going to look at three ways to change colors in Adobe Photoshop. These tools are used to change the color of an object in a photograph or recolor a portion of an image.
Although Photoshop offers countless tools for correcting color or subtly toning an image, the techniques in this article are designed for the more specific and dramatic artistic effect of completely changing the color of an object. These three methods are fairly distinct and which technique is best is going to be completely dependent on the image you are working with.
Below, I do my best to offer suggestions of which types of images each technique will work with. However, I recommend experimenting with them yourself to get a feel for what works best for you.
We’re going to jump right into the steps below using layers, adjustment layers, and masking, so if those terms aren’t familiar to you, I recommend checking out the article that Spencer wrote on Photoshop Layers and Masking before we begin.
Changing Colors Using a Hue/Saturation Adjustment Layer
The first way to change colors is by using the Hue/Saturation sliders. While this method has the potential of being the easiest way to change the color of an object, it comes with a pretty big caveat: it doesn’t work well in every image. But we’re going to start with it because when it works, it’s a very fast and easy way to change colors.
Hue/Saturation works best when you have an image with really good color separation between the color you want to change and the rest of the image. If your image is fairly monochromatic, or you have a lot of the same color throughout the image, changing the color of just one of those objects is going to be a bit trickier.
Using the Hue/Saturation slider is fairly straightforward. The Hue Slider is a bar-shaped representation of a color wheel. When you slide the hue slider, you are shifting all of the colors in your image around the color wheel. So, starting at the center the bar, you can shift the slider up to 180 degrees in either direction.
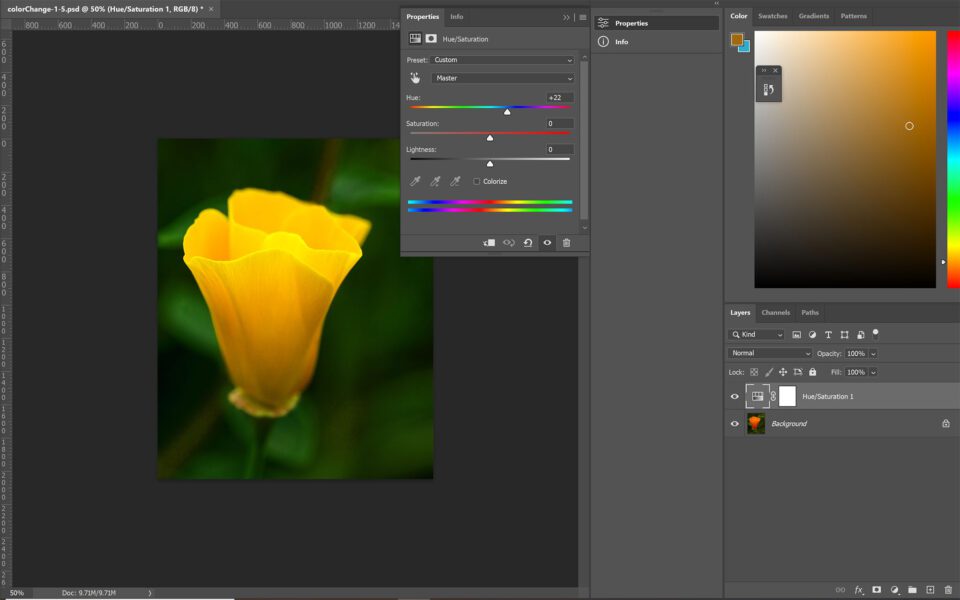
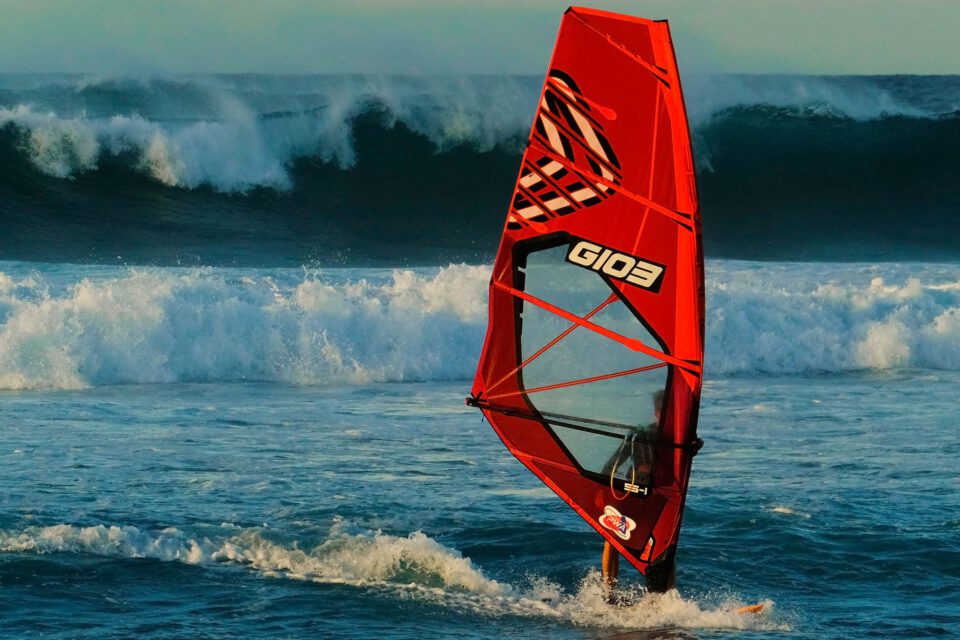
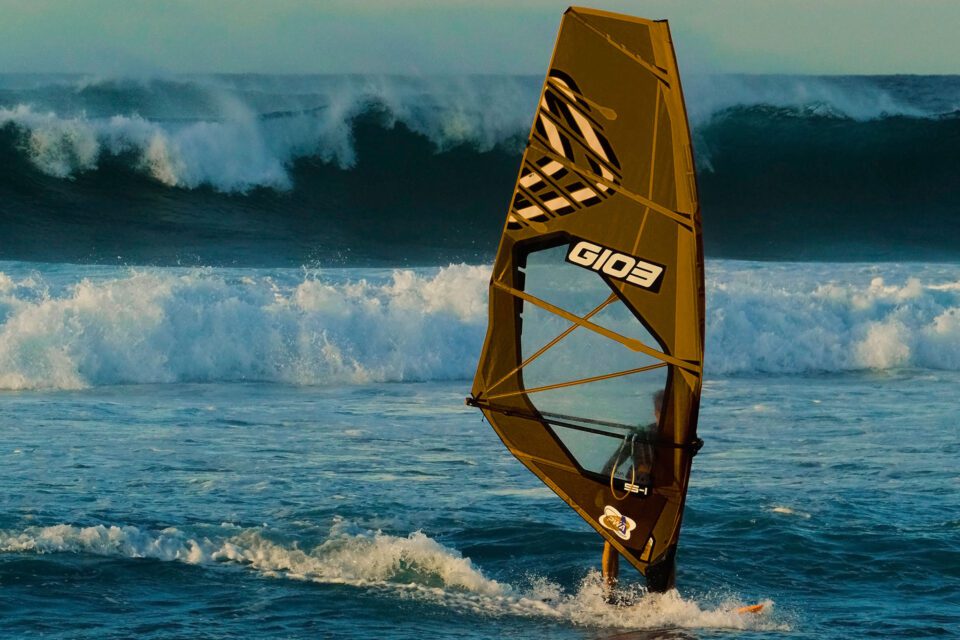
If you simply slide the hue slider, you are making global adjustments- meaning you are changing every color in your image. This tool becomes much more useful and more practical when you use the dropdown menu, or the two rainbow sliders at the bottom of the Hue/Saturation panel, to limit the range of the adjustments you are making. You can see that change below:
This technique can also be combined with masking, which makes it even more powerful. (Though when an image needs more than a basic mask, I usually prefer to use the other two techniques that I’ll cover in a moment.)
Aside from the simple quickness of this technique, another major benefit is that it’s already non-destructive by default. Since you are working with an adjustment layer, you can go back and change the color as many times as you want.
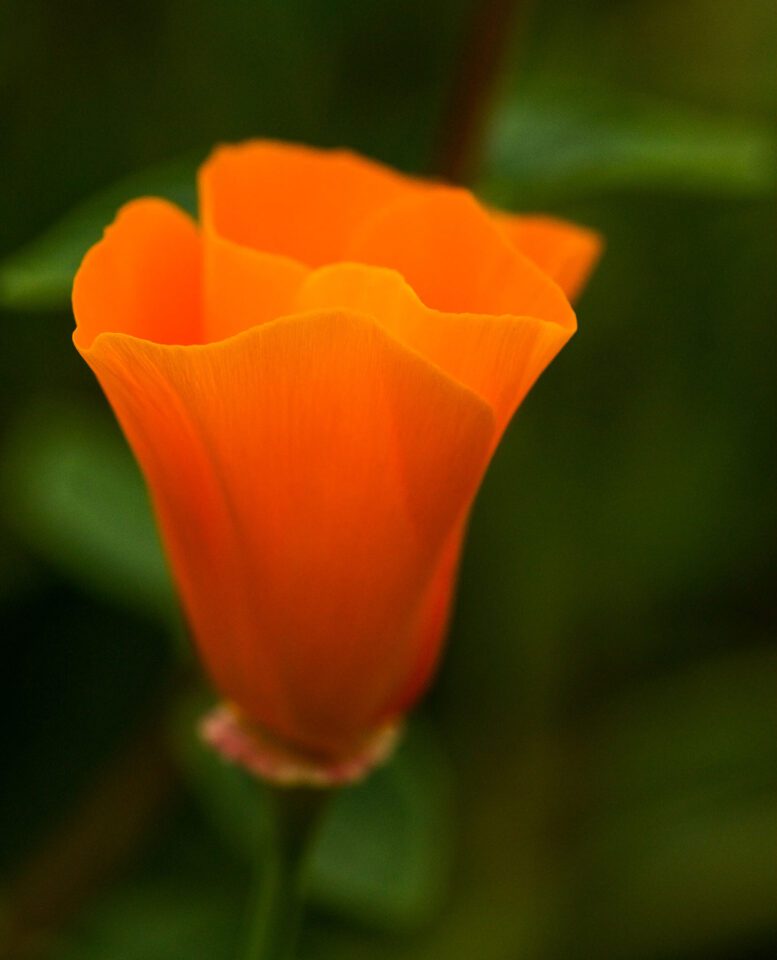
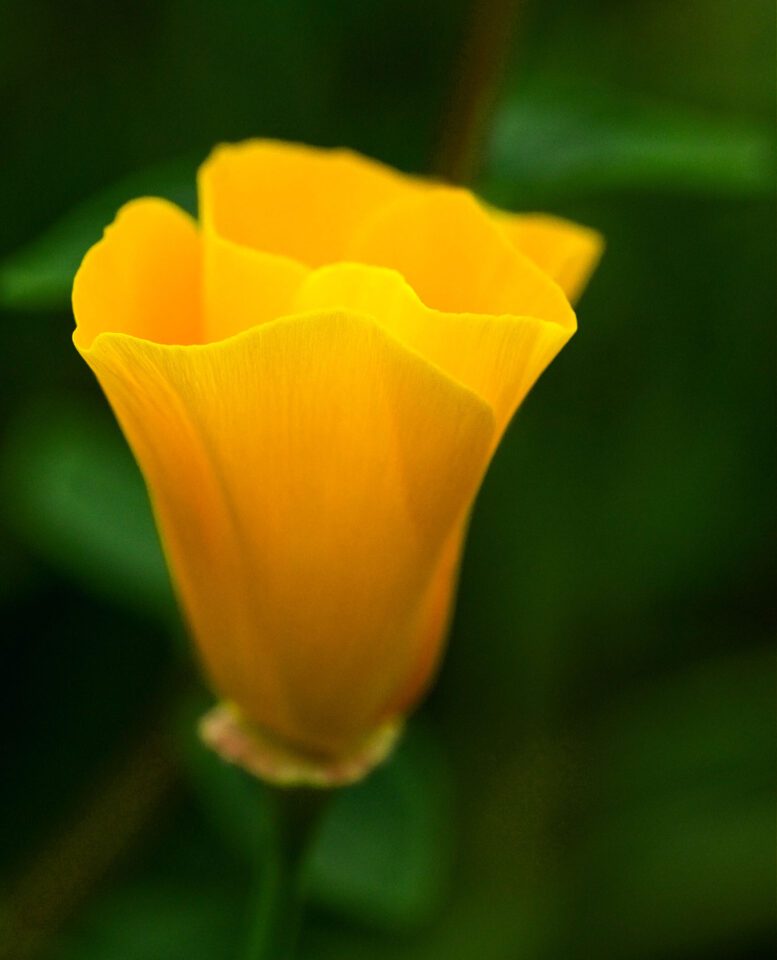
However, a drawback is that it can shift some colors or areas of the image that you didn’t intend. In the example above, you will see that even though the flower is what changed colors the most, the background also shifted a bit. You can minimize this by using the two rainbow sliders at the bottom of the Hue/Saturation panel to limit the colors that are adjusted, but you may not be able to eliminate it completely. In this particular case, the color shift worked, so I just left it. If it had bothered me I could have used a layer mask to “erase” the color change anywhere I didn’t want it.
Here’s another example. The following is the original image:
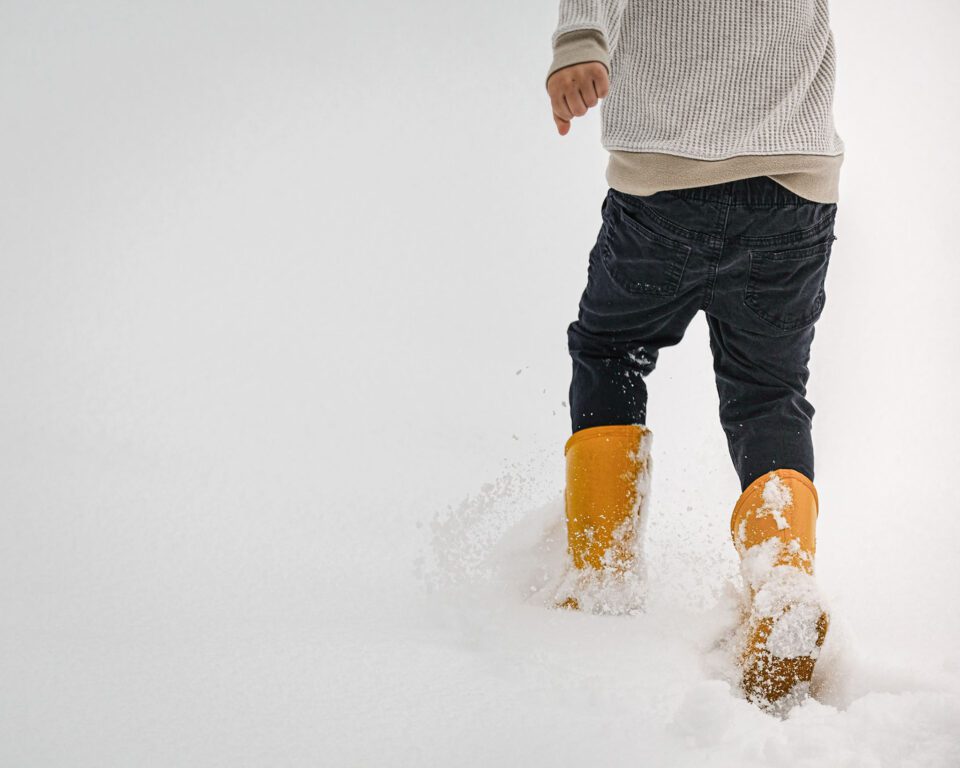
In this example, I used the fact that the Hue/Saturation Adjustment layer affects the entire image to my advantage. You may notice in the image above that there’s a very subtle reflection of the yellow boots in the nearby snow. Reflections and color casts on surrounding objects are something you want to watch out for when changing colors. In this case, the Hue/Saturation adjustment made that easy, as you can see below:
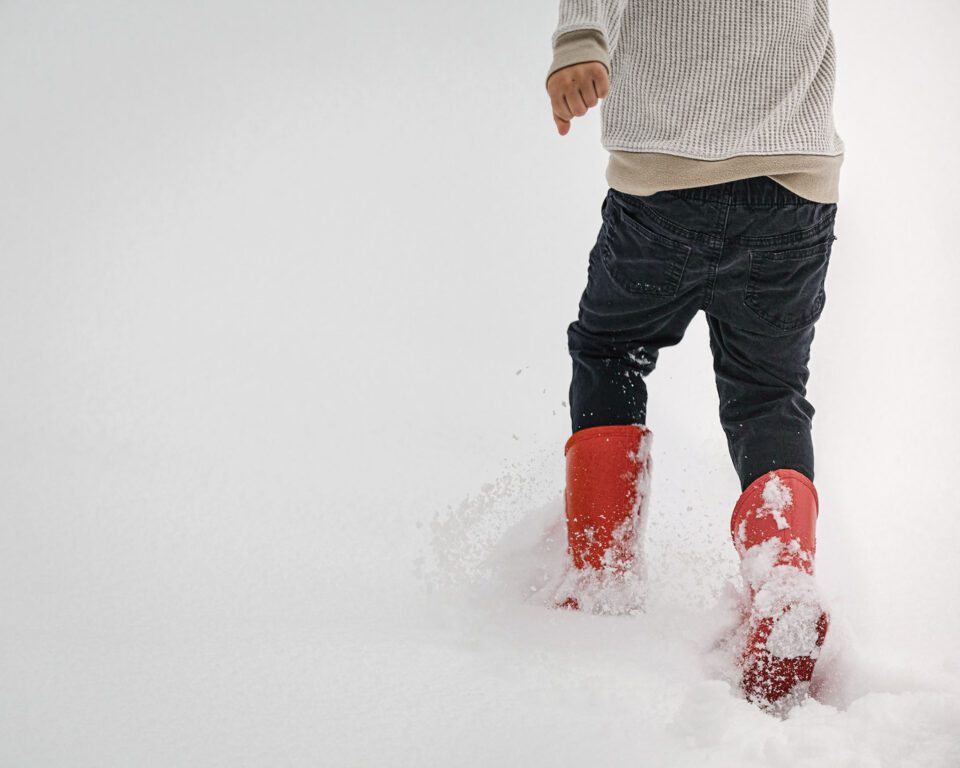
However, I did need to quickly mask over the hand and the shirt, which also had some yellow in them, to get rid of the unwanted red color change in those areas. It was still a very quick and easy edit overall, though.
Changing Colors Using Blending Modes
Blending modes are an extremely powerful function of layers in Photoshop. Today we’re going to look at the two blending modes that can help us re-color an object in an image, but for a look at what the other blend modes can do, check out this article on Blend Modes by Madhu.
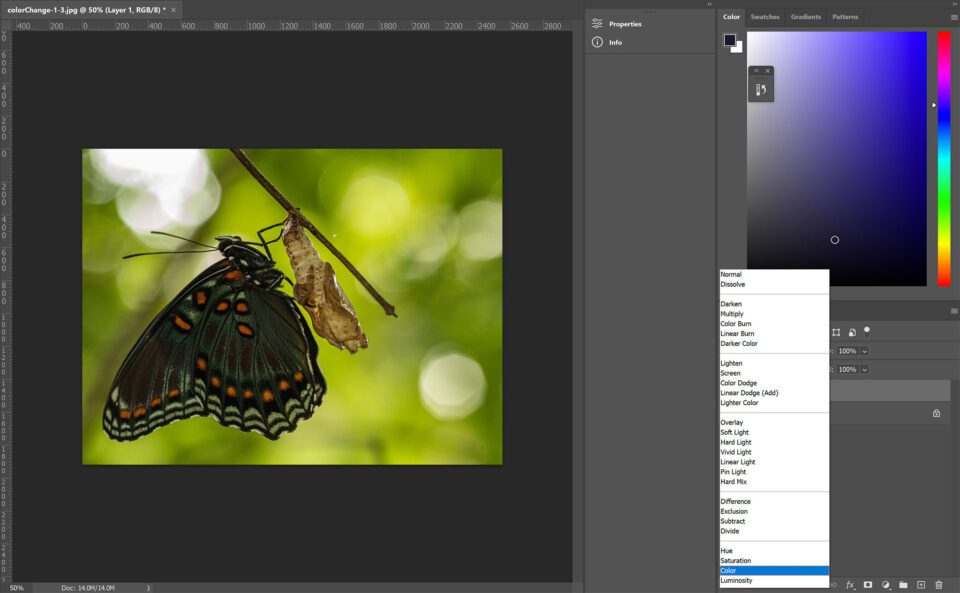
To change colors using blending modes, start by creating a blank layer above your original image. Change the blending mode of the blank layer to either hue or saturation. These two modes are similar, but they do produce different effects. “Hue” keeps the saturation and luminosity of the original (underlying) layer while changing the hue to match your new color. “Color” changes both the color and the saturation while retaining the original layer’s luminosity. The difference may seem subtle, but it often has a substantial effect on the image. Fortunately, it is easy and non-destructive to toggle between the two blend modes to see what works in your image.
The next step is to paint (on the new blank layer) over the portion of the image you want to change with the brush tool and your chosen color. If the image you are recoloring has clear, distinct outlines, and you are using a pen tablet to do your painting, then painting might be very straightforward. But most of the time we aren’t quite that lucky! You can easily combine this technique with a layer mask, using any of Photoshop’s masking options to create a layer mask on the new (hue or color) layer before painting.

When you find yourself needing to add a layer mask to your hue/color layer, there are a few tips that often come in handy. The first is that after you’ve finished making your mask, you can apply a gaussian blur filter directly on the mask. This can soften up the mask just enough to make the color change appear more natural.
Also, the color range tool (located under the “Select” menu at the top) sometimes works well for selecting the area you want to recolor in the first place. The color range tool will select that same color in other areas of the image as well (not unlike the Hue/Saturation adjustment layer), but if the other areas don’t overlap/touch the area you need to re-color, you can simply paint over those portions of the image.
Changing Color Using the Color Replacement Brush
When you need to change the color of a more complex area in a photo, something with smaller spaces, or less defined edges, the Color Replacement Brush is your best option. The Color Replacement Brush is a very powerful tool hidden under the regular Paint Brush Tool in Photoshop.
The Color Replacement Tool brings up a cursor that at first glance could be confused with the typical brush. For years I actually ignored this tool, assuming it was essentially the same as the above technique of using the brush with a color or hue blending mode. But this tool is far more powerful that it first appears and it contains some very useful controls that you will find makes changing color far easier in many cases.
The general concept of using the Color Replacement Brush is fairly simple. As you paint over the object you want to recolor, Photoshop will change only the colors that match whichever color is under the cross-hair in the center of the brush. It will replace them with your chosen foreground color.
The actual painting technique is similar to using any Photoshop brush tool, although you want to make sure that the cross-hair is always over the part of the image you want to recolor. But while the concept is simple, this tool contains many options that modify its behavior in dramatic and useful ways.
Mode
![]()
The mode selection here works the same as changing the blending mode of the layer, like we looked at earlier. You have the same Hue and Color options as well as Saturation (keep the hue and luminosity from the original color and replace only the saturation with the new color) and Luminosity (Keep the hue and saturation of the original color and adopt only the luminosity from the new color). When you are using this tool for color replacement, you will probably be looking to use either the hue or color option.
Sampling Options
![]()
While these three options aren’t labeled, the icons make sense once you understand what they do (and we will look at them in the order they appear in the options bar). The sampling options control how Photoshop selects the color you will be replacing. With only one exception, the sampling is controlled by the cross-hair in the center of the brush cursor, but the sampling behavior changes depending on the option selected.
The first option is “Continuous,” which continuously samples the color under the cross-hair. As you move the brush tool, the cross-hair moves, and Photoshop is continuously updating the sampled color. (This option works well in most situations, especially when paired with the “find edges” option). It is important when using this option that you pay especially close attention to the location of the cross-hair as you paint.
The second option is “Sample Once.” It samples the color under the cross-hair once, when you first click, and as long as you continue to hold down your mouse button and paint it replaces only that one color that it originally sampled.
The third option is the “Background Color” option and it replaces only the colors that match whichever color is the background color swatch. This is the one option that does not use the cross-hair for color selection, but honestly I have never used it.
Limit
![]()
The “Limits” selection controls the behavior of the actual painting/color replacing that you do.
First, “Contiguous” is the default option, and it will only replace colors that both match the sampled color (usually the color under the cross-hair) and are adjacent to it, or touching it in some way. It will not replace non-adjacent pixels even if they are the sampled color and fall within the brush cursor area.
“Find edges” works like continuous but pays attention to the edges of an object and only replaces the colors that Photoshop identifies as being contained within those edges. While this does not work perfectly, especially in areas with very complex or blurred edges, it works surprisingly well and makes recoloring quick and fairly straightforward, especially when paired with the continuous sampling option.
“Discontinuous” replaces the sampled color regardless of where it appears within the brush cursor area.
Tolerance
![]()
Tolerance controls how closely a color must match the sampled color in order to be replaced. For images with only subtle variations in colors, you will find that a low tolerance is necessary. If your object is not surrounded by similar colors, you will find that increasing the tolerance will work well and speed up your workflow. There is no magic formula to selecting the right tolerance level; you will need to adjust it as you go. If the replacement feels too particular, try increasing the tolerance. If it is not accurate enough, decrease the tolerance. The tolerance has a surprisingly strong effect on the way this tool works, so if the color replacement brush is not behaving the way you expect it to, the first thing to check is the tolerance level.
Putting It Into Practice
To use the Color Replacement Brush, select your desired new color as the foreground color in the color swatches. Unlike the Adjustment layer technique and the Blending Mode technique above, when you use the Color Replacement Brush, you are working right on the original image layer – meaning that it’s destructive. The way around this is to duplicate the layer and paint only on the duplicate. That’s always good practice so that you can undo your work if needed.
While the options in the color replacement brush may seem overwhelming, I recommend starting with the sampling mode set to “Continuous” and the limit set to either “Contiguous” or “Find Edges.” A tolerance in the 50-60 percent range is a good starting point as well. As you begin to use the brush and experience its behavior, you will get a feel for when you need to adjust the settings and use other options instead.
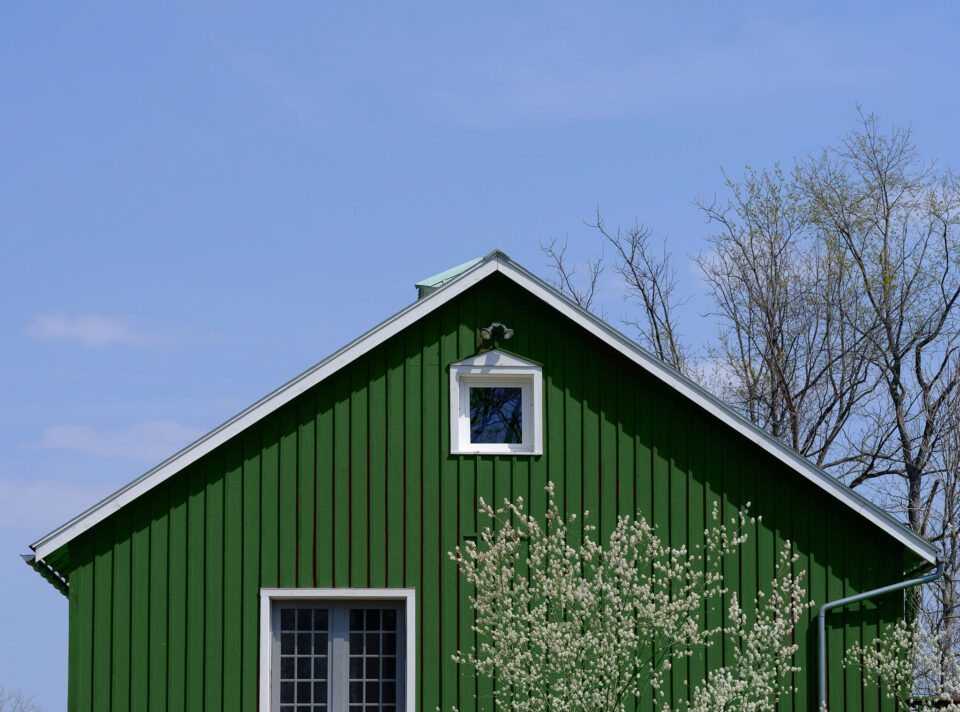
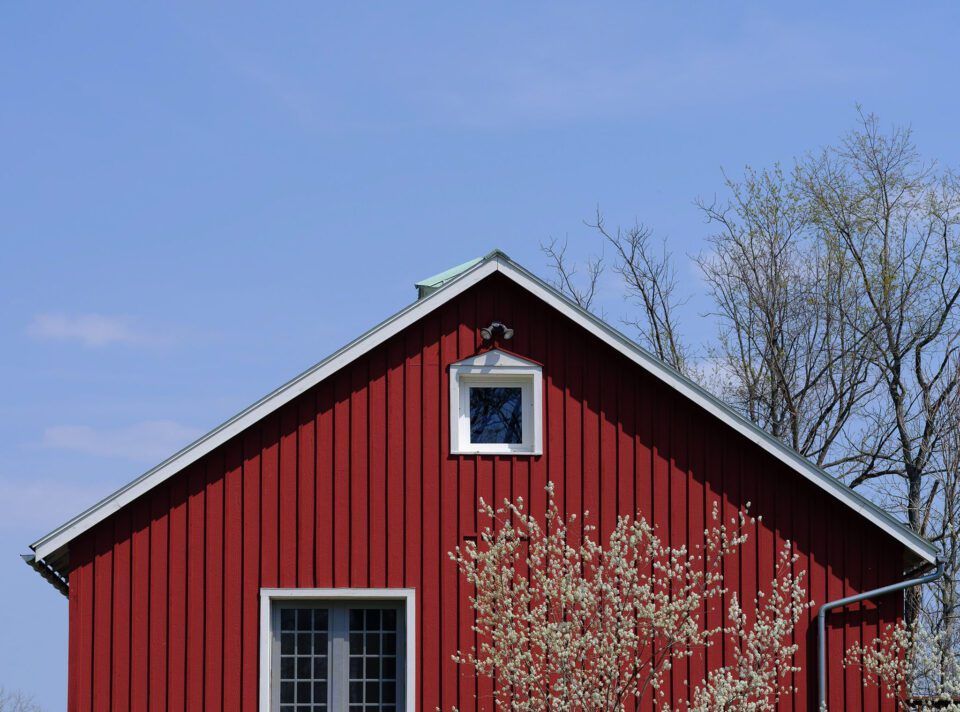
While using the Color Replacement Tool can be more tedious than either of the above techniques, there are times it is absolutely invaluable. In the image above, re-coloring the barn where it falls behind the blossoming tree poses quite a challenge. Trying to paint a mask in between those blossoms and branches would be nearly impossible, but the color replacement tool makes this job fast and easy. It allowed me to paint right over the entire area but only affected the pixels that matched the barn color that I had originally sampled.
Conclusion
We have looked at three ways to replace color in Adobe Photoshop. The Hue/Saturation Adjustment layer method is simple and extremely flexible, though a bit less flexible than the other methods. The Blending Mode technique is straightforward, but it works best on objects that have well-defined edges or on objects that are easy to mask. The third method, using the Color Replacement Brush, is the most powerful option and is great for more complicated re-coloring that might otherwise require complicated masking. But it also tends to be more of a tedious manual method.
There are dozens of ways to do almost everything in Photoshop, and these three methods changing colors in Photoshop are the ones I find the most useful. Other methods exist as well, although most of them employ some variation or combination of the techniques and tools we looked at today.
There is one other color change option built into Photoshop that we did not look at today and that is the Replace Color option located under Adjustments in the Image menu. Honestly, I have found this tool to be very clunky and I have never managed to use it for an effective color change. Even in images that seemed like they should have been straightforward color replacements, this tool left me with odd blocks of uncolored areas and messy edges. It just didn’t do a good job. While the lure of what is essentially one click color replacement might seem tempting, I have never found this tool to live up to its promise and have experienced much better results using the methods described above, even if the process is slightly more tedious.
Also, of course, color replacement isn’t always something that photographers are willing to do depending on their style of work. It can be very useful for advertisement photography, fine art compositing, and surreal photos even if you don’t want to do it to more straightforward work. But I’ve also found that plenty of everyday photos can benefit from slight color shifts here and there, such as using the Hue/Saturation tool to isolate an overly cyan sky and make it a bit more blue.
If you have a different experience or a different preferred method of color changing, feel free to share in the comments!