There are so many ways to edit a Milky Way photo in Lightroom that it can be tough to know where to start. That’s particularly true if you’re after maximum image quality, because some of Lightroom’s sliders can cause unwanted noise or halos that are difficult to remove.
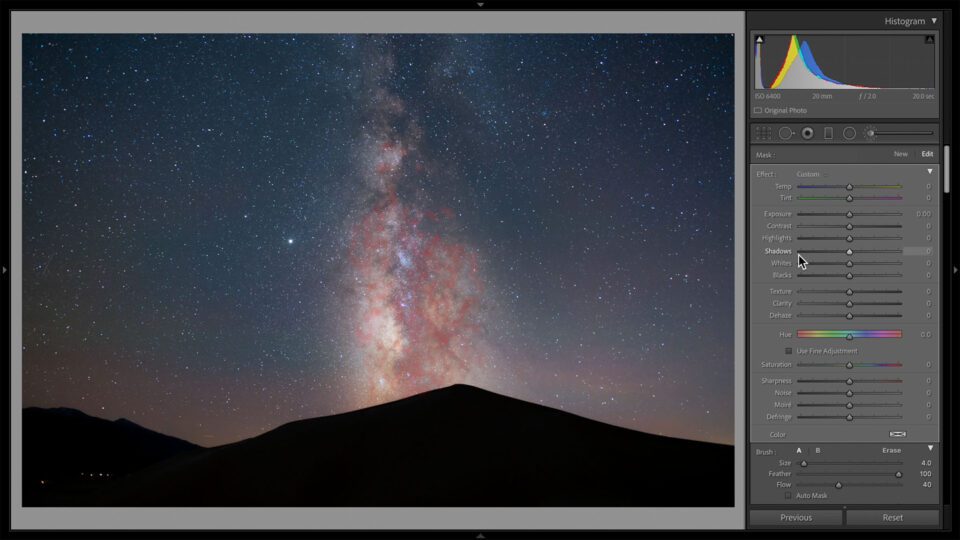
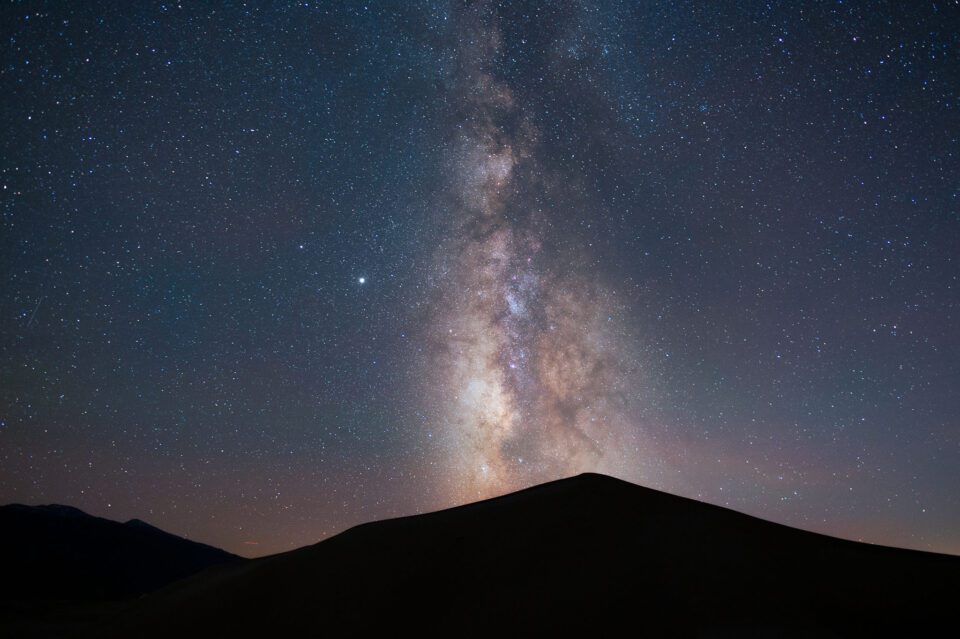
Here, I’ll go through my step-by-step process in Lightroom to help your Milky Way photos pop without losing image quality. This is the photo (unedited shown below) that I’ve chosen to process for the tutorial:
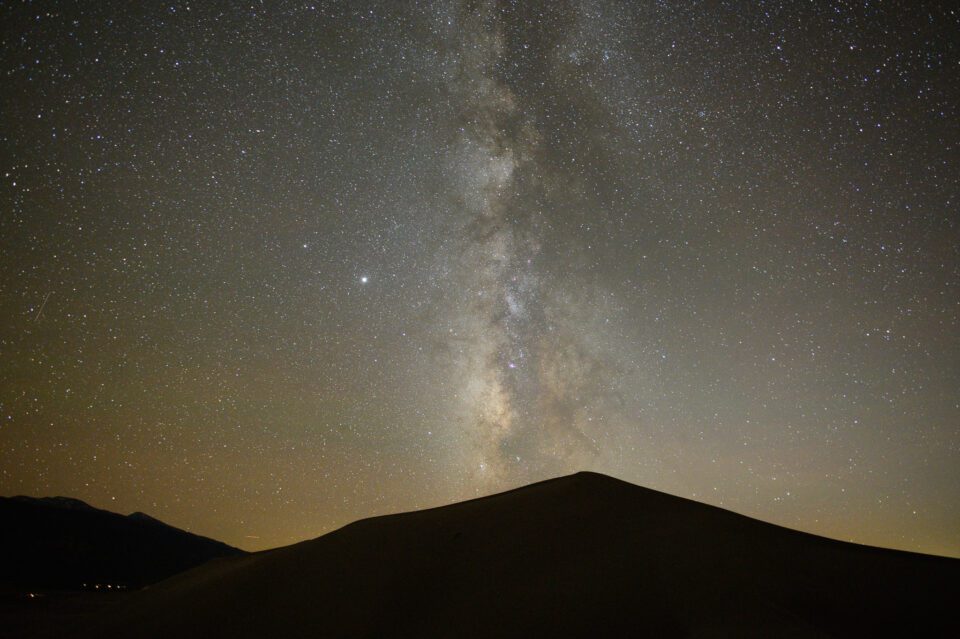
From a composition standpoint, it lacks a good subject other than the Milky Way, so it’s not my favorite photo ever. But it works well for this tutorial because it’s simple: a silhouetted foreground and a clear Milky Way in the sky. It’s a very common situation in astrophotography, and learning how to deal with photos like this is important before working with more complex images.
I’ve divided my process into 12 steps that you can see below.
1. Form a Plan
Before you start doing any edits in Lightroom, it helps to have a plan. Here’s the order I suggest for your edits: Global > Local > Spot > Photoshop.
- Global: Start by doing as many slider adjustments as you need. This includes everything from the Basic Panel to the sharpening and noise reduction sliders, as well as cropping the image.
- Local: After you’ve gotten a good base, start dodging and burning your photo or making local color adjustments using the gradient, radial gradient, and brush tools. I recommend starting broad (gradients) and working your way down to finer adjustments (very small brush edits).
- Spot: Do any spot healing in areas that need to be fixed, like unwanted airplane or satellite trails in the sky.
- Photoshop: If there are edits you can’t do in Lightroom, open your photo in Photoshop after completing all the steps in this article. Soon, I’ll publish a separate post about editing Milky Way photos in Photoshop.
I recommend trying to visualize the edits you’re planning to make rather than shifting sliders randomly.
2. Set the Right Defaults
Some of Lightroom’s default settings aren’t optimal for astrophotography. Here are the ones I recommend changing:
- Set the Profile at the top of the Basic Panel to Adobe Standard, or, if it shows up as an option, Adobe Standard V2. We’ll come back to this in a later step.
- Turn off the sharpening and noise reduction settings for now; Lightroom’s defaults aren’t great for Milky Way photography.
- Make sure “remove chromatic aberration” is selected in the Lens Corrections panel.
- Click “enable profile corrections” in the same panel, but feel free to reset the Distortion slider to zero and lower the Vignetting slider substantially. Lightroom often overdoes the vignetting correction, and the distortion correction isn’t needed for a lot of Milky Way photos.
Also, crop your photo prior to doing the rest of the steps below.
3. Find a Neutral White Balance
It’s a good idea to find a relatively neutral white balance before doing any other edits. Milky Way photos tend to have very bad white balance settings by default, because the camera’s Auto white balance doesn’t do well in low light, and other options like Daylight or Tungsten white balance are usually too yellow or blue.
While you could try using Lightroom’s white balance selector eyedropper tool, I’m not a big fan for this type of photography. It’s too easy to fool by clicking in slightly different areas of the frame. Instead, I recommend boosting vibrance and saturation all the way to +100, then adjusting color temperature and tint until there’s a good balance of colors in the sky.
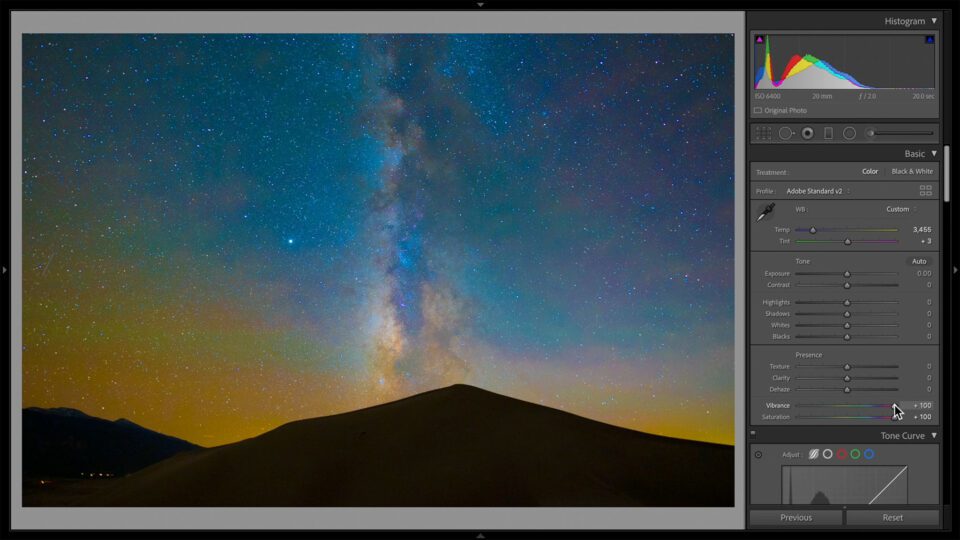
After you’re done setting white balance and tint, reset the vibrance and saturation sliders back to zero.
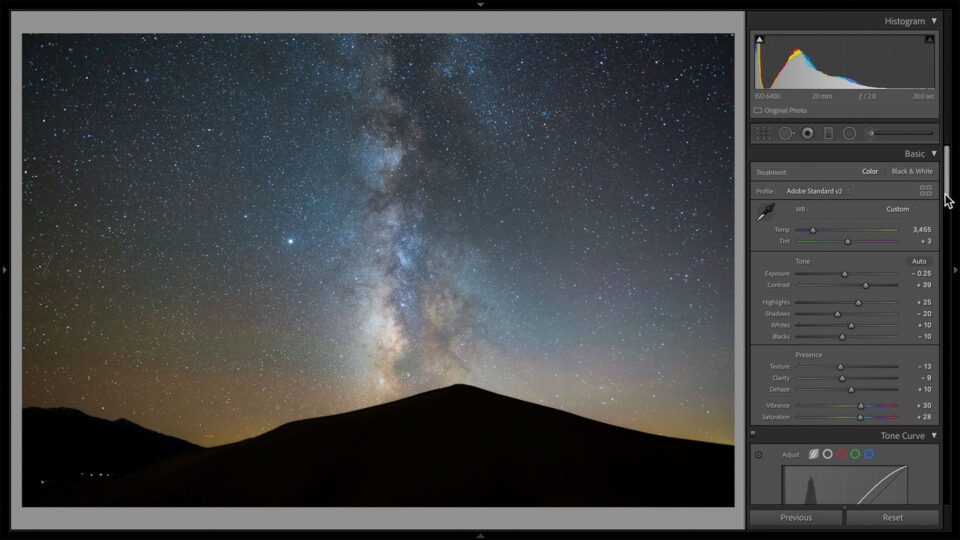
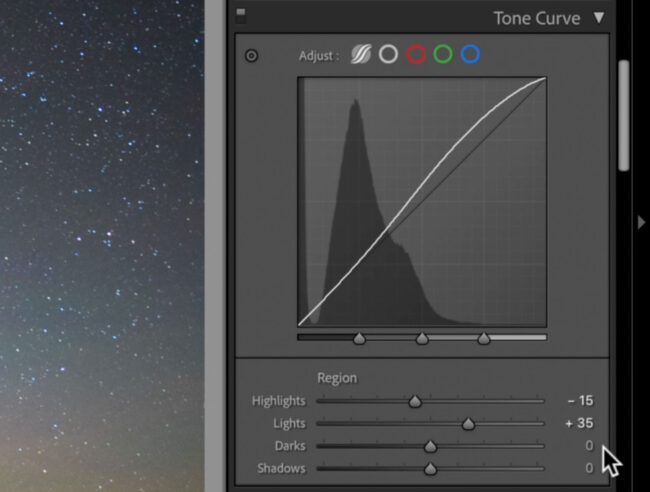
4. Make Global Edits in the Basic and Tone Curve Panels
The next step is to do your most important brightness and contrast edits using the two top panels (Basic and Tone Curve). There aren’t any set values here that are good or bad. It depends entirely on the photo at hand. I would, however, caution moderation. For example, the Texture and Clarity sliders can crunch up the stars in a way that really pops out, which may look ok at such an early stage of editing, but often looks grungy and dirty later. I usually recommend decreasing these sliders a bit rather than boosting them.
If I had to give some general recommendations, here’s what they are:
- Don’t brighten things too much. It’s nighttime!
- Use a slightly lower texture and clarity to give a subtler, more refined feel to the stars. About -5 or -10 is usually good.
- The difference between vibrance and saturation is especially apparent in Milky Way photography. Vibrance affects the whole image, while saturation primarily affects areas that were already saturated. Be deliberate about which of them you use.
- In the Tone Curve panel, the Highlights slider is a very fine edit that only affects the brightest stars. I like to decrease it a bit, maybe -10, to keep that refined feel.
- My favorite way to boost contrast is to decrease the Exposure slider in the Basic Panel while increasing the Lights slider in the Tone Curve panel correspondingly. It’s not just for astrophotography; that’s one of my go-to edits for almost any landscape shot.
5. Use Color Grading More Than HSL for Color Edits
Although I like the level of control that Lightroom’s HSL (hue, saturation, lightness) sliders offer for color adjustments, they aren’t perfect. In particular, if you push the sliders too far from each other, you can increase the photo’s color noise significantly.
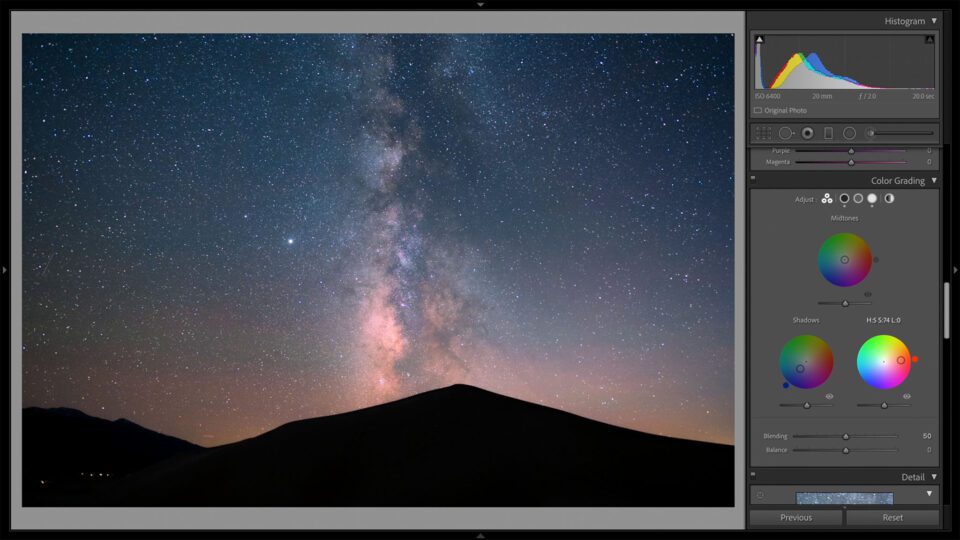
Instead, for Milky Way photography, I recommend using the Color Grading panel. It’s Lightroom’s replacement for the Split Toning panel, and it’s well-suited to this type of photo. My usual preference is to make the shadows bluer and the highlights oranger.
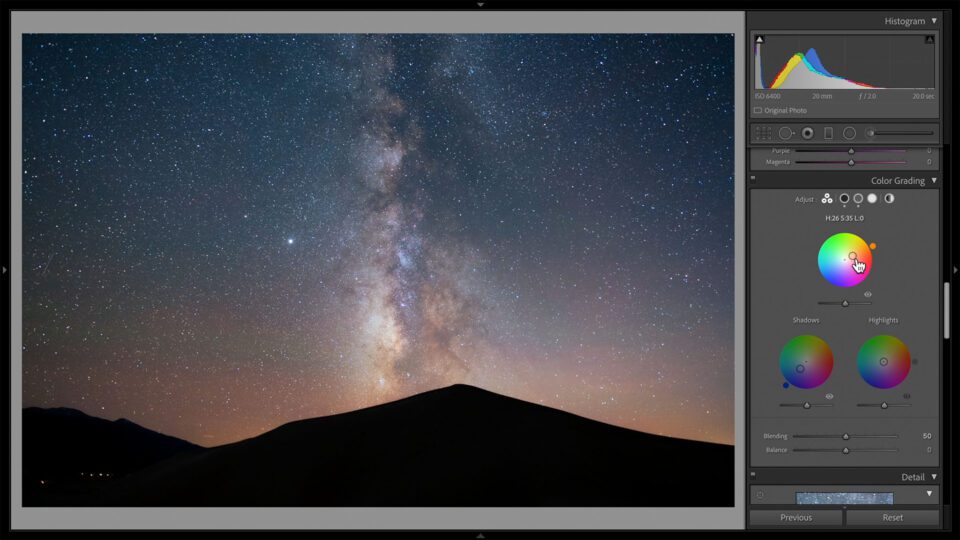
However, the actual “Highlights” color wheel isn’t the one I recommend for Milky Way photography. As you can see, it targets the brightest stars a bit too much:
Instead, the brighter areas of the sky tend to look better if you adjust the “Midtones” color wheel instead. Here’s the result:
6. Pay Close Attention to Color Noise Reduction
I’ve written before about how color noise reduction in Lightroom harms low-level color detail. That’s especially true for Milky Way photography, where even Lightroom’s default color noise reduction destroys a lot of the color around stars. Take a look at the following crops, where you can see less color detail with Lightroom’s defaults compared to zero color noise reduction:
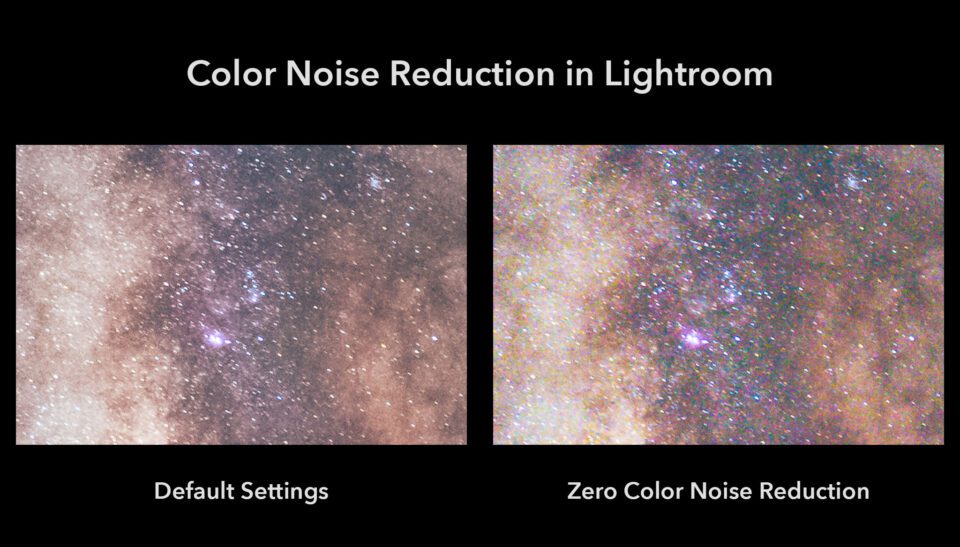
The problem is that the second photo clearly has too much color noise. So, our goal is somewhere in between: retaining the colorful stars without excess color noise. Here are the settings I recommend for your Milky Way shots (assuming high ISOs rather than using a tracking head or image stacking):
- Color noise reduction: Roughly +10 to +20
- Color detail: Roughly +60 to +80
- Color contrast: +100 every time
This is the result:
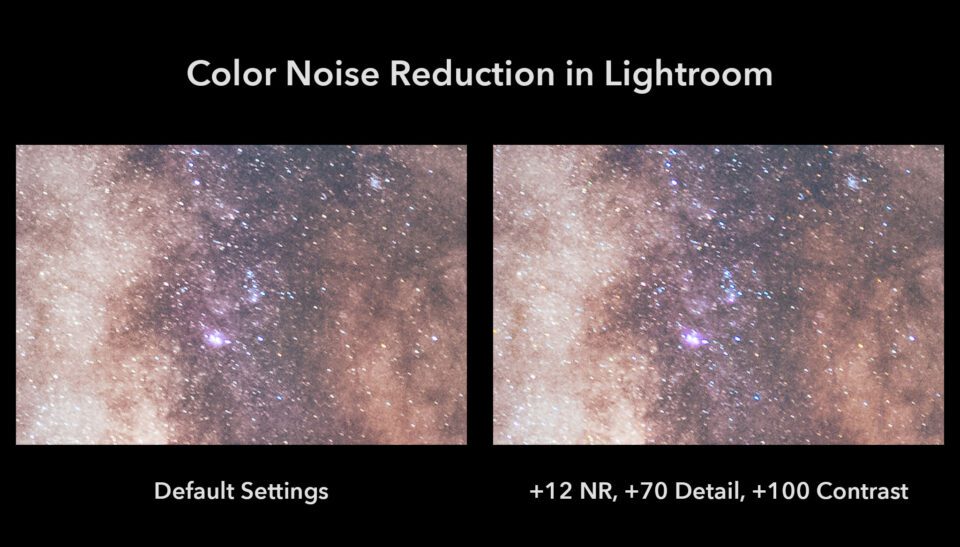
That’s what I’m after. It has much more color detail than the default settings without going overboard on color noise. (Click to see larger if the differences aren’t clear.)
You may be wondering about my sharpening and luminance noise reduction settings. Those are always a balancing act, and my settings for this photo are shown here:
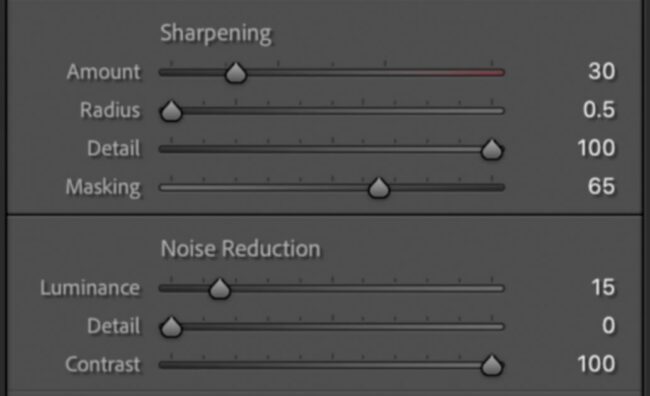
But I’m prioritizing a deconvolution sharpening algorithm (Radius of 0.5 and Detail of 100), whereas you may prefer something more aggressive. I normally don’t like to increase the Masking slider so much, but for Milky Way photography at high ISOs, it’s worth doing because of all the shot noise.
7. Use Range Masking for Local Adjustments
We’re mostly done with global adjustments at this point. It’s time to do localized adjustments on areas of the sky or foreground to make them stand out how you want.
Personally, most of the local adjustments I do are what’s known as dodging and burning – AKA, brightening and darkening certain areas in order to emphasize and de-emphasize them. But before I get into that process, I want to mention a useful tool in Lightroom called Range Masking.
Range Masking is a way to apply your local adjustments only to certain areas of the photo in Lightroom, such as bright areas, dark areas, or blue areas. It’s very useful for something like Milky Way photography. Say that I want to create a gradient of highly saturated blue in order to get rid of light pollution along the horizon. A preview of my gradient mask is shown below (with my edits affecting anything in red):
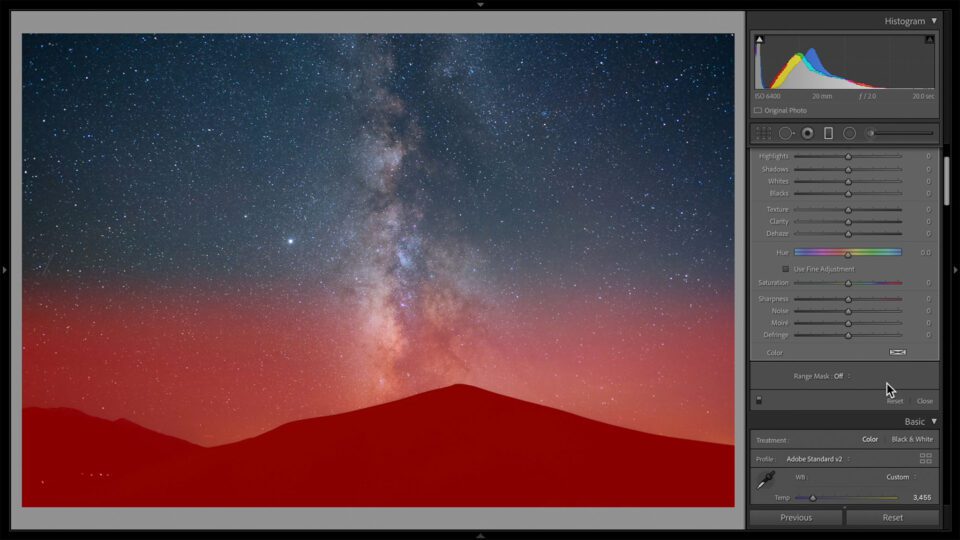
As it is, the edits I make will not only affect the light pollution but also the foreground. I don’t want to add a bunch of blue saturation to the foreground, so I can use Lightroom’s luminance range mask to exclude any dark regions from the mask. This new gradient looks much better:
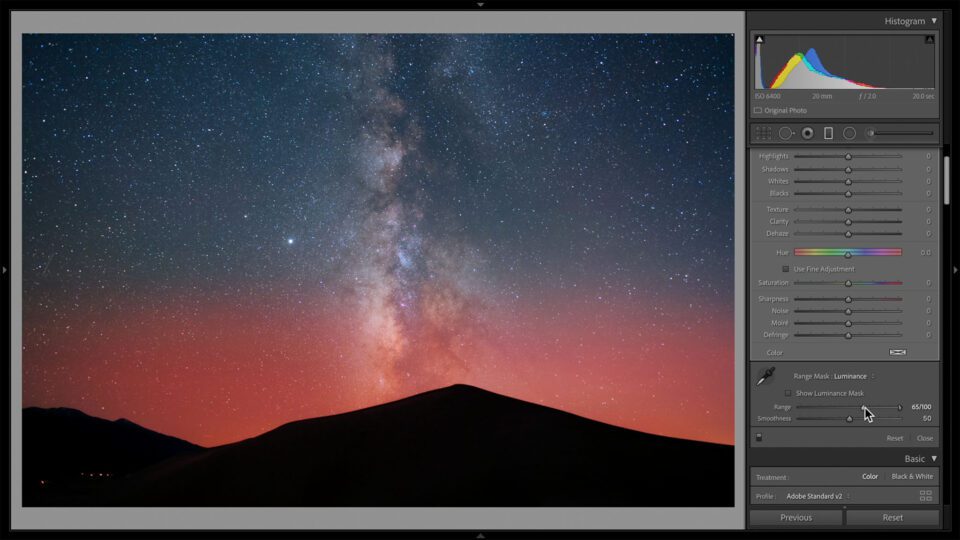
Now I can edit the colors as I wish without worrying about bleeding into the foreground. This helps avoid halos, which can be a nuisance for Milky Way photography.
If you’re wondering, Range Masking is also superior to Lightroom’s “Auto Mask” option within the brush tool, which frequently mistakes edges and adds a lot of noise. Range Masking isn’t perfect in that regard, but it’s substantially better than Auto Mask (especially if the Range Mask’s “Smoothness” value is set relatively high).
8. Make the Milky Way Pop by Editing Everything Else
At this point, you could start doing some brush or radial gradient adjustments directly on the Milky Way to boost contrast, increase the brightness, and generally make it pop. Or, you could do the opposite: Darken and de-emphasize the sky surrounding the Milky Way core for a similar result.
I usually prefer this method because the Milky Way can get too bright otherwise. But you may also want to do a combination of the two. Here’s how my radial gradient looks as I select the non-Milky Way parts of the sky:
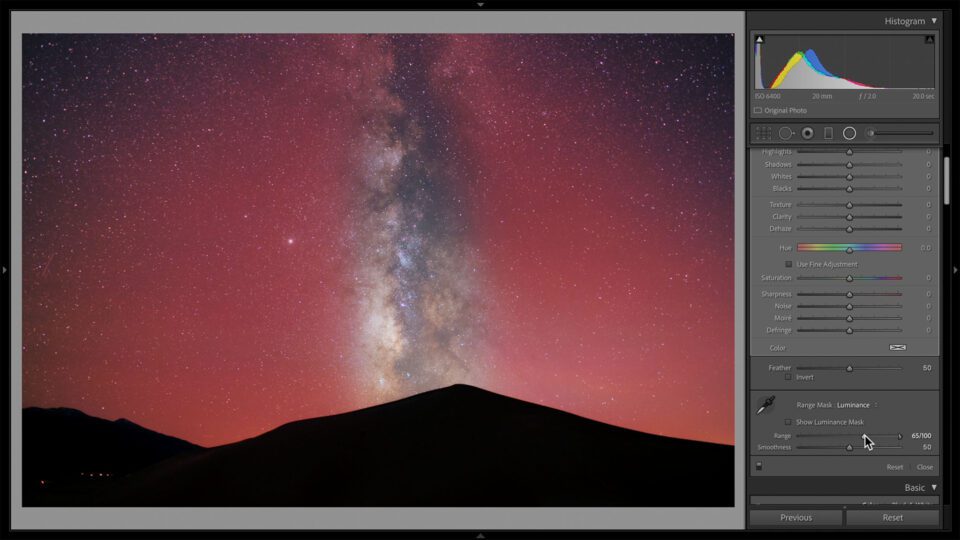
I then decreased the brightness and made a few other edits to the surrounding sky, and the result is a Milky Way that pops much more:

9. Dodge and Burn the Small Details of the Milky Way
To bring out the structure of the dust clouds in our galaxy, I like to do some dodging and burning with small brush adjustments. Here’s how my mask looks for a burn (darkening) adjustment:
Then, by decreasing exposure, increasing contrast, and increasing dehaze, I can emphasize the shape of the Milky Way:
The same can be done to areas which you want to brighten/dodge, although I didn’t need to do any in this photo.
I recommend using a very soft brush with a low flow so as not to overdo these edits. It’s easy to get a result that looks fake or crunchy by overdoing things. Local adjustments almost always benefit from a light touch.
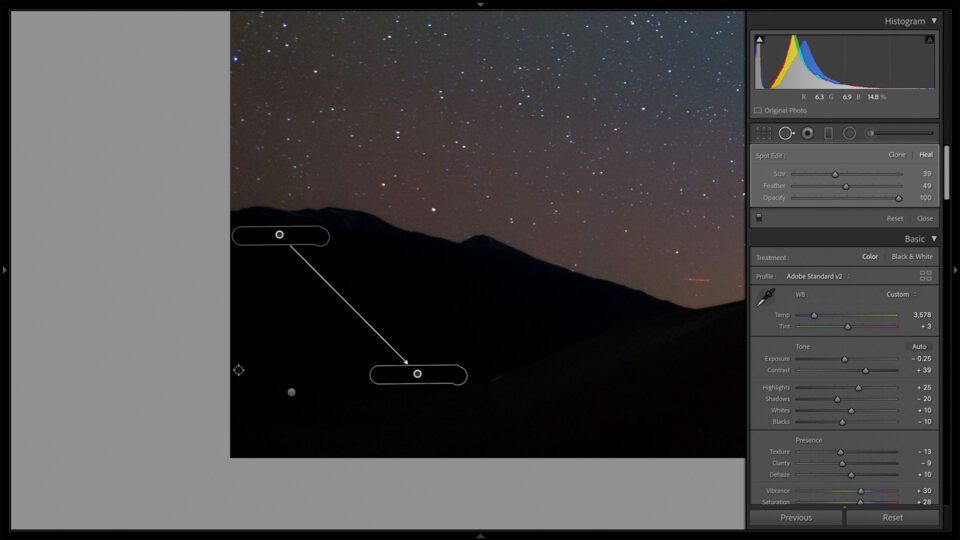
10. Spot Heal Any Small Areas That Need It
I’m not normally a fan of spot-healing details that were in front of me when I took a photo, but if it’s not something you mind, this is the right time to do it. Spot healing can slow down Lightroom quite a bit, especially if you need to do a lot of it on a particular photo. You can reduce frustration by saving it for late in the process.
In this case, let’s say that I want to get rid of those lights in the foreground, as well as some hot pixels that Lightroom missed. Lightroom’s spot healing isn’t nearly as good as Photoshop’s, but it’s perfectly fine for basic Milky Way photography needs:
11. Add Any Profiles That You Want
Lightroom’s profile browser isn’t for everyone. I’ve seen it compared to browsing Instagram filters, and not in a good way. But I confess to liking some of the profiles, especially since it’s easy to decrease their intensity as needed. I like doing this step near the end, after all other color and contrast adjustments are done. Here’s how Lightroom’s profile browser looks:
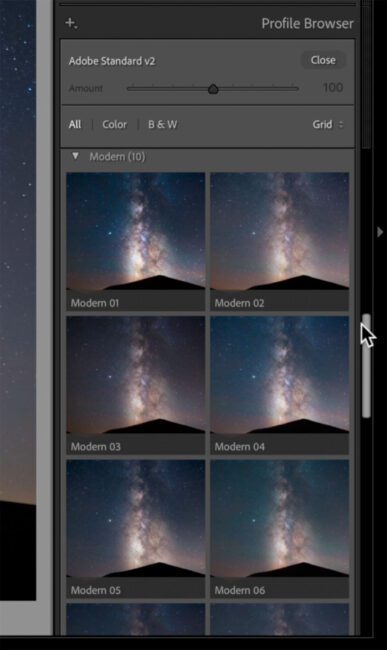
For what it’s worth, this is the reason why I told you to select “Adobe Standard” or “Adobe Standard V2” as one of the first steps in your editing process. For whatever reason, all of Adobe’s special profiles are based on Adobe Standard as a starting point. In other words, if you slide the “Amount” slider on any of the Artistic/Modern/Vintage profiles down to zero, it looks almost identical to Adobe Standard/Adobe Standard V2.
In this case, I like how the Modern 04 profile looks with the slider decreased to 35.
12. Check Your Edit By Switching the Background to Black
In Milky Way photography, it can be difficult to tell if there are strange colors in some of the darkest areas of the photo. Switching Lightroom’s background to black can make it easier to figure out.
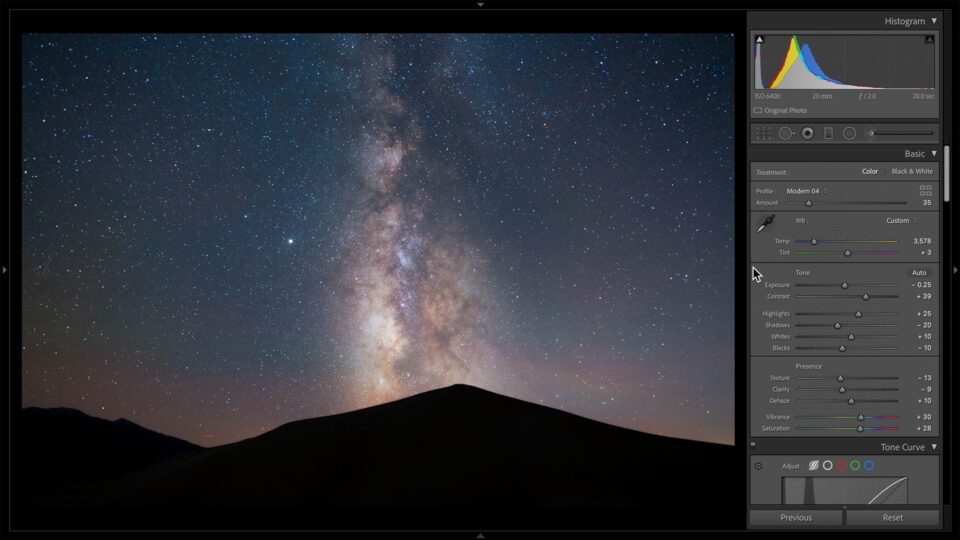
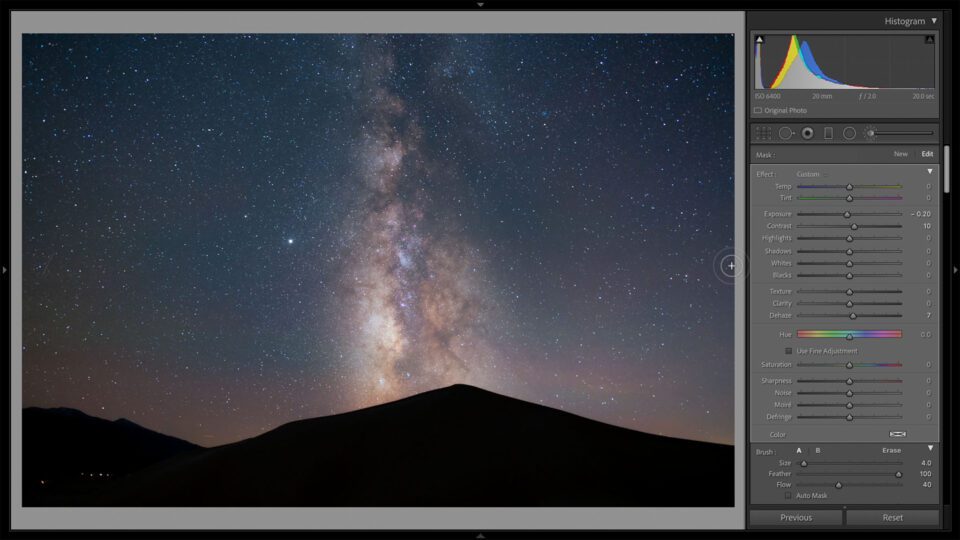
This photo has some dull colors along the edges that I didn’t notice before, so I added a couple more radial gradients to the sides of the image for minor adjustments. The final photo is shown below (click to see larger):
And here’s a before and after:
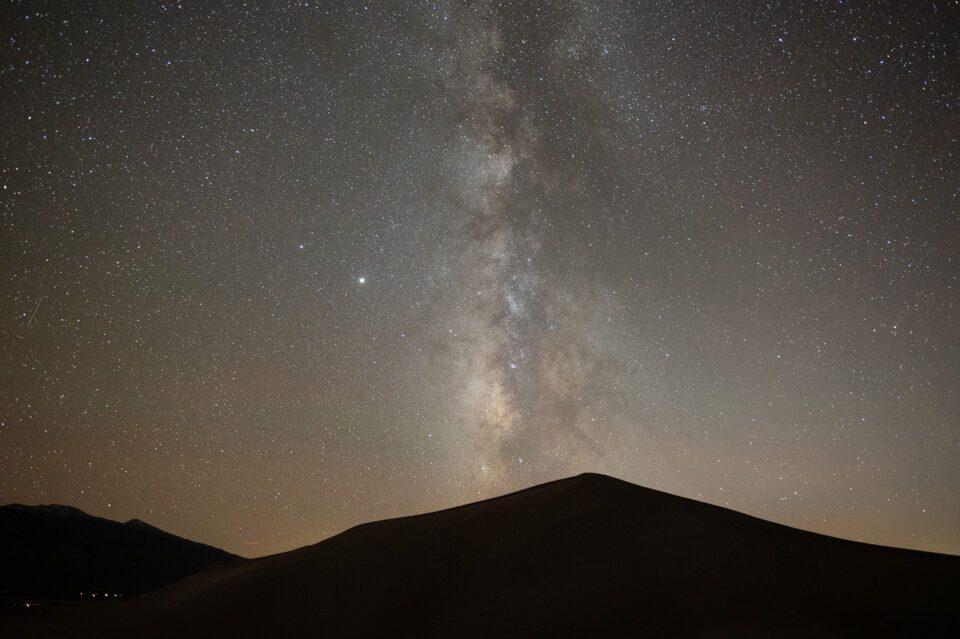
If you think it’s overdone, you can always decrease the sliders a bit. Or, if you think it’s underdone, there’s still room to boost them. The final look is up to you.
Conclusion
Milky Way photography is at its best when you put your personality into your post-processing. Sometimes, I’ll go back to a Milky Way photo years later and try out a more colorful, interpretive edit – or, just the opposite, trying to make things look more lifelike.
You can also go beyond Lightroom’s editing capabilities by using Photoshop or other software to do specific things you have in mind. Post-processing is quite a flexible field, and even the steps in this article are intended to be a jumping-off point rather than a rigid structure you have to follow. But if you were trying to figure out a straightforward process to follow that retains your image quality as much as possible, hopefully this gave you some good ideas.