I have always liked figure skating. There is something about how skaters glide, apparently effortlessly, on the ice. They show tremendous power, yet such grace. Along the same lines, I have always been interested in photography, although I had never really pursued it until a few years ago. I think the reason was that I hadn’t found a subject that compelled me to go out and start taking pictures. So, when my two daughters got into the sport a few years ago, I saw it as the perfect opportunity to pick up my camera and start taking beautiful photographs. I could already see myself taking amazing pictures of skaters in action. How hard could it be, right? Boy, was I in for a surprise.
My first attempts at figure skating photography were with my old, trusted, point-and-shoot Canon camera. I had a model that included all the most important modes (auto, aperture priority, shutter priority, and even manual). No matter how I played with settings that I didn’t really understand, all my pictures would come out dark and grey. And, most of the time, blurry. I decided the time had come to enter the world of DSLR cameras.
In this article, I will share what I have learned so far on this adventure. Although I will specifically talk about tips for figure skating photography, you will find that much of the information below also applies to indoor sports in general.
Camera Equipment Considerations for Figure Skating
Early on, I didn’t know anything about DSLRs, except that I didn’t want to carry around a camera that was too bulky. So, I immediately picked the Canon EOS Rebel SL1 (100D) when the store clerk showed it to me. I bought it with the 18-55mm f/3.5-5.6 IS STM kit lens, and I was somewhat pressured into taking advantage of “today’s special,” which was to include the 55-250mm f/4-5.6 IS STM lens for a few hundred dollars more.
Although it is true that an 18-55mm lens is not ideal for photographing skaters from the stands, here is a word of advice: When buying your first camera, unless you know exactly what you are after, go for one of the basic kits. Then, practice using it until your figure out exactly what type of subject you want to photograph. Then, go to Photography Life, and read the site from beginning to end (I’m kidding, but that’s almost what I did)! When you start to understand how photography works – what aperture, shutter speed and focal length mean – you can zero in on the gear you will really need, and thus avoid wasting money.
In my case, after a few months of not so bad, but still disappointing pictures, I decided to sell that 55-250 lens. The aperture was a big reason for my decision, since it had a maximum of f/4. Plus, it started using smaller apertures very quickly upon zooming in, way before hitting 100mm, so it was hard to freeze the action and still get enough light for decent pictures. I decided to purchase a Tamron SP 70-200mm f/2.8Di VC USD lens instead. Yes, I actually mounted that beast on a Canon SL1! The balance was a bit awkward, but the image quality was finally there.
When using such a lens – which weighs in at more than 3 pounds – you need good support. This is especially true if your camera is so small that you can’t really use it to carry some of the lens’s weight. That’s when a monopod comes in handy. I bought a used one from a friend and fitted it with a ball head.
I recommend a ball head sports photography, because when the camera is simply screwed onto the monopod, you can’t tilt the camera side to side (so as to correct for the monopod if it is at an angle). You have to make the monopod the very center of rotation and move your body around it. This is really not practical, for two main reasons: First, there isn’t always a lot of room to move around, especially when you’re taking pictures from the stands. Second, skaters move fast – like, really fast. It can be very tricky to frame pictures properly while dancing around a monopod.
I didn’t feel I had to go for an expensive ball head, since all I needed was a ball head that would provide smooth movement when loosened halfway. And I really didn’t want to shell out another few hundred dollars. The one I ended up getting cost me $45 and has been serving me perfectly since. Here’s how I use it: once I attach my lens, I loosen the ball just enough to let it move freely, while still providing a bit of friction, which in turn, provides some support. I can then rotate my body to follow the skater, and while the monopod still tilts on the side, the ball head serves as a multi-directional hinge that allows me to keep the camera level. Of course, when the monopod is tilted, it doesn’t hold as much of the weight of the lens and camera, but when the friction of the ball head is set just right, it still helps. This makes a huge difference when shooting pictures during a two-hour figure skating show.
How to Deal with Tricky Lighting Conditions
At the start of this article, I said that the pictures I took with my point and shoot camera were all dark and grey. This is because most interior ice skating rinks, especially those that haven’t been updated in many years, are not well lit at all. They seem to be bright, but it’s usually an illusion that is brought on by the fact that the ice is white.
All figure skating clubs where I’ve taken pictures do not allow the use of a flash, and with good reason. A skater could easily be blinded or disoriented by catching a flash at the start of a jump, and the consequences could be disastrous. So, you must make do with whatever light is available.
That’s no problem when you have an f/2.8 lens, right? Right, and wrong. In order to freeze action and not get a blurry subject, your shutter speed needs to be very fast. Yes, vibration compensation (image stabilizing) helps, but only for the movement of your own hands – it does nothing to decrease subject movement in a photo.
As far as aperture, shooting at f/2.8 is usually wide enough that sufficient light will hit the sensor, provided you are willing to let your camera flirt with higher ISO (1600, and sometimes 3200). But I discovered another issue with lighting. When I started editing my pictures, I saw strange and uneven lighting. On some photos, the ice would be white, while on others, the ice would get a reddish or greenish hue. Even worse, sometimes I would get both on the same picture.
The following photographs illustrate this well. The pictures are part of the same burst, so they were taken around 0.25 second apart. White balance (color temperature and tint) is the same in both pictures. Same shutter speed, aperture, and focal length:
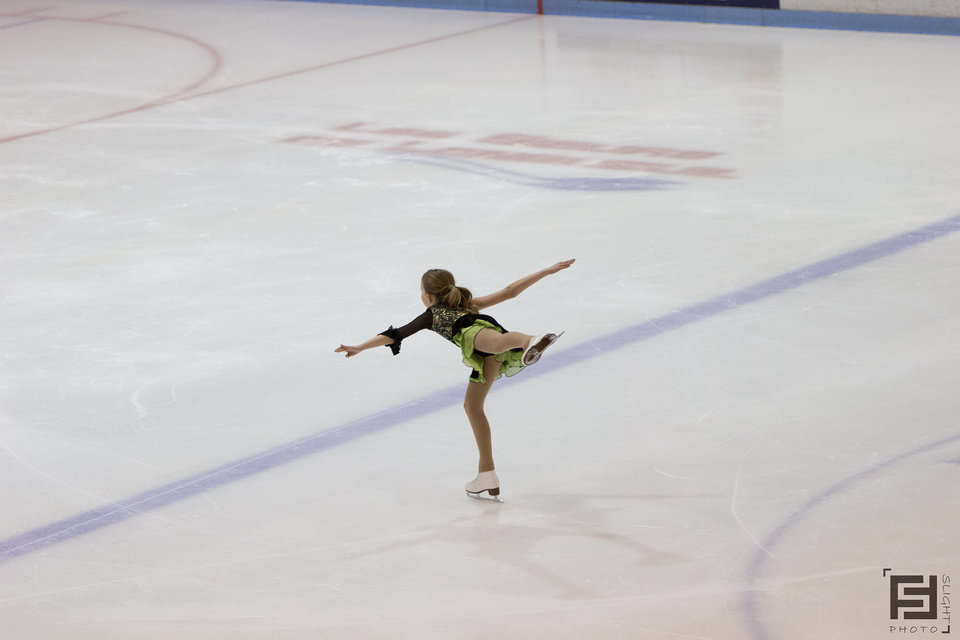
I did some research and discovered that this happens because the fluorescent and sodium lights that are used in most arenas flicker. There are numerous technical articles online that can give you all the details, but in short, they turn on and off rapidly, usually at least 50 or 60 times per second. The eye cannot see it, but when you are shooting at 1/400, the camera might catch the light as it’s either turning on or turning off.
The downside of this is that it becomes a nightmare to correctly set white balance, as almost every picture in a set will be different. The upside of the flickering lights is… well… there is no upside. Note that shooting RAW is essential here, as it allows changing the white balance when editing pictures, but it is still time-consuming. Also, some cameras have an anti-flicker mode intended to prevent this issue (more on that later), but not all do. The worst case is when only part of an image gets a strange tint, at which point there is roughly nothing that can be done to fix it. Frustrating.
Recommended Focusing and Camera Settings
I got pretty good pictures with my SL1, but after a while I became frustrated with its limitations for sports photography. First, it only offers 9 AF points, and only the center point is cross-type. It is not easy to keep a single AF point on a moving skater. Second, it doesn’t have a dedicated button for back-button focusing, even though you are able to program one. (Back-button focusing takes a bit of getting used to, but it’s a life saver when shooting a group of skaters on the ice. You can focus once, and then press and release the shutter button many times without fear of messing up the focus.) Third, the SL1 can only shoot at 4 frames per second, and it slows down to around 2.5 fps after around 7 or 8 pictures.
So, I decided it was Christmas again, and I went ahead and splurged on a Canon 7D Mark II. This camera basically bust through all the limitations that I listed above. It features 65 cross-type AF points, with the center one being dual-cross. It features a dedicated AF-ON button for back-button focusing, like most higher-end cameras. And, it can go as high as 10 fps for around 26 pictures before slowing down.
Here are the camera settings I use and recommend to photograph figure skating:
- Image type: RAW. As I wrote earlier, shooting RAW allows many adjustments to be made to photographs. My workflow consists of culling pictures with FastRawViewer (thanks to Photography Life for the nice review of that product), then using Adobe Bridge to call up Adobe Camera Raw. On pictures that show too much noise, I then use Dfine 2 from the Nik collection.
- Shooting mode: Shutter priority. You can accomplish the same thing in aperture-priority or manual mode with auto ISO, but some photographers do not find that to be as intuitive for starting out.
- Shutter speed: 1/400. You can sometimes get by with 1/320, but 1/400 will give you a higher keeper rate, as you get less motion blur.
- ISO: Auto, with a maximum ISO set to 3200, at which point noise becomes too much of an issue. I know I would probably have gotten less noise at higher ISOs if I had gone with a Nikon camera, but since my first point and shoot cameras were all Canon, I naturally went with what I already knew. Either way, it is important to set a high ISO, since it is better to have a great picture with a bit of noise than a noise-free picture where the main subject is blurred.
- White balance: Auto. This usually gives me a good base to work with, and I can fine tune white balance in post-processing.
- Autofocus: AI Servo (continuous focusing), using up-center group of focus points. Focus points can be grouped in several ways on the 7D Mark II. The arrangement I chose gives me 3 rows of 5 focus points, located in the upper portion of the center of the viewfinder. This gives me a higher chance of achieving accurate focus on the skater’s face. Using a group of focus points, rather than a single point, increases the likelihood of accurate focus on the subject. Also, like many other cameras, the 7D Mark II allows the user to personalize focus tracking parameters. Values for tracking sensitivity, acceleration and deceleration tracking, as well as AF point auto-switching, can be fine tuned as needed. The camera even offers a preset for figure skating, and, so far, I have not found a reason to change it.
There is another setting on the 7D Mark II that really increases the quality of pictures, and really simplifies post-processing. I mentioned earlier that light flickers in most arenas. To circumvent this, the 7D Mark II features a light flickering detection system, and that system works very well. When enabled, the camera detects when light flickers, and adjusts the shutter release timing so that every picture is taken when the light is at its highest intensity. This results in sets of pictures that are evenly lit, and that show virtually no white balance variance. Since the shutter needs to be synchronized with the lights, enabling light flickering detection does slow down the burst rate to around 8 fps, but that is still fast enough to get good results.
Deciding When to Take a Picture
A good figure skater will seem to glide effortlessly on the ice, but in reality, the sport demands a lot of effort and strength. And most of the time, when every muscle in the body is solicited to execute a tight spin or a jump, the brain seems to either completely forget about the face muscles, or it commands them to participate in the effort.
Consequently, if you focus mostly on photos of jumps and spins, you’ll often get spectacular pictures, but you’ll have to expect less than ideal facial expressions. I’m not saying you should not shoot pictures of those moves though, as you can still get some good ones.
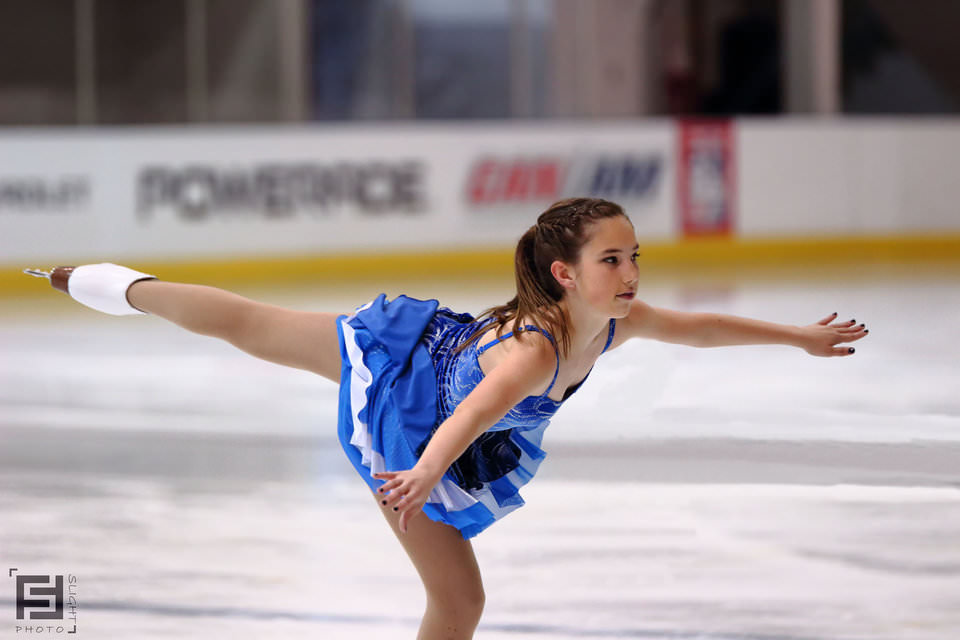
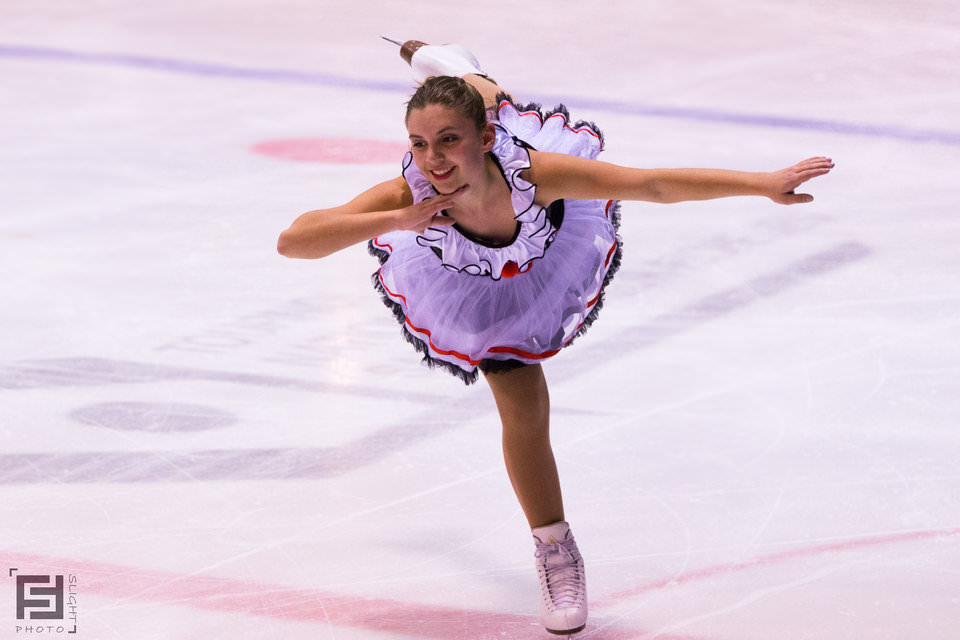
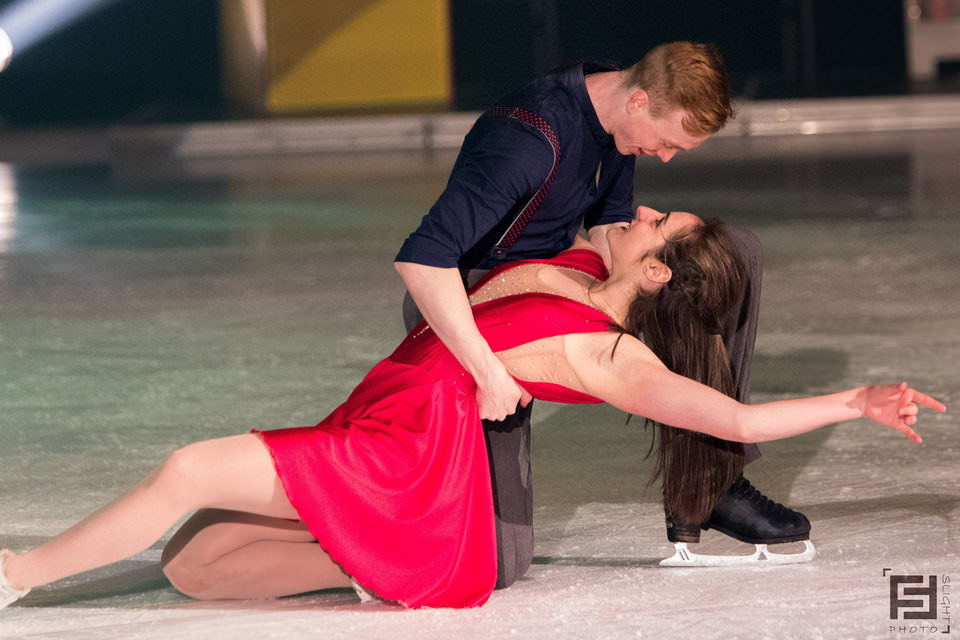
However, for me, the best pictures are obtained when the skater is doing tranquil movements, such as arabesques. This is when facial expression will be at its best, and this is also when you see more emotion show through.
Composition and Use of Light
Everyone agrees that besides bad light, bad composition is probably the most effective way to ruin a picture. However, when shooting fast-moving sports, a compromise must be made. I can’t say that I do not worry about composition, because inherently, whenever anyone takes a picture, how to frame the subject and what is included in the background is always on the photographer’s mind. But, when taking pictures inside an arena, there is not much flexibility to move around to find the best place to take pictures. Also, when tracking a fast-moving subject, you probably will not have the luxury to calmly compose an image. I find it is easier to rely on a smaller group of AF points and attempt to leave the subject under this group. This does sometimes require a bit of cropping in post-processing to adjust composition, but, with practice, you should be able to get a good photo to work with most of the time.
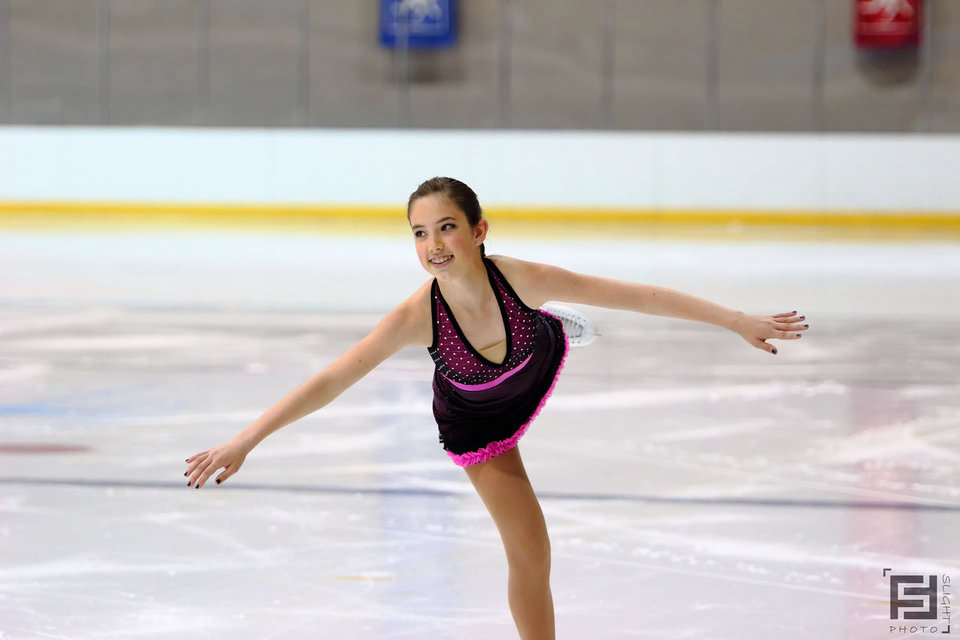
When we look at figure skating pictures on the net, we often see the same kind of pictures, where the skater is photographed in portrait orientation and centered in the picture. Don’t get me wrong – those pictures are usually taken by professional photographs, and are of very high quality, but they are not the kind of pictures I want to take. Early on, I made a conscious decision to almost always shoot in landscape orientation. Even though boards and arena walls rarely offer an attractive backdrop, this is the environment in which skaters perform, and I like to leave some of it in the picture. In many occasions, it is possible to frame pictures to have a background that is not too busy. Also, because there is not much light, I often end up shooting wide-open at f/2.8, which effectively blurs the background. On other occasions, shooting pictures from the stands, higher up, allows the picture to be framed in a way that the surrounding ice becomes the background.
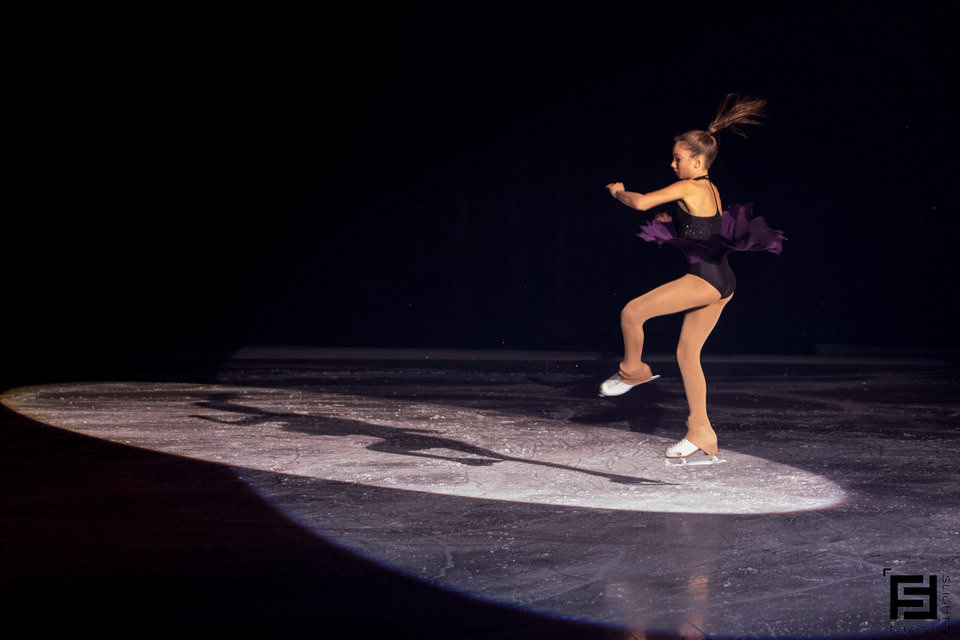
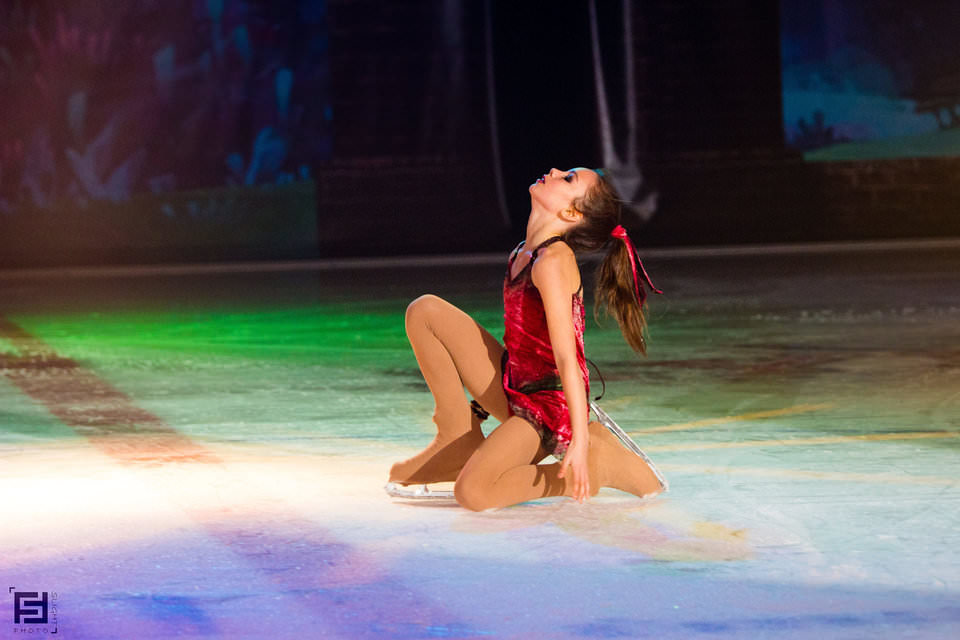
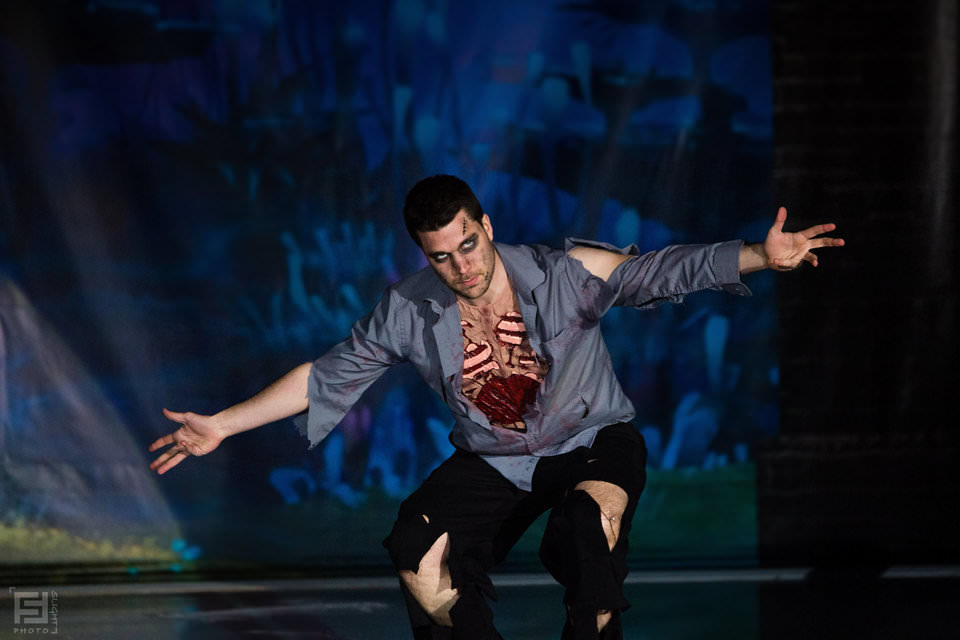
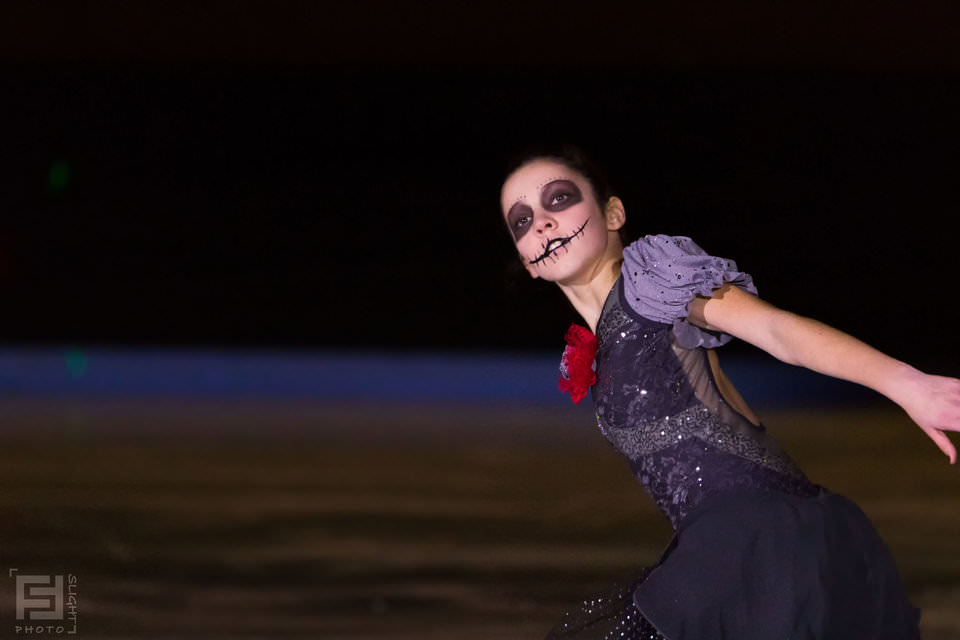
When I have the good fortune to take pictures during figure skating shows, it gets even better. I gain access to the side of the ice, the arena lights are usually turned off, and follow spots are put in use. Some numbers also feature multicolored backgrounds and ambient lights, while others feature a more muted environment, where the spotlights that follow the skaters provide rich contrast with the almost black backgrounds.

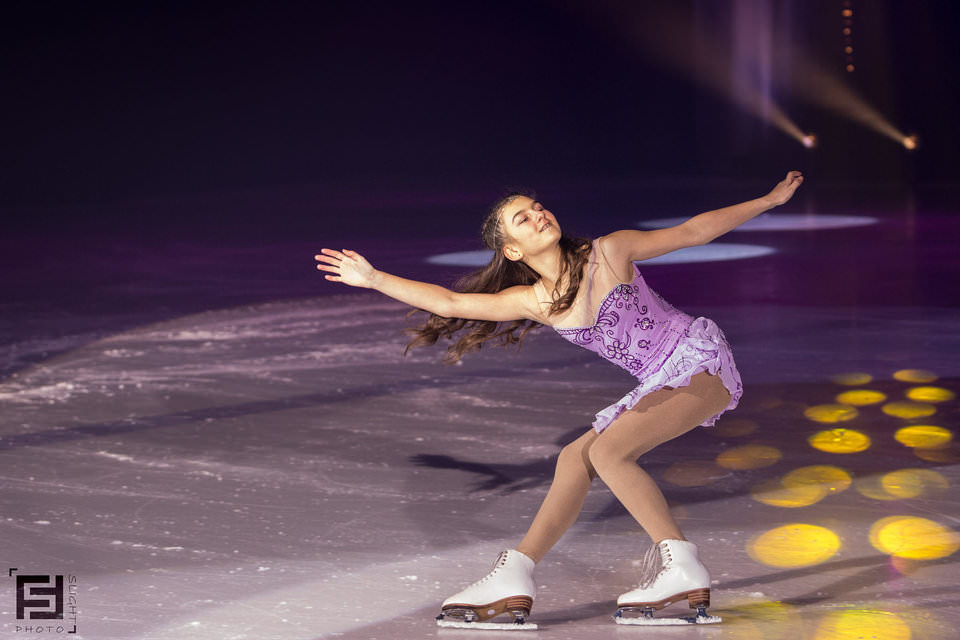
Finally, I find that leaving some negative space in a photograph makes it more interesting. For example, framing the skater a bit off-centre, and leaving space in front of her, gives an impression of movement. Negative space also makes it easier to isolate your subject and better transmit the emotion of the moment to the viewer.
How to Capture Emotion
In the end, for me, it’s all about emotion.
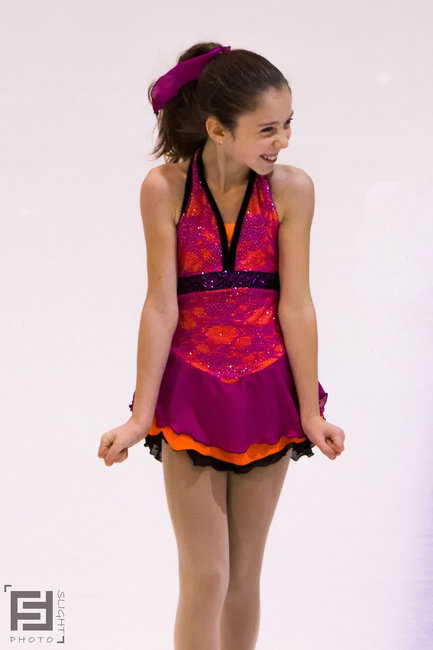
I said at the beginning of this article that when I started in photography, I hadn’t yet found something that compelled me to go out and start taking pictures. Well, through all my experiences so far, I have finally found it. I like to photograph people, and, more importantly, emotion. The pictures I like the most, both within and outside of figure skating, are those of people just doing what they do, without having them pose for the camera. These are the pictures where expressions and emotions are at their truest. Some emotions can be subtle, and others, intense.
I think the best way to illustrate my point is the following picture, and the short story behind it. This picture represents what I hope to get every time I pick up my camera. Of all the photographs I have taken so far, this one is by far one of my favorites. The young skater was about to step off the ice, and I was following her in my viewfinder, hoping to get one last picture. It was at the end of a test session, in which she had evidently performed up to her expectations. Just before exiting the ice, she took a quick side look at her coach, and her joy just burst out. This is what I want to get in all the pictures I take: pure emotion.
I hope that this tutorial has provided you with some useful tips for photographing figure skating, and has inspired you to take some photos like this for yourself.
Please note that, since some of the skaters here are minors, I obtained permission from their parents to use the photographs in this article.
Thank you to reader Frederic Slight for contributing this guest post! You can see more of his images on his Flickr page.