
In addition to being wedding photographers, my wife Anna and I are also keen divers (at least as long as the water is warm and clear!), so quite naturally, we’ve been eager to experiment with underwater photos for quite some time.
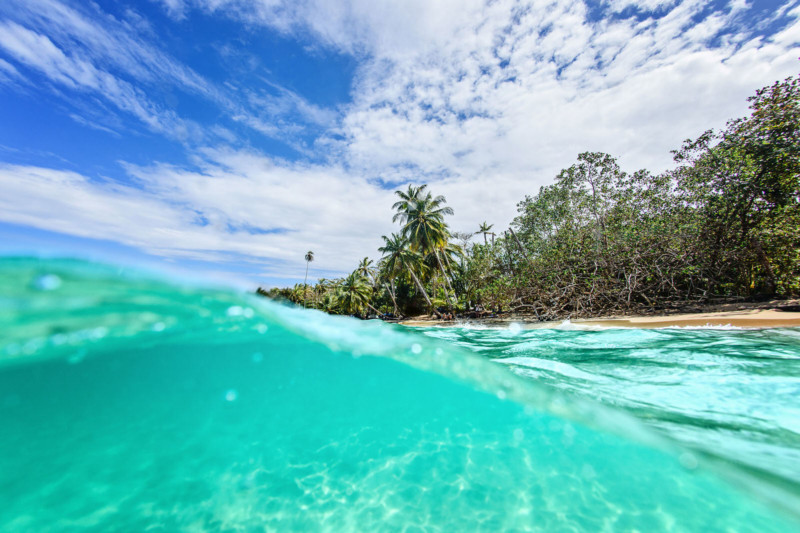
As well as photographing marine life, we were particularly interested in capturing people underwater and doing under/over shots, where part of the frame is above water while the rest is an underwater scene.
We read through countless websites, forum posts, and books, but regardless of how keen we were, we couldn’t quite commit to the cost of buying a full underwater photography rig. After a couple of years of experimenting and trying various alternatives, we eventually caved in and now feel as though we are finally making good progress with the quality of our underwater photos. To celebrate our recent advances, we thought we would write a short post to share with you some of the things we learned when testing out various methods, and hopefully you’ll find these hints and tips useful if you take on the challenge of planning your own underwater shoot.
Equipment
Most people interested in underwater photography usually start with: a GoPro, a mobile phone in a plastic pouch or a compact underwater camera. It was no different in our case. We first tried underwater photography/video using a GoPro when snorkeling on our honeymoon and while a GoPro is an impressively capable camera for what it is, it also has some serious limitations so soon we started looking for something else.
The next step for us was a plastic bag type of housing (Ewa Marine) for the Sony A7RII. As we were planning to use it no more than a meter or so underwater, we thought it would work just fine… well, it didn’t. We had two main issues with it: the first was that the handling was dreadful – just pressing the shutter release button was a challenge let alone adjusting anything or reviewing the photos, and the second was with the size of the port (lens opening) – we used a 28mm lens, and with a flat port, the field of view was substantially smaller than expected. As a result, we sold the bag after just a couple of uses.
Finally, towards the end of 2017, we took the plunge and bought a proper underwater housing. We opted for an Ikelite housing – one of the cheapest options amongst professional underwater housings, although ‘cheap’ is very subjective in this context. The main reason why Ikelite housings are cheaper is due to the fact that they are made from plastic rather than aluminum and tend to be a bit more bulky, neither of which posed any issue for us.
Buying a ‘proper’ housing is quite a big commitment. They are expensive, often similar in price to the camera they are designed for and every camera model requires a different, dedicated housing. We have a couple of different cameras, but we decided to get a housing for our Nikon D850 as it’s the most future-proof.
To use a housing, you must also buy a lens port. These come in various sizes to accommodate different lenses and in two different types: flat port (used for macro), and dome port (used for wide angle). Water decreases the angle of view of the lens by approximately 25-30%, e.g. 24mm lens becomes roughly 30-35mm. Dome ports are used to reduce or remove this effect entirely. As we wanted to do over/under shots and photograph people underwater, we opted for a dome port.
Our full setup for the first shoot included the following:
1. Nikon D850
2. Nikon 16mm Fisheye lens
3. Ikelite housing with a tray and handle
4. Ikelite 8-inch dome port
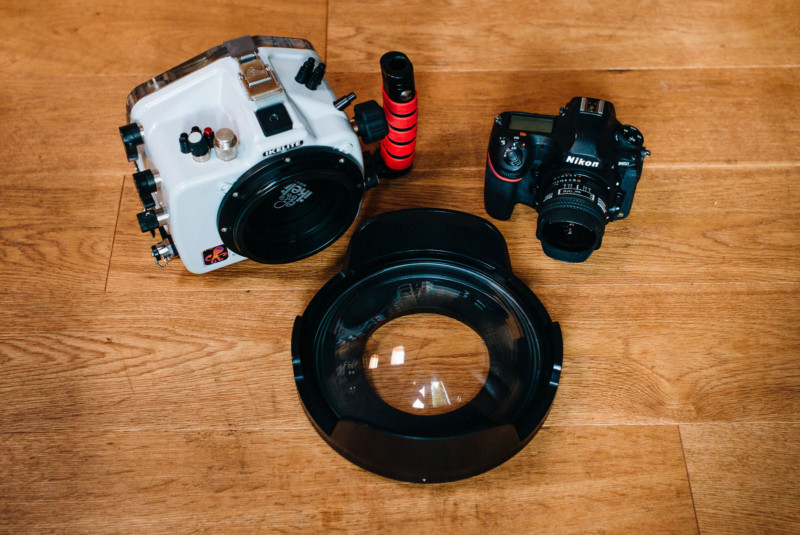

As far as underwater rigs go, this was quite a simple setup. We decided to use just natural light to start with so we didn’t have to worry about underwater strobes and arms to mount them.
We used a fisheye lens, as it’s often recommended for wide-angle underwater photography due to the fact that it performs well with a dome port and has a huge depth of field (very helpful for under/over shots). Although it worked alright (after correcting distortions in Lightroom), it also forced us to put the subject in the center of the frame to avoid distortion. For our next shoot, we’re planning to use a 28mm rectilinear lens.
Using the dome port not only allows you to capture a much wider scene but it also makes under/over shots possible. The bigger the dome, the easier these photos are. In fact getting an under/over shot is relatively easy, getting one which is technically correct and interesting, is far more difficult.
Planning the shoot
Photographing people underwater requires a fair bit of planning, so we have put together a list of things you need to consider when planning such a shoot. These will also be applicable if you want to photograph marine life using natural light.
Water clarity: Calm salt water tends to have the most clarity, while fresh water is often the least clear. Swimming pools can appear clear, but often contain chemicals invisible to the eye, that negatively affect the photos.
Waves: Ideally you want the surface to be as calm as possible which is especially true for under/over shots. Bear in mind that the surface of the water can appear quite calm from the shore, but can actually be quite rough once you get in the water, and even more so when looking through a viewfinder.
Sea floor: It helps to start in the shallows even if you are a confident swimmer or diver as wielding a bulky and heavy housing makes everything more difficult. You and your models should be able to stand if needed. A sandy sea floor reflects sunlight better but there will be more silt in the water. A rocky bottom should give you clearer water but it will reflect less light and it’s likely to be more difficult or even dangerous to stand on.
Currents: Best to avoid them. Make sure you find out in advance if and where you can expect currents. Rip currents especially can be dangerous as they can occur close to shore and can be very strong.
Dangerous marine life: Find out if there is any dangerous marine life you should be aware of such as jellyfish or scorpion fish. Sea urchins although not dangerous are rather unpleasant if stepped on so be careful.
Don’t harm or stress marine life: If there is any marine life in the shallows, make sure you are not disturbing it in any way. If in doubt, just move to different location.
Time of day: If you are using only natural light, try to shoot around noon. The sunlight penetrates water deeper at noon, so you will get more light, especially if your subject is fully submerged. This is somewhat less important for over/under shots.
Location in relation to the sun: Consider where the sun is going to be during your shoot. For over/under shots, you want the sun to illuminate the subject rather than backlight it, but you also have to think about what you will then get in the background e.g. the land instead of open water.
Study your equipment: Although a good housing should allow you to use all functions of the camera, you should check if there are any settings you won’t be able to change. Also, many controls may be placed differently on the housing and are usually not labeled, so make sure you know what each lever or button does.
Preparing equipment for the shoot
Underwater photography is inherently heavily equipment focused and involves several challenges you don’t have to think about when shooting topside. These are a few things that you will need to check and prepare in advance of your underwater shoot.
Assemble the housing, port, and camera without haste in a well-lit and clean place. Any mistakes may end up being very expensive. The housing manufacturers’ warranty won’t cover a flooding of the housing, and most insurance policies won’t cover it either. You need a specialist insurance for using your gear underwater. For safety, I would recommend you assemble everything at home/hotel room/ship cabin rather than on the beach, in a car or on a small boat.
Make sure you check the O-rings for damage and debris, lubricate them (use correct lubricant!) and remove any excess. It’s there to help you seal the housing but it’s not supposed to be a sealant in itself.
Clean the port, especially on the inside, before you put the camera in and close the housing.
Make sure the camera has a memory card, charged battery and lens cap removed.
Put some desiccant sachets in the housing to minimize fogging. Make sure it’s not pinched when you close the housing or loose so it could move and block camera controls.
Once you close the housing, check EVERYTHING. Make sure you can operate everything you need and that you can take a clear photo. Don’t wait until you get in the water to test it.
If your housing has a vacuum valve, buy a pump with gauge and test the housing for any leaks. It can take few hours to detect a small leak so if possible, leave it connected overnight.
Keep your equipment away from direct sunlight and protect the port from anything that may scratch it, until you get in the water.
Settings
Aperture: As focusing can be a bit tricky when shooting underwater, smaller settings such as f8 will help with slightly missed focus. For over/under shots a small aperture is essential as the underwater subject/scene very often will be MUCH closer than the topside subject/scene.
Shutter speed: Around 1/400s or faster as it will be difficult for you and your subject to stay still, even if that’s your aim.
ISO: As low as possible as you will probably have to edit the images quite a bit so you will want to preserve as much of the quality as you can.
Autofocus: Set it to continuous/servo mode as there is likely to be a fair bit of movement.
Burst mode: You will have to overshoot quite a bit to ensure you get some useful shots.
White balance: Auto, your preferred custom setting or whatever matches the shooting conditions best.
Shoot in RAW: I know some of you may strive to get the shot perfect in camera but underwater photos require a fair bit of editing to get the most out of them.
During the shoot
Although good preparation will definitely help, don’t underestimate how much more difficult shooting underwater is (even if it’s just under the surface) in comparison to shooting topside. Below are a few tips you may find useful:
Framing the shot: Looking through your mask AND into a viewfinder/screen when the camera is in a housing is difficult. If your camera has good live view it helps a lot but be careful as it may sacrifice focusing speed, accuracy and burst speed.
Keep the port clear of droplets (over/under photos): It will be rather impossible to keep it dry, so quickly dunk it before the shot.
Buoyancy: Both you and your model are likely to be more buoyant than you wish. Using some diving weights may help you to go down and/or stay down, just make sure you do it safely. The model will have to exhale to sink. Otherwise, the air in their lungs will keep raising them to the surface.
Watch air bubbles: Even after exhaling, there will be still some air left, so you should watch out for air bubbles coming out of the nose as they may ruin the shot.
Relax: It goes without saying that both, you and your model, should feel very confident and relaxed in water. Any tension or stress will make the shoot much more visible and it will show in photos.
Watch facial expressions: Natural face expressions are much more difficult under water. Again, remember to exhale (don’t do hamster cheeks), relax and shoot A LOT.
Take your time: Don’t rush, as that’s when mistakes happen. When shooting underwater theses mistakes may end up being very expensive or dangerous so just chill and take your time. Treat the first few shoots as practice and experiment. Don’t worry if you only end up with one or two usable photos to start off with.
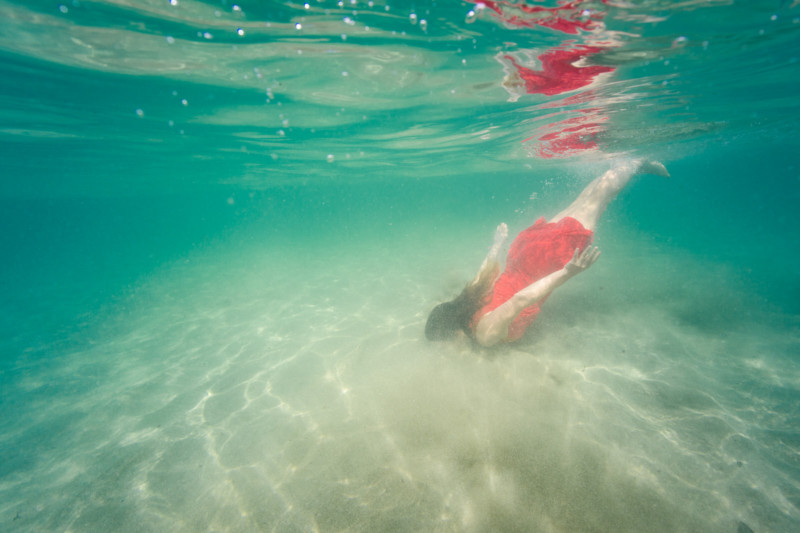
Mind your surroundings: As the photo below shows. If your model is diving, make sure they are not going to hit the seabed or bottom of the swimming pool as Anna did here. This is even more important if you are shooting somewhere with a lot of rocks or coral.

Safety measures: Underwater photography can be dangerous so make sure you put some safety measures in place. Prep well for the location where you will be shooting (currents, dangerous marine life etc.), start with shooting in the shallows until you become more confident and used to handling your camera underwater. Have a safety diver with you if necessary.
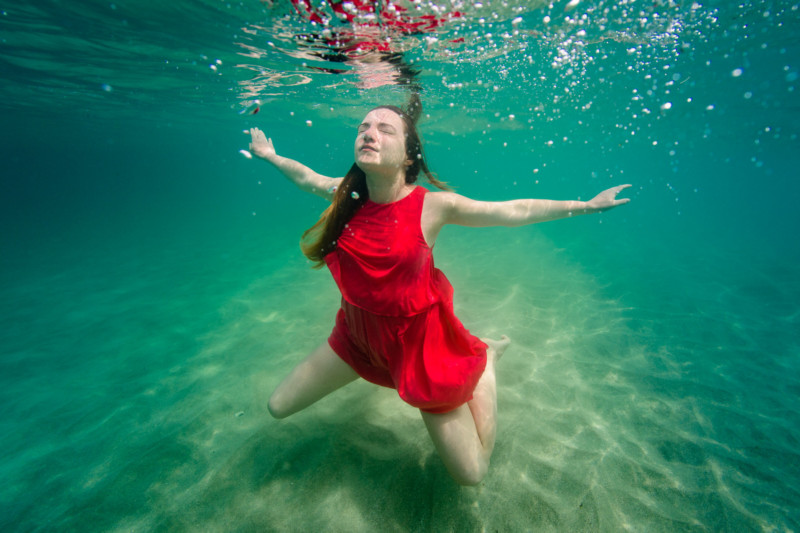
Choice of clothing: If you are photographing a model underwater, make sure the clothes they are wearing work well in such environment and ‘flow’ nicely. The clothes should be lightweight and not restrict movement so they don’t weigh the model down, which can be extremely dangerous.
Have plenty of drinking water: While shooting underwater is a lot of fun, it is also hard work, so make sure you’ve got plenty of water and some snacks. If you are shooting outdoors, don’t underestimate the sun, as you probably won’t feel it much when shooting and can end up with some nasty burns.
How it went/what we’ve learned
So, after a lot of reading up on underwater photography and a few not very successful attempts, how did it go when we finally did it properly with all the equipment?
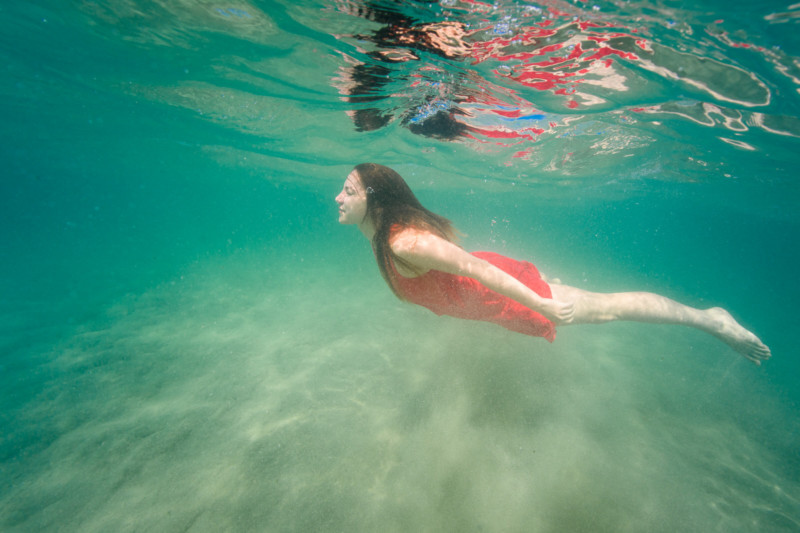
We did two shoots: one where I photographed Anna who acted as the model, and another with a couple who were up for taking part in our experiment. We shot around 700 photos in total and culled this number down to around 30 images with potential. Out of 30, less than 10 were actually usable and you can see the best ones below.
Shooting underwater or doing under/over shots is very difficult even for an experienced topside photographer. It requires a lot of planning, practice and some luck, but it’s extremely rewarding when it goes well. We’ve got another practice shoot lined up really soon (this time in a swimming pool) and a couple more planned for the coming months so you will soon start seeing more of those photos in our portfolio.
We hope you found this helpful and can make some use of these tips when experimenting with your own underwater shots.


About the author: Andy and Anna Zofka are a husband-and-wife wedding photography team based in the Cambridge area. The opinions expressed in this article are solely those of the author. You can find more of the couple’s work and writing on their website, Instagram, and Facebook. This article was also published here.