A while back I covered eight common photography myths and dispelled them. Now I have found a few more I wanted to bust so you can get straight answers on these important issues.
#1 – Use f/8 for sharp images
You may have heard about finding the “sweet spot” for your lens to get the sharpest images possible. Or you may also have heard the phrase “f/8 and be there”. But will f/8 make your images sharp all the time in all situations? NO!
Yes, there is a such thing as a sweet spot for every lens. It’s the aperture that overall produces the sharpest images for that lens. Usually, that is about 2-3 stops down from wide open. So what does that mean in reality? How do you use it?

If you have a 100mm f/2 lens, for example, the largest possible aperture you can use is f/2. So the sharpest overall will be 2-3 stops down from that or f/5.6-f/8. Aha! We hit that magic f/8 mark again. So in this example if you want a really sharp image, AND f/8 gives you enough depth of field, AND you have enough light to shoot at f/8 without getting a slow shutter speed OR cranking up the ISO – then go ahead and shoot at f/8.
When NOT to follow this rule
But if the lighting is dim, a better choice is to use a large aperture. Shooting wide open in low lighting conditions will help you keep the ISO lower and the shutter speed fast enough to combat camera shake when handholding.
OR you need more or less depth of field then f/8 isn’t going to be your best option. For doing landscape and macro photography, you may need an even smaller aperture like f/11 or f/ 16. In portrait photography, you want a large aperture like f/4 (or even larger like f/2.8 or 1.8) to help you blur the background more.
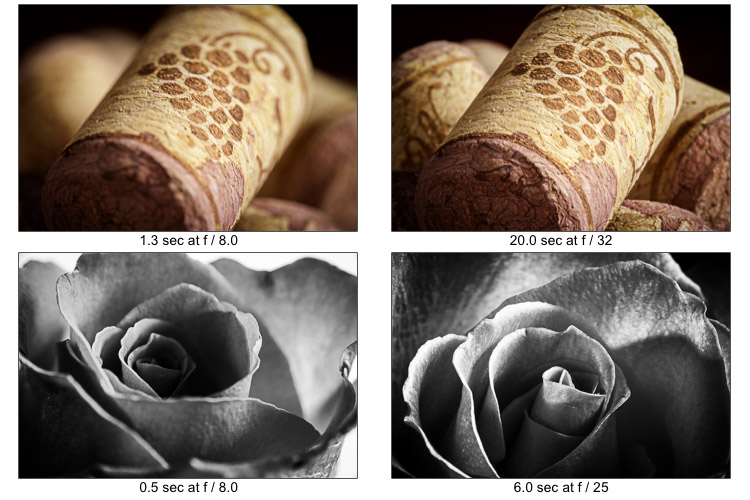
In all honesty, the f/8 rule isn’t one I follow or recommend you do either. Instead, consciously choose all your camera settings and pick the best options for the given shooting situation.
#2 – Cover your viewfinder to avoid light leaks
This myth suggests that the eyepiece or viewfinder will let light enter the camera during long exposures and create problems in your images. Things like light leaks, streaks, or simply overexposure are things that “they” say will happen if you don’t cover the viewfinder.
While some cameras have a little switch you can flip to activate an internal cover – if you don’t have that it’s not all that easy to do. Personally, I’ve never bothered and I shoot a lot of night photography and long exposures and I have never had any issues with any of the cameras I’ve used.

If you have an entry-level camera, or have dropped yours and have some dings in the body, then you may have light leaks. But those are also not likely related to the viewfinder.
What I suggest is that you do a test and see if you have a problem with your camera. Set the camera up on a tripod (nighttime is best for a slow shutter speed). Then shine a flashlight directly into the eyepiece during the exposure. If you get a light leak then you need to cover the eyepiece when shooting in those situations.
But really, how often are you going to be aiming your light source into the back of the camera? So I find this one is usually a non-issue.
#3 – Use TIFs not JPGs
Another common myth you may have heard is that you should save your images at TIFs instead of JPGs because the image quality is better. Well, that’s debatable. Yes, there are some situations where a TIF is a good choice but saving as a finished image is NOT one of them.
While it is true that TIFs are 16-bit files and JPGs are only 8-bit, but that’s not the only factor you need to consider when saving your images
TIFs are better when:
- You are opening a raw file in a Lightroom or Photoshop plugin to do some edits. Use a TIF (or open the raw file directly) instead of sending a JPG to the plugin.
- You need to save layers, but then I would recommend the PSD format over TIF in that case.
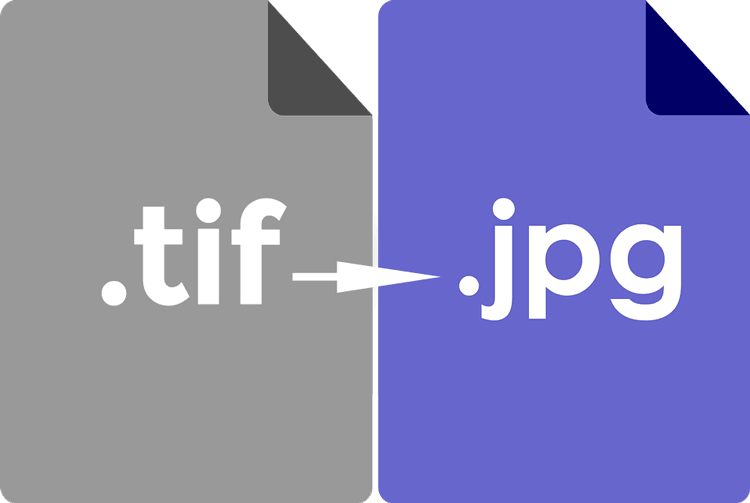
JPGs are better for:
- Saving images for posting online or sending by email. TIFs are too big and are not always readable by other programs like web browsers and email software.
- Sending to your lab for printing. Again TIFs are really large files and most labs do not want you to send them because they fill up their server and also take too long to upload.
- Saving your final edited version for various purposes.
The main myth about saving finished images as JPGs suggests that if you save over a JPG or open it too many times the image will be degraded. That is partly true and partly false.
First, if it’s your final version you don’t be editing it later, you just save it and use it where you need to use it. Upload it online or send it to your printer, or email to a friend.
Secondly, you’d have to open and close the JPG several 1000 times before it would start to degrade the file to the point where it would be visible in the image. If that were ever to occur, just go back to your working file (your raw file in Lightroom or a working PSD file) and save a new JPG. Simple, problem solved.
So no, you don’t need TIFs for everything. I only use them when working with plugins, that’s it.
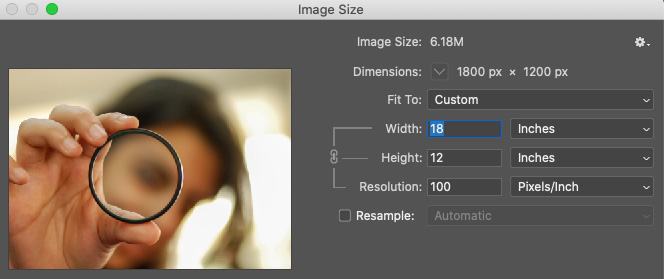
#4 – Save online images at 300 DPI
This is something that causes a lot of confusion and misconceptions. DPI stands for dots per inch but it only applies when you are printing your images (literally in terms of how many dots of ink or sprayed per inch on the paper).
When saving images for sharing online all that matters is the actual pixel size. Web browsers, email software, and social media sites all display the images at the pixel size, so the DPI is totally irrelevant. Let me do an example for you.
If you save an image at 300 DPI and it’s 4×6″, the actual pixel size is 1200×1800 (or 4×300 by 6×300). If you take that SAME image and save it at 100 DPI in 4×6″ it will only be 400×600 (4×100 by 6×100).
If you have an image that is 2000×3000 pixels no matter what DPI you save it at, the pixel size will still be the same. The only thing that changes is the PRINT size.

- 1200×1800 pixels at 300 DPI is 1200x1800px (it will print as 4×6″)
- 1200×1800 pixels at 200 DPI is still 1200x1800px (but it will print as 6×9″)
- 1200×1800 pixels at 100 DPI is still 1200x1800px(but it will print as 12×18″)
Read more on this topic here: How to Resize Photos for Facebook, Email and Social Media.
NOTE: If you are sending files to a lab to be printed, you need to know what DPI they print at to correctly size your images.
#5 – Shoot only when the light is good
The suggestion that you should only go out and shoot when the light is good is not only subjective but could cause you to miss some opportunities.
First of all, what exactly is good light? As I said, that is subjective. It’s all about what you want to create, the mode you want for your image, and the subject matter. There is an appropriate time to use harsh light as well as soft light. Knowing when to use each is the key to making good images.
Read more about that topic here: What is Quality of Light and How to Use it to Take Better Photos.
Secondly, you could be missing out on some great shots by not even heading out the door if the light isn’t perfect or as you wanted. Stormy weather, dramatic clouds, fog, rain, and even snow can all make sure stunning dramatic images.
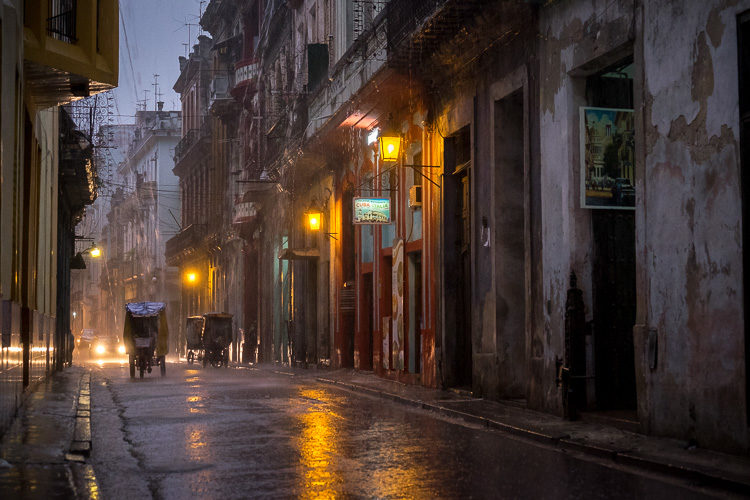
This is when the amateurs and beginners head inside and the pros are just getting started. Sometimes in order to get good shots you have to be willing to get a little bit uncomfortable. That includes standing in the rain, going out at midnight, or getting up five mornings in a row at dawn to get the shot.
Read more here: In Order to Create Great Photos You May Need to Get Uncomfortable.
#6 – UV filters are useless
I’ve had many debates and discussions about whether or not UV filters provide any value to photographers. I am on the YES side and am all for putting UV filters on your lenses. I have one on every single lens I own. Let’s look at the pros and cons of this.
PROS
- Protect the front of your lens from dust, fingerprints, and skin oils.
- Protest your lens from impact. The filter will break before the front lens element if you happen to drop the lens or bang it into something.
- Aren’t super expensive in the grand scheme of things.
- Do NOT change or affect the image quality.
NOTE: The last point above is the major bone of contention for people on the NO side. They believe that UV filters affect image quality and that they degrade the image. The argument is that you are putting a less expensive, lower-quality piece of glass in front of your more expensive lens. But unless you shoot all your images at f/22 you will not see any flaws in the filter ever show up in your photos. I also recommend not buying the cheapest filters you can find. Get a good brand whose filters are clean and clear with a good quality coating.
CONS
- A small added expense (but less than replacing a broken lens)
- Can cause reflections of lights shooting at night.
- Can cause edge vignetting on wide-angle lenses or if filters are stacked.
For me, the pros far outweigh the cons. If or when the last two items above occur, just take the filter off or buy a slim mount filter (low profile) for wide lenses. As for the cost of the filter itself, I can personally attest it is well worth it! Remember don’t get the cheapest ones, but $50-100 for protection is a good investment in my opinion.
Make sure you check the filter size of your lens and buy the correct one! Look inside the back of your lens cap to find the size in mm. Check out my list of recommended brands here.
I once had a lens fall onto a concrete surface. It fell out of an open compartment when I picked up my bag – BIG OOPS! The entire thing happened in slow motion as we watched it fall and land. Do you know what I mean? Like time slows down. A photographer’s nightmare come true.

I heard glass break and saw bits of it on the ground. But I was relieved to find out that it was just the filter that had absorbed 100% of the impact and the lens was totally unscathed! Considering it was a Canon 24-70mm f/2.8 lens which is worth about $1900 USD, the $60 filter was a no-brainer!
NOTE: If you have kit lenses that are relatively inexpensive (worth less than about $300) then it may not be worth it to put UV filters on them. But any lens over that value, do consider protecting them with one.
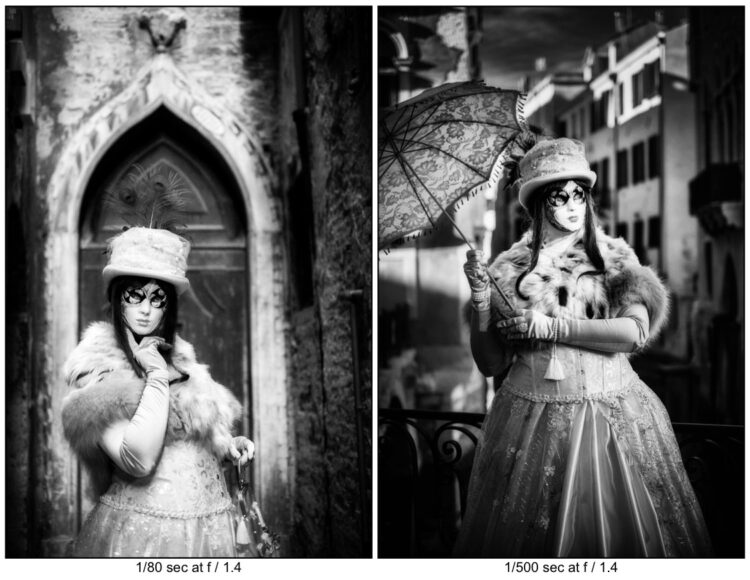
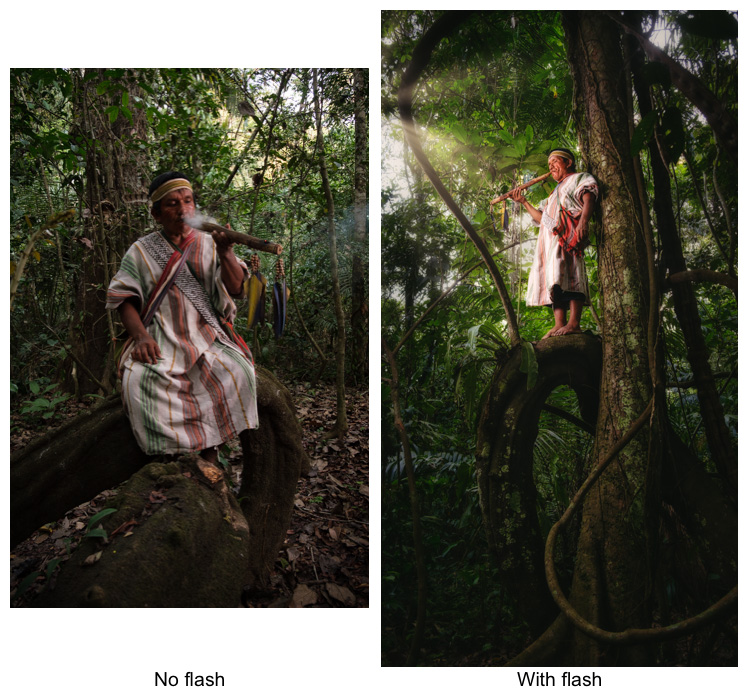
#7 – Natural light is better than flash
This myth is easy to debunk. I’ve already mentioned that there is no such thing as good or bad light – only the most appropriate. But some photographers insist that natural light looks better and is better than using flash. Hmmm?

One is not better than the other, they are just different. There are pros and cons to using both natural light and flash.
So whenever I hear someone say natural light is better than flash I get suspicious. Often the issue is that the photographer doesn’t really know how to use flash or is afraid of it. So it’s like they are using the statement as a justification for their lack of knowledge or to convince themselves.
So don’t be that kind of photographer! Flash may be intimidating or seem hard at first but there are many advantages to know how to use it and when to apply it. Sometimes you can create images that wouldn’t have been possible with available or natural light only.
Examples

The image above left was blurry due to low light and a slow shutter speed because the dancer was jumping and moving. So flash was used to make the image on the right. I altered the balance of ambient to flash to darken the background the flash froze the dancer.

Read the following articles for tips on how to get started using flash:
More advanced flash tutorials:
Even more learning
Light It Up!, an ebook by flash expert, Piet Van den Eynde. A failsafe 10-step approach on how to successfully work with off-camera flash, even with multiple lights. At its core, it’s even simpler than that.

#8 – You don’t need to turn off IS/VR on a tripod
If you listen to manufacturers then you don’t need to turn off your image stabilization when you mount your camera on a tripod. But, if you are like me and don’t trust them – turn it off anyway!

The stabilization in your lens (or camera body if that’s how yours works) is like a little gyroscope. It vibrates to try to counteract any camera shake you might get when handholding the camera. It’s supposed to magically determine when you are using a tripod and turn itself off.
But like many things which are automatic on the camera – it can get it wrong sometimes. I’d just rather not take the chance so I turn off the IS on the lens anyway.
Just remember to turn it back on again after you’re done with the tripod!
Conclusion
Just to wrap up, I’d like you to consider and think about things when you hear them out in the photography world. “They” say a lot of things and they aren’t always right.
Many of the points I’ve mentioned here are highly subjective and I’m sure I’ll get some comments disagreeing with my viewpoints. That’s totally fine as everyone is entitled to their own experiences and opinions.
I strongly urge you to think for yourself and make educated choices. Let’s discuss in the comment area below!
Cheers,
