What is this mysterious Bokeh Effect I keep hearing about? Do I need to use it? How do I make it? How do you spell and pronounce it anyway? These are all questions you probably asked yourself about Bokeh photography at one point or another. Well, look no further! I am here to offer you a ‘complete and concise but not complex’ walkthrough of bokeh.
What is Bokeh in photography
The photographic term bokeh more specifically refers to the aesthetic quality of blur produced by the out of focus points of light in an image. In layman’s terms, it is the little circles of light and blur in an image.
Bokeh is visually pleasing, gives you a sense of depth, and helps you emphasize & frame your subject beautifully
To be thorough, some may want to argue that it isn’t the blur itself, but the combination of blur and reflected points of light.
The word bokeh (pronounced BOH-Kə or BOH-kay) comes from the Japanese boke (ボケ), which means ‘blur’ or ‘haze’. In the same semantics, boke-aji means ‘the blur quality’.

How Do I Pronounce Bokeh?
In the late 90s, Photo Techniques magazine editor Mike Johnston added an –h to help pronounce the word more appropriately (Boh-Kay) in English. The magazine was working on a series of papers on the topic and thought it useful to adopt the spelling for correct phonetics.
How Do I Get the Bokeh Effect?
There are three main factors that come into play when creating bokeh. Lens, distance, and aperture can each affect the bokeh’s intensity and quality.
1. Open up Your Aperture
The opening hole of your lens that allows light through to the camera sensor, otherwise known as your aperture, controls your depth of field. When your aperture is wide, you have a narrower depth of field. In other words, the focus plane of your image is thin.
Having a narrow depth of field increase the chances of your background being blurry. Which yields a bokeh effect if there is a light source in the background.
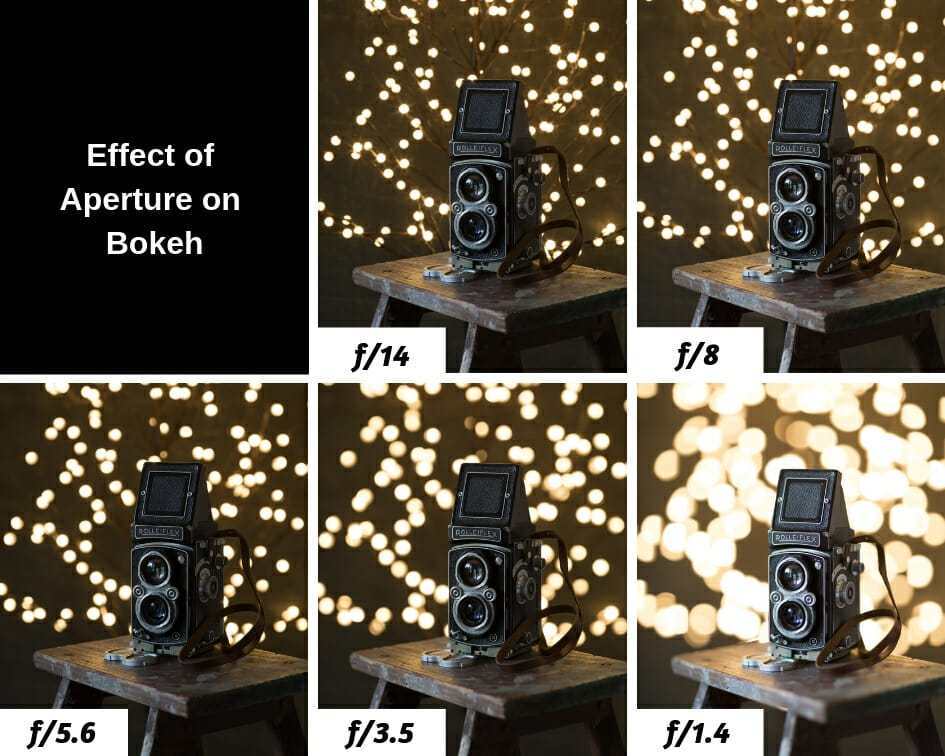
Small f stop number = narrow depth of field = more bokeh
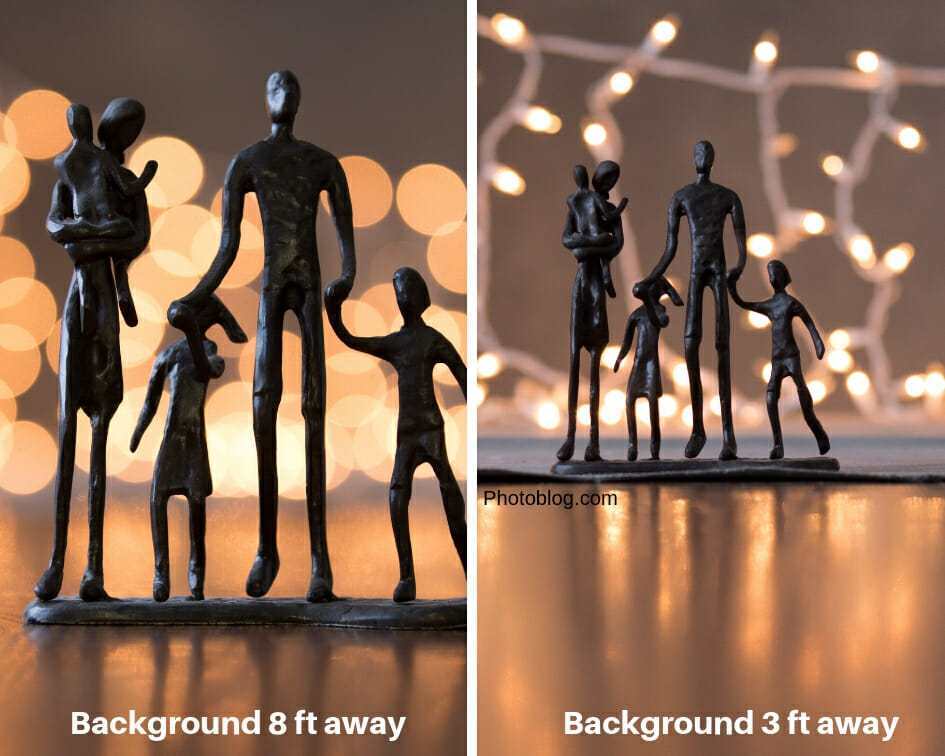
2. Increase the Distance Between Subject and Background
The more distance you can have between your subject and the background, the more bokeh effect you will get. Knowing this is especially helpful if you have opened up your aperture all the way but still need more bokeh effect.
The reason is simple, with a smaller depth of field, the further the background is, more out of focus it will be. Improving quality of your bokeh.
3. Move in closer to your subject
As you move the camera closer to your subject, the bokeh effect will intensify. This is because as you move close to your subject, you capture less background in your frame. Which means that out of focus background highlights will be enlarged, giving you more bokeh effect.

4. Use a Longer Focal Length
All else being equal, a longer focal length will give you more apparent bokeh effect. That is why portrait and wedding photographers use longer focal length lenses such as 85mm or the 70-200mm.
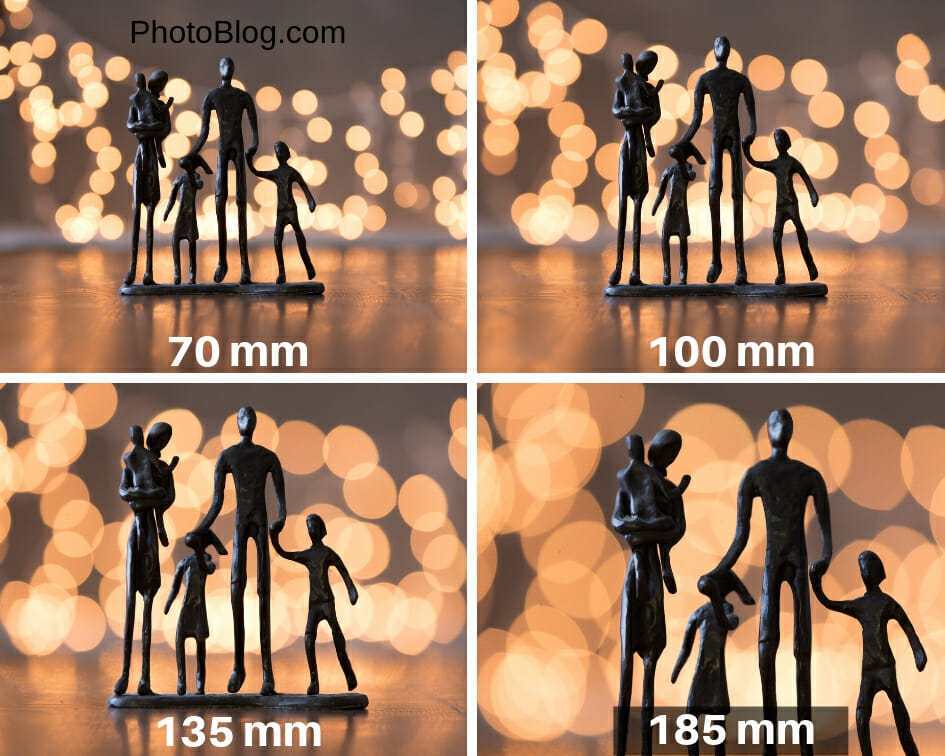
The apparent increase in the quality of the bokeh is due to the zoom effect. Larger focal lengths capture a smaller background area (enlarge it). Thus giving the appearance of more bokeh effect.
5. Use a Lens with Better Bokeh Quality
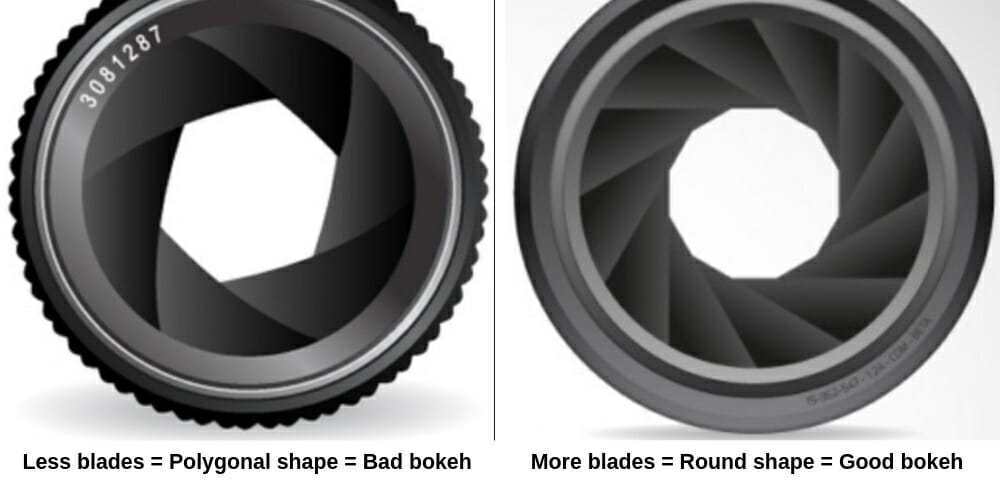
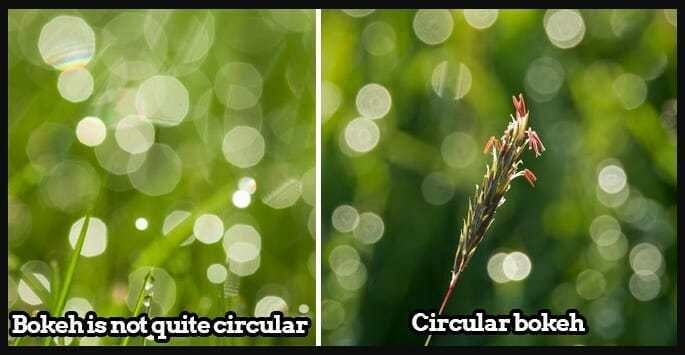
There is no beating around the bush on this one. The better quality the lens, the better the bokeh. What makes a good or a bad bokeh? Simply put, a good bokeh will be soft, creamy, and round. A bad one will have hard edges and look like polygons, creating visual distractions.
The shape of your bokeh depends on the number of diaphragm blades that makes up the aperture. The more diaphragm blades there is the more circular shape the aperture is. Resulting in more round shaped bokeh.
When to Use Bokeh?
Is there such a thing as too much bokeh effect in an image? It’s subjective and
What you need to know is that the purpose of using bokeh is to create a visually pleasing background that emphasizes & frame your subject. It is here to give a sense of depth to your image. However, it does not mean it is the best way to do so or the only way, or that is the only purpose of bokeh. Some people love bokeh so much, they make it the main topic of their image!
You will most likely find bokeh is best used in portrait photography, product, or still photography. But it does not mean you can’t use it for wildlife photography. There are no rules! If you decide it would make a landscape image incredible, then give it a go.
When Not to Use Bokeh
With that said there really isn’t much point in using bokeh for, let’s say, real estate photography or architecture when you need everything tack sharp. It is also very difficult to use a shallow depth of field in street photography, where you would miss a lot of action, probably lose sharpness and would not achieve the necessary scene layering (interesting foreground, middle and background).
Bokeh Patterns
When it comes to patterns, there are options beyond the perfect round and the polygonal bokeh shape. You can find creative ways to shape bokeh further.
Custom Bokeh Shapes
Create your own shape with either bokeh kits of shapes (hearts, stars, etc) or DIY shapes (have a look at #2 of these photography hacks)
The swirly bokeh
This is actually becoming a thing. Older lenses from Leica or Helios, for example, can create a very unique swirly bokeh effect around your subject, an ethereal frame. It has the benefit of framing even more than regular bokeh. Although it actually is a technical flaw of the lens, these old school lenses are sought by connoisseurs for this particular effect
Bokeh Photography Examples


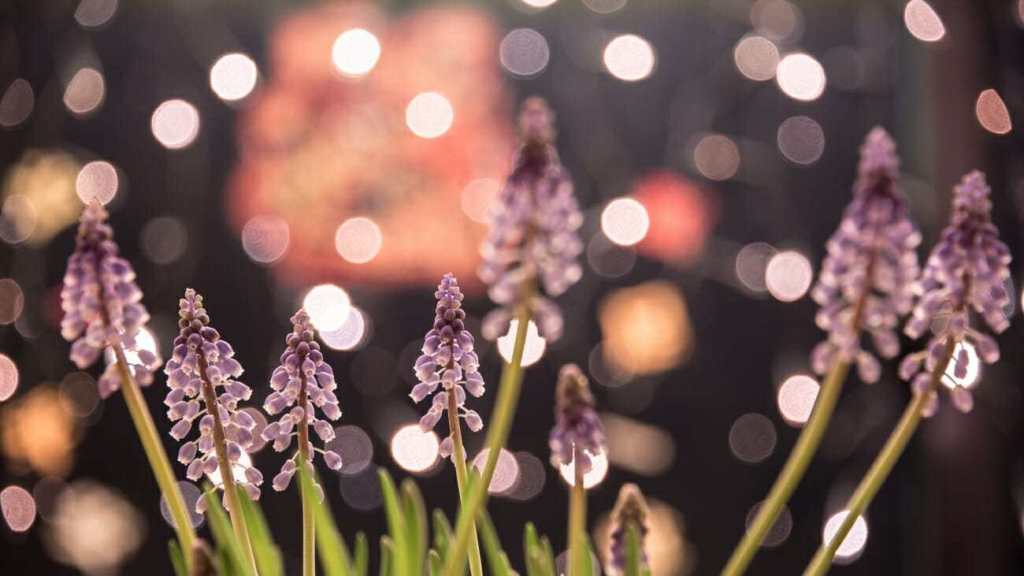
Notice on the close up, the mild edges of the circles as it was shot a few years ago with a 50mm of slightly lesser quality at f/2.8 and 1/250.
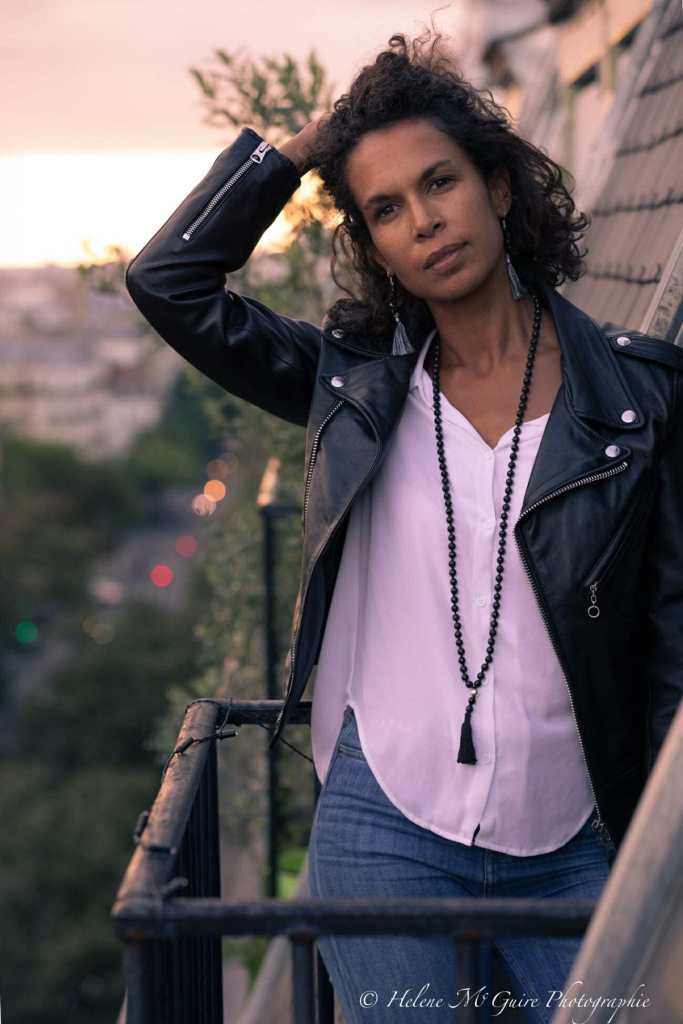
Shot in Paris between 2 balconies at 100mm, f.4.5 and 1/200. The background is so far from the subject that the aperture was wide enough. The rooftops have a nice blur, the traffic and sunkissed plants create subtle bokeh. You don’t need an enormous
amount of bokeh to benefit your image, sometimes just a touch is enough.
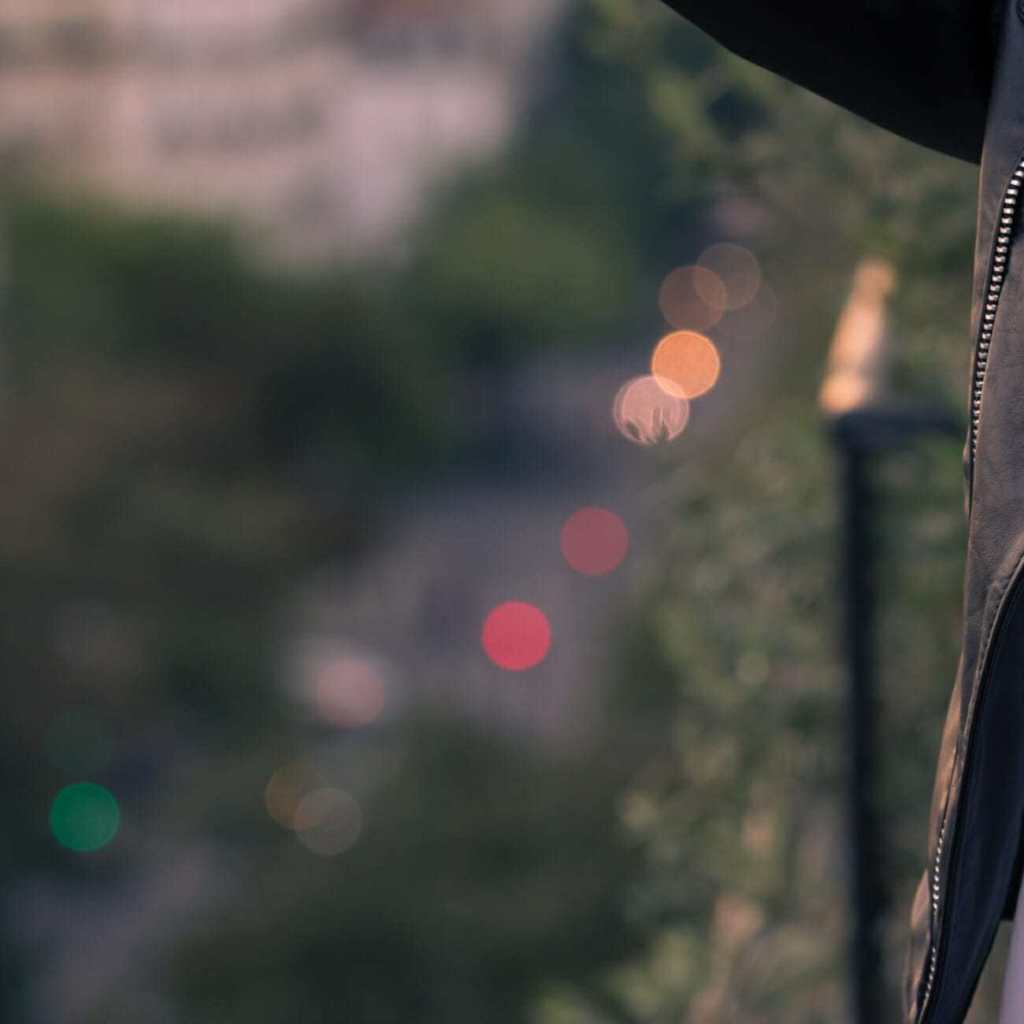
The rooftops have a nice blur, the traffic and sunkissed plants create subtle bokeh. You don’t need an enormous amount of bokeh to benefit your image, sometimes just a touch is enough.
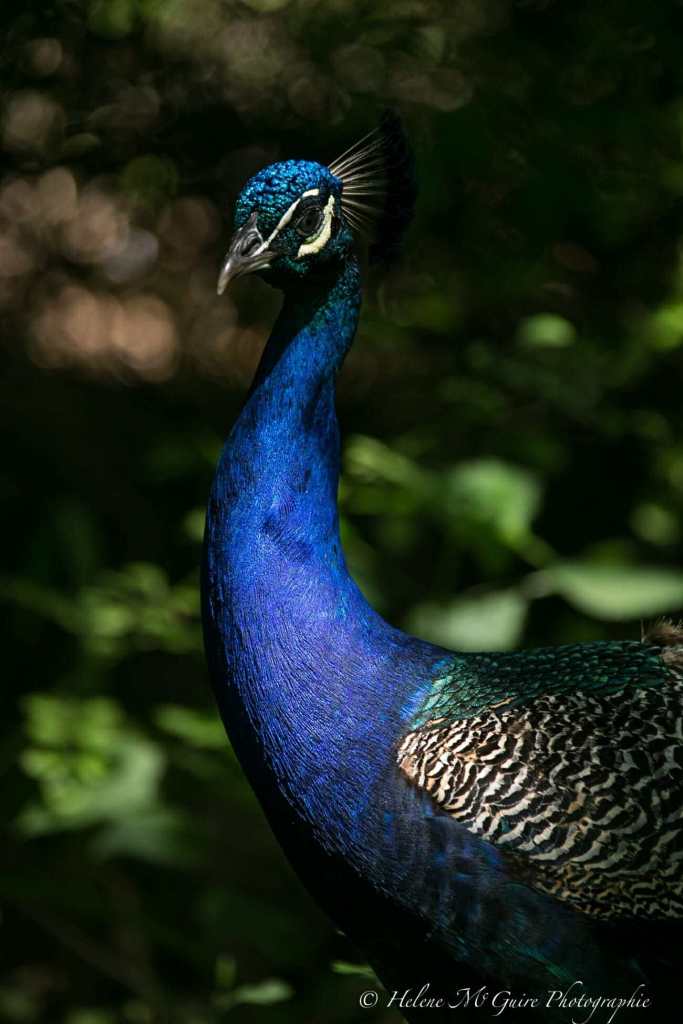
This peacock wasn’t exactly flying like a hunting condor but it was on the constant move. My shutter speed had to be high enough to avoid motion blur (1/320) and my depth of field deep enough not to miss the details of
I still got a little framing bokeh thanks to the distance between the peacock and the backdrop bushes.
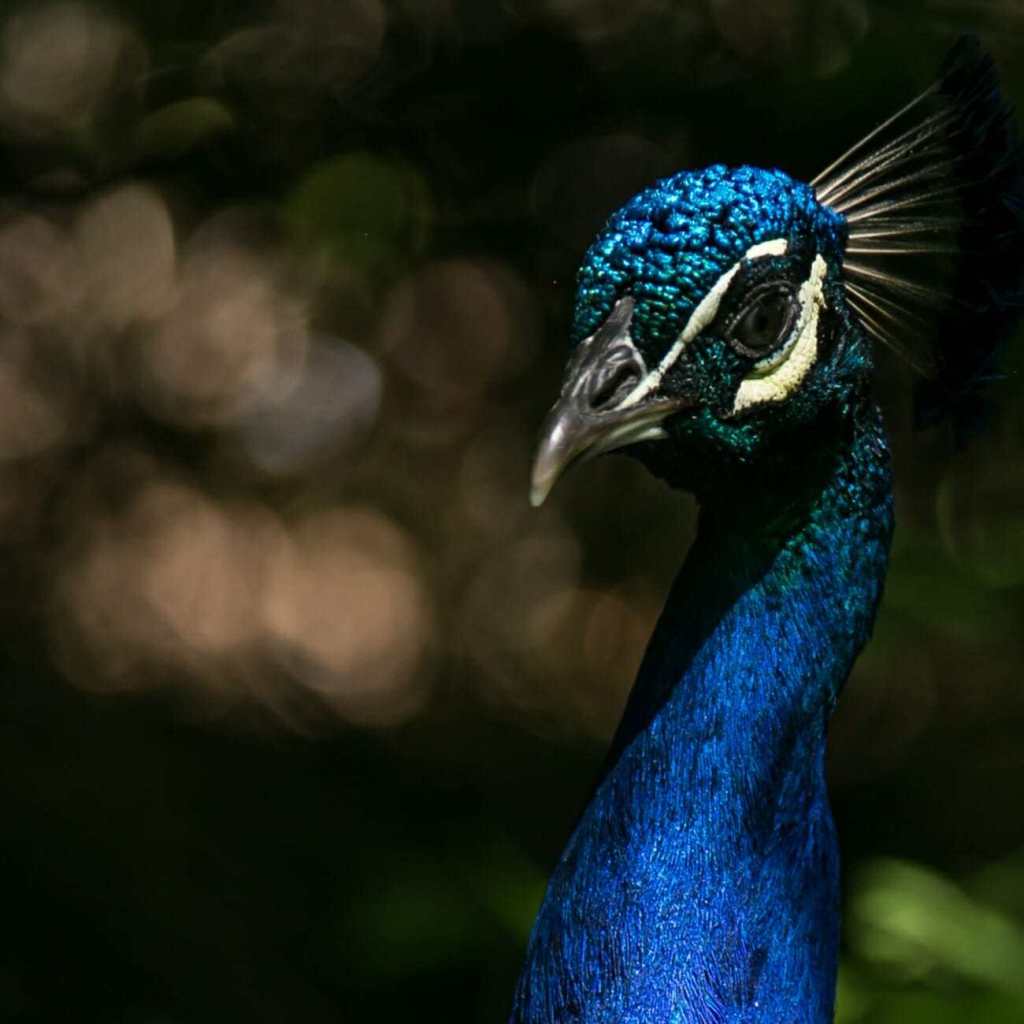
He used the Helio 44 prime lens (58mm) at aperture f/2 (very wide).
7. Exercise to try at home
Here is a practice exercise to master the art of Bokeh:
- Choose a backdrop, a plain dark surface plus a source of light. For instance, you can use a string of holiday lights, but really anything that produces a small source of light is fine.
- Choose an object to capture.
- Choose your widest and longest lens (or lenses).
Play around and experiment with each of these factors,
- Aperture (open up all the way and then f/11)
- Change distance between subject and background
- Change distance between camera and background
- Try different focal lengths (24mm, 85mm, 105mm, 200mm)
This exercise will help you get a sense of the tools and their impact on the Bokeh. See what happens.
Please share with us your impressions, your main take away point, your favorite setting, and have fun with it!
Download FREE Photography Lighting Cheat Sheet
Subscribe and get a free downloadable photography lighting cheat sheet