One of the more complex technical topics in photography is something called hyperfocal distance. At first glance, the basic definition of hyperfocal distance seems pretty straightforward: It’s the distance at which you focus your camera lens to get as much of your shot in focus as possible, from the foreground to the horizon.
Things start to get complicated when you try to narrow down that definition, and even more difficult when you start to get into the specifics of how to calculate the hyperfocal distance for various different lenses and shooting situations. Let’s dive into the mechanics of hyperfocal distance and see if we can’t bring some clarity to what can be a murky and confusing topic.
For the purposes of this article, we’re going to assume that you are familiar with the basics of technical photography, so you know about things like aperture, focal length, depth of field, and prime vs. zoom lenses. If any of those terms are new to you, you may want to check out some of our other articles on those topics and then circle back to this one when you’re ready.
A Practical Example
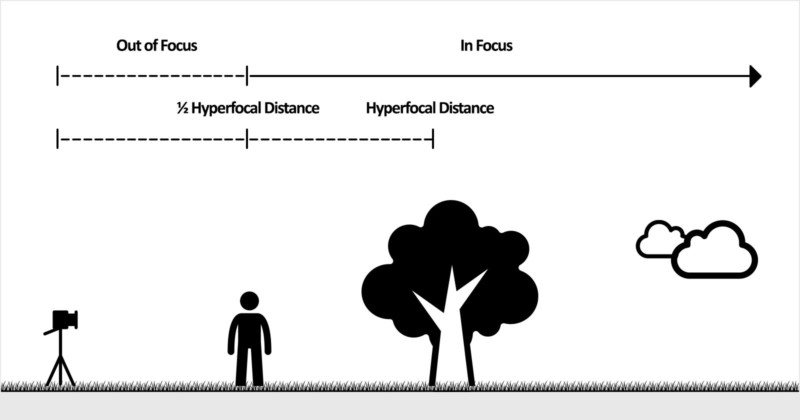
Let’s consider a pretty common scenario: You are taking a landscape photograph of a field on a sunny day, and you have a person in the foreground, a tree in the middle ground, and then some awesome swirly clouds in the deep background. Here’s your problem: What lens do you use, at what aperture, set to what focal point, so that all three major elements — the person, the tree, and the clouds — are in focus and sharp enough?

If you focus on the person, the tree is out of focus. If you focus on the clouds, the person is blurry. If you focus on the tree — well, maybe that could work, or maybe the tree will be nice and sharp but the person and the clouds will both be out of focus. But let’s say you fiddle around a bit with your focus and find a “sweet spot” at 55 feet away, with your 85mm lens set to f/16, that puts all the important elements of the shot in focus. That “sweet spot” is your hyperfocal distance. Just write down your lens settings in your photography notebook — 85mm, f/16, 55’ — and now you know what your hyperfocal distance is!
Simple, right? Except that that’s only the hyperfocal distance for that field, with that person and that tree and those clouds. If the person isn’t exactly the same distance away the next time, you can’t use 55’ as your hyperfocal distance. Surely there must be a better way to calculate hyperfocal distance other than just guessing and checking for every element in every shot?
There is, as long as we set some ground rules. Let’s say that hyperfocal distance is the minimum focusing distance necessary, with a given lens, to get objects at infinity in focus. By “infinity”, we mean objects on the visible horizon like clouds or stars or distant mountains.
With that definition in mind, there is a complicated mathematical formula that will let you calculate the hyperfocal distance of any given lens… but it’s going to be completely useless to you in the field. In the field, you’re going to have to wing it.
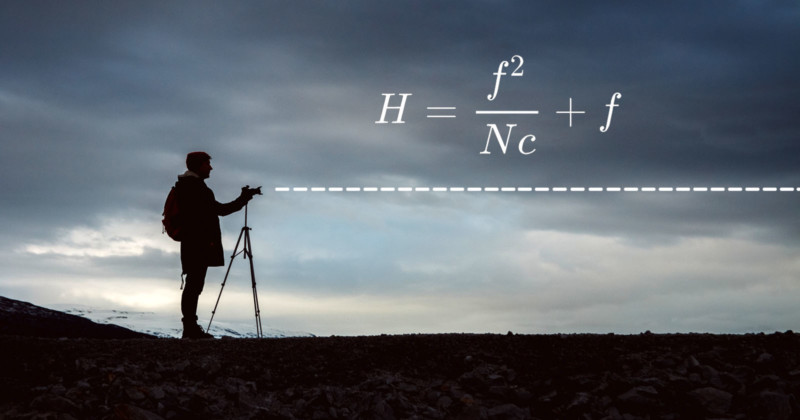
If you’re curious, the formula looks like this:

f is your focal length, N is your aperture, and c is your maximum circle of confusion, which is a way of measuring acceptable sharpness.
Here is where we run into our big problem: what counts as “in focus” is a subjective judgment. In our example, our goal was getting the background clouds and foreground person to be sharp enough. The problem is, there isn’t a universal definition of “sharp enough”. Maybe I want to see every eyelash on that person’s face, but you are OK with a little artistic blur. So how can we calculate the hyperfocal distance to get a shot “in focus” when there’s no way to nail down what “in focus” really means?
I bet that you thought that I was going to have an answer to that question. Unfortunately, I don’t, and this is the heart of what makes calculating hyperfocal distance so difficult. Even though you can mathematically define how sharp or fuzzy an image is, everyone has a different preference of how sharp something needs to be for it to be considered sharp “enough”.
The Subjective Route
One way to go is to embrace this subjectivity. Some people will tell you the best way to figure out hyperfocal distance is to set your desired aperture, then focus up until infinity is “perfectly sharp,” and then zoom (using your lens with a zoom lens or your feet with a prime lens) to get your foreground in focus, adjusting as you go to make sure the background stays sharp.
Using this method, your hyperfocal distance will vary with your aperture setting. This is a subjective method for determining hyperfocal distance because where you focus will vary based on when you think the foreground elements are sharp enough.
The Objective Route
Others will say that the best way is to define hyperfocal distance is the objective method. With this technique, start with a lower aperture, compose your shot, and find the focal point in which infinity is equally as blurry as your foreground element. Remember, “equally sharp” and “equally blurry” mean the same thing. Then, without changing your focal point or your zoom, you can adjust your aperture until both foreground and background are acceptably sharp. (If they never get acceptably sharp no matter how high your aperture goes, that means that your equipment isn’t up to the job.)
Using this method, your hyperfocal distance is the same no matter what your aperture is, since you’re not finding your focus based on a subjective judgment of what is or isn’t sharp “enough”. Instead, you are finding your focus on where the background and foreground are equally sharp, which is an objective measure, and then adjusting only your aperture.
The “objective” method is sometimes called the “double distance” method because your focal point is going to be about double the distance from you to the closest foreground element. In our example of person, tree, and clouds, if the person is roughly 30 feet away from you, then your hyperfocal distance is going to be roughly 60 feet away. If you’re really good at estimating distances (or you have a laser rangefinder), you can use this shortcut to save yourself a lot of time by focusing at 60 feet, to begin with, and adjusting aperture from there.

Pros and Cons
Both of these techniques have their advantages. The subjective method involves keeping your background in perfect focus while doing the best you can to capture the foreground. This is obviously better when your background elements are the most important thing in the shot, like if you’re shooting starscapes. It also tends to save you frustration if your lens is shorter, or limited in terms of aperture settings.
The objective method works well if the entire composition has equal priority, in other words, if the horizon isn’t more important than your foreground. It also has the advantage of always being the same relative to your foreground elements. With any given lens and camera, as long as you know how far away your foreground is, your hyperfocal distance will not change. Finally, at least in my opinion, it makes for cleaner compositions, and overall it’s a lot less work.
Shortcuts
Now, all that being said, are there any shortcuts we can use? What about hyperfocal distance tables, or apps, or the focusing scale on the side of a lens? Well, the problem with tables and apps is that firstly, they prioritize background elements, so your foreground might come out blurry. Secondly, most of them use a formula optimized for 35mm film cameras and standard-sized physical prints. If you have a full-frame camera and if your photographs are destined to become 8x10s hanging in a gallery somewhere, then tables and apps might be fine. Otherwise, you’re going to get suboptimal results.
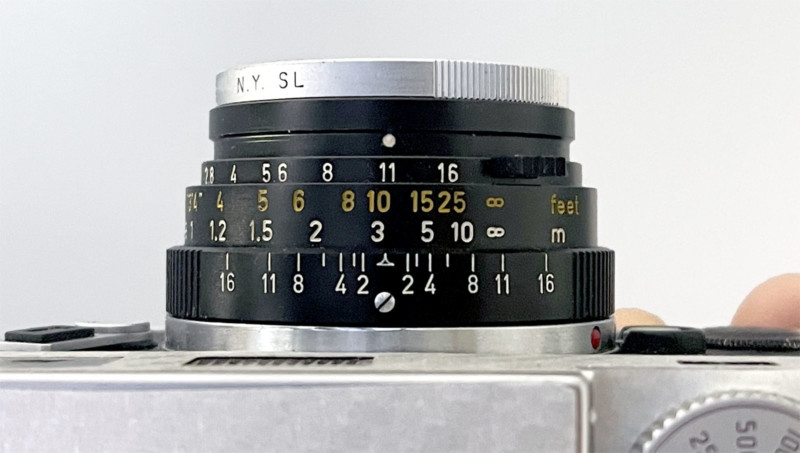
On the other hand, the focusing scales you find on the sides of lenses can actually work really well for finding hyperfocal distance — if you know how to use them, and if your lens has one at all.
To find your hyperfocal distance, line up the infinity mark over your current aperture and note the distance that then appears right above the center index line of your depth-of-field scale.

Most focusing scales nowadays only appear on professional-grade manual-focus prime lenses. Consumer-grade autofocus prime lenses only sometimes have scales, and even when they do, they can be pretty imprecise. As far as zoom lenses go, the only ones that have useful focus scales on them are push-pull zooms, and those went out of style in the mid-1980s. While you may occasionally find rudimentary focus scales on contemporary zooms, they’re not really good for much. Lastly, some older fixed-lens cameras may have a red dot on their focus dial. That red dot indicates the hyperfocal distance for that camera.
In Summary
So, to review: The hyperfocal distance in your shot is the minimum distance at which you can focus to get sharp focus on objects at infinity. You can find it in the field in two ways, either by focusing up to infinity then zooming to get the foreground in focus or by finding the point at which background and foreground are equally out-of-focus, then adjusting your aperture upwards until they’re in focus. Finally, you can sometimes use tables, apps, or scales as a shortcut, but they only work well in specific circumstances.’
If you’ve stuck with us this far, congratulations. There aren’t many technical topics in photography more complicated than hyperfocal distance. If you understand it, you’ve earned a pat on the back. The next time you’re out in the field with a manual lens and a few minutes to kill, why not try using one of our two methods? Once you get some practice at figuring it out on the fly, finding your hyperfocal distance becomes second nature.
Image credits: Stock photos licensed from Depositphotos. Illustration created with images (1, 2, 3, 4, 5) licensed under CC BY 3.0.