Adobe Photoshop doesn’t turn layers into smart objects by default, so it can be easy to forget how useful they are. But they have some amazing benefits that you should know about – most of all, the ability to re-edit filters that you’ve applied to a layer.
That’s not the only reason to convert a layer to a smart object, but it’s one of the biggest. Two others reasons that are important in photography are that smart objects make it easier to do image averaging and perform nondestructive transform/warps of layers. They are also helpful in graphic design for various purposes.
What Is a Smart Object?
A smart object is the ultimate non-destructive layer in Photoshop. Any edits that you apply to a smart object can be undone or revisited; they’re never baked permanently into the layer.
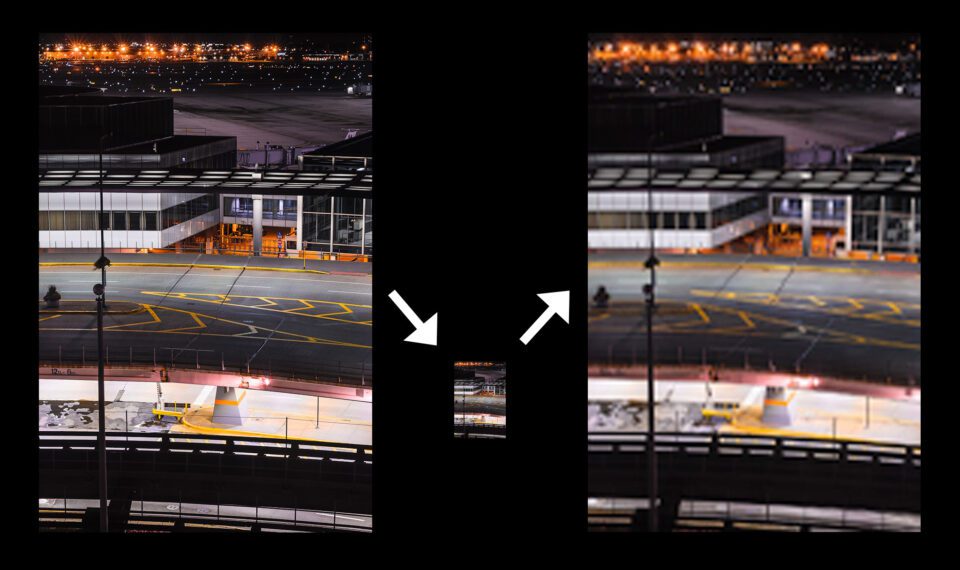
Let me demonstrate how a smart object differs from an ordinary layer. If you use Photoshop’s transform tool to shrink an ordinary layer, it will turn into a low resolution version of itself. Trying to enlarge it back to the original size will give you a blurry image:
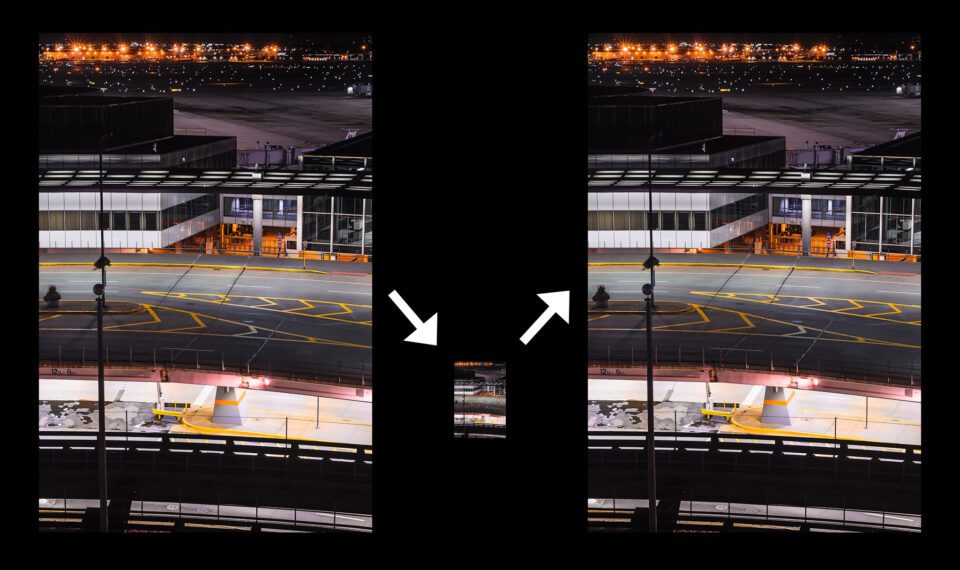
If you do the same process to a layer that has been converted to a smart object, you can shrink and resize the layer to your heart’s content, and it remains just as sharp:
The nondestructive character of smart objects goes beyond just resizing layers, as I’ll show in a moment. First, though, let’s look at the different ways to make a smart object.
How to Create Smart Objects in Photoshop
Converting a layer to a smart object is very easy in Photoshop. You simply right click on the layer in question and select “Convert to Smart Object.”
You can also create a smart object out of multiple layers. Shift + click (or Ctrl/Cmd + click) to select the layers you want, right click, and select “Convert to Smart Object.” The layers will merge into a single smart object layer. Photoshop then lets you choose how the component layers within the smart object blend together; just go to Photoshop’s top menu > Layer > Smart Objects > Stack Mode, and you’ll see a number of options.
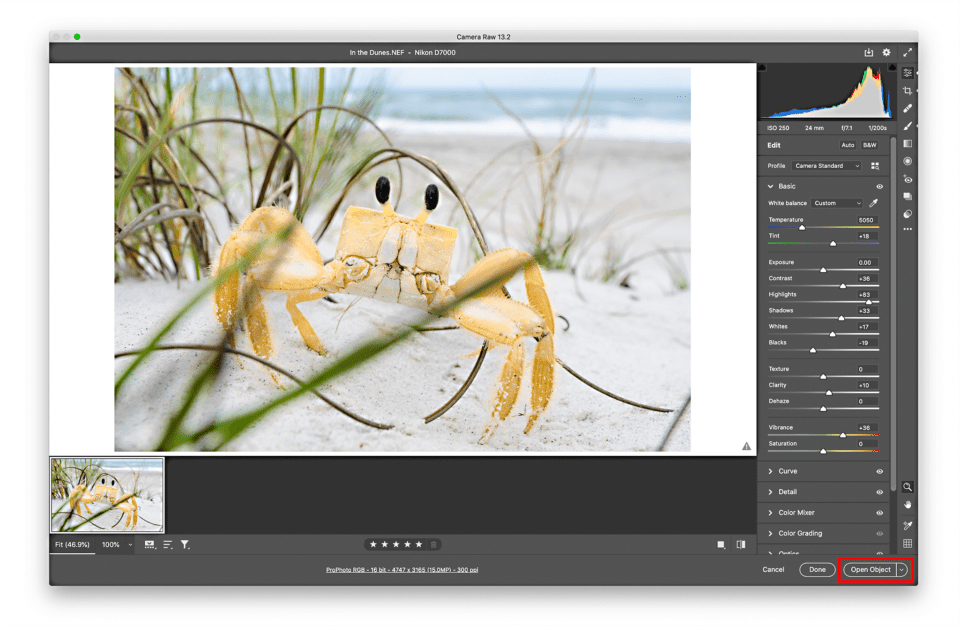
You can also convert a layer to a smart object directly from Adobe Camera Raw, which I highly recommend. After you’ve opened a raw file in Adobe Camera Raw and finished your edits, just hold down the Shift key, and you’ll see that the “Open” button at the bottom of Camera Raw changes to “Open Object.” Click it, and the photo you’ve been editing will open directly as a smart object for further editing in Photoshop.
Benefits of Smart Objects for Photographers
There are tons of reasons to use smart objects in Photoshop, and I’m going to limit this article to the three that I consider the most useful for photography. (You can see a longer list of what they do, including some niche uses, on Adobe’s website.) Here are the ones that are the most important for photographers to know:
1. Nondestructive Filters
Photoshop’s filter tools are a huge help for photography, especially now that the Camera Raw dialog has been added as a filter option in the newer versions of Photoshop. I routinely use the Camera Raw filter to make global adjustments in Photoshop, and I’ll also use filters like sharpening, noise reduction, and Gaussian blur on occasion.
But what happens if you apply a filter and only realize later that you went a bit too far? You might have to delete the layer and start over, which can be a serious problem if you’ve done a number of other edits to that layer in the meantime.
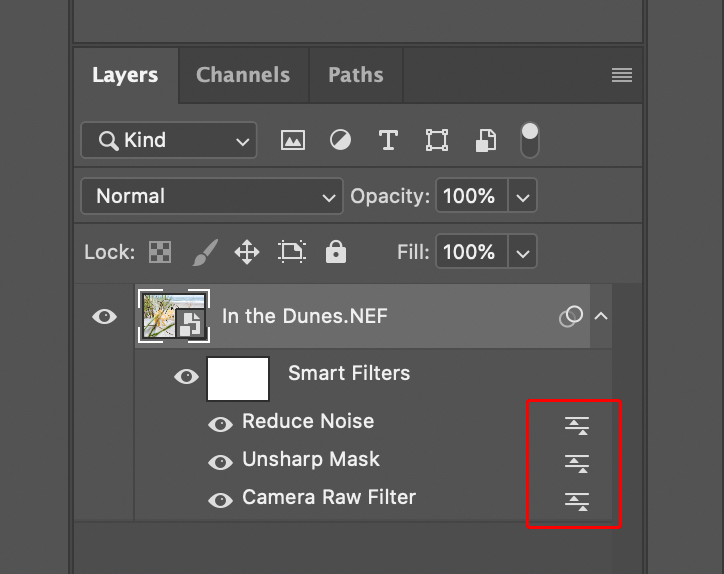
Instead, if you convert a layer to a smart object before applying any filters, they become “smart filters” instead. A list of all your smart filters appears under the smart object in Photoshop, and you can double click any of their names to re-open the filter dialog.
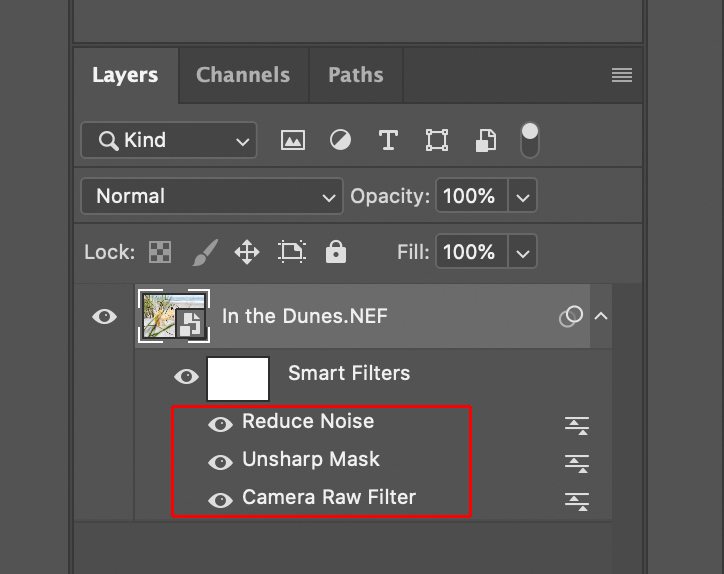
This can be a huge help for photographers. Did you realize too late that your earlier unsharp mask was too strong? Double click the words “Unsharp Mask” below your smart object, and you can tone down your prior edits. Missed a spot in a Camera Raw local adjustment? No need to delete the layer and start over; it’s all stored in the smart object and can be re-edited at any time by double clicking the title “Camera Raw Filter.” (This is why I recommend “opening as object” rather than just opening your image any time you finish working with a raw file in Adobe Camera Raw.)
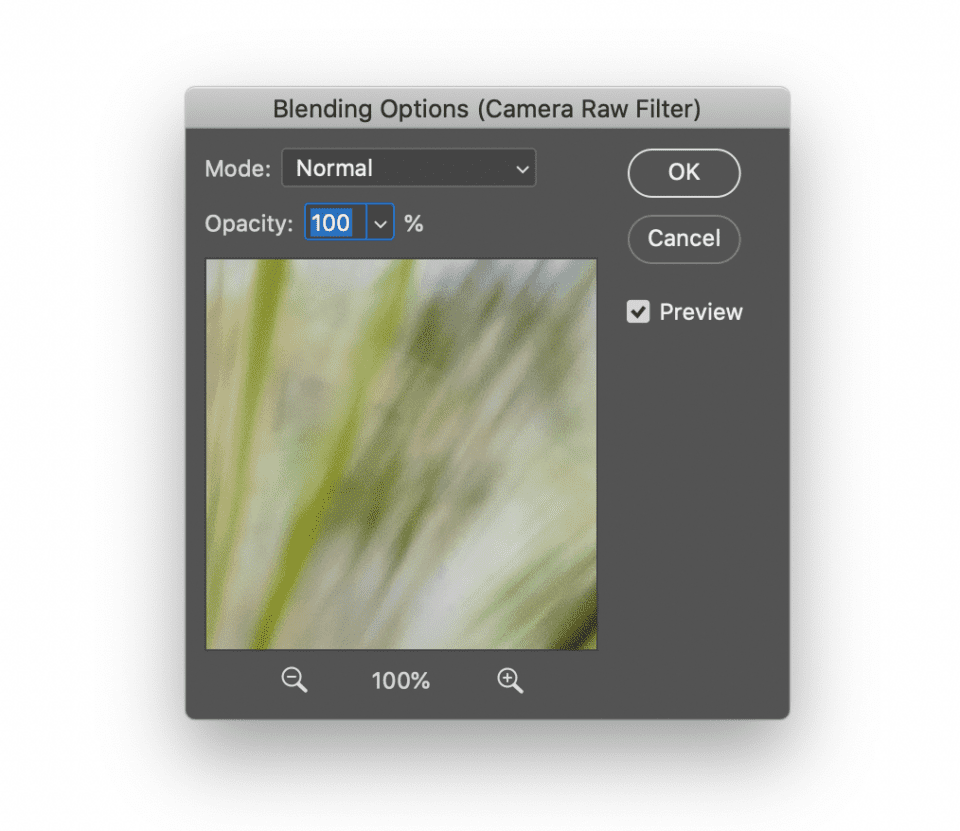
You can even blend the smart filters using layer blend modes by double clicking the icon on the right-hand edge of any smart filter:
Doing so will pop up a dialog that looks like this, allowing you to change the opacity and blend mode just like any other layer:
Overall, being able to re-do any filter edits is the biggest reason to convert a layer to a smart object in Photoshop, at least for photography. Once you start using it, you’ll never look back.
2. Nondestructive Transform
Another helpful reason to use smart objects is to warp or transform the layer without permanently baking the transformation into the layer. I demonstrated this earlier in the article, and hopefully you can see how it would be useful to have such an option for resizing different layers.
However, this only really applies if you’re doing some sort of composite photography, whether surrealistic or something more grounded like product photography. Not all photographers need to composite images together, but if you do, it’s best to convert your layers to smart objects before resizing them.
For example, if you were editing this composite image (taken by Nasim), you should start by converting each of the three moon layers to a smart object so as not to lose resolution when decreasing and increasing their size:
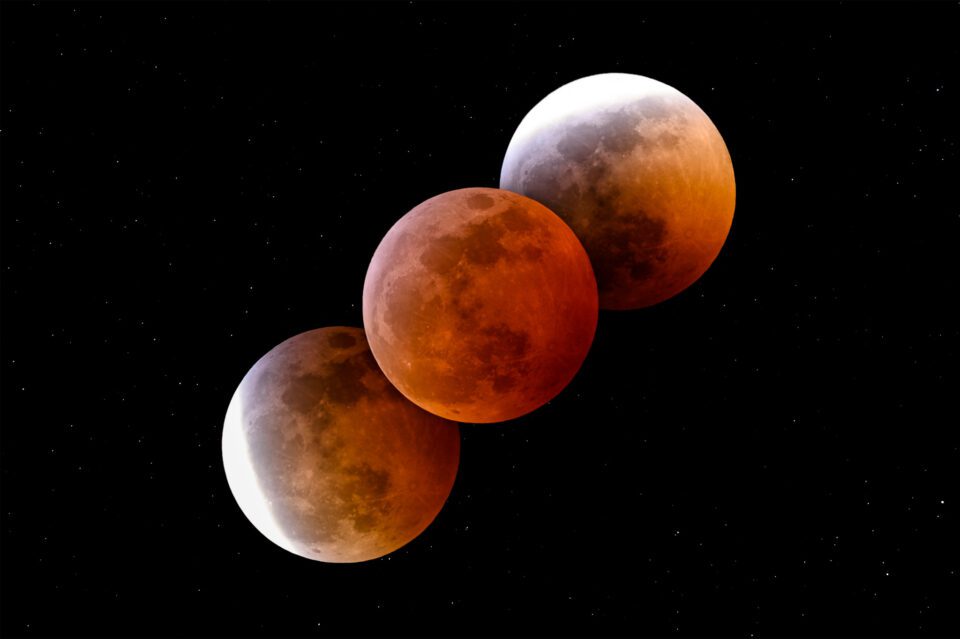
NIKON Z7 + 300mm f/4 @ 420mm, ISO 200, 10 seconds, f/8.0
3. Image Averaging to Reduce Noise
The technique of image averaging has really been growing on me lately, especially for applications like drone photography. By taking multiple identical photos and then averaging them together in Photoshop, the total level of noise will drop substantially:
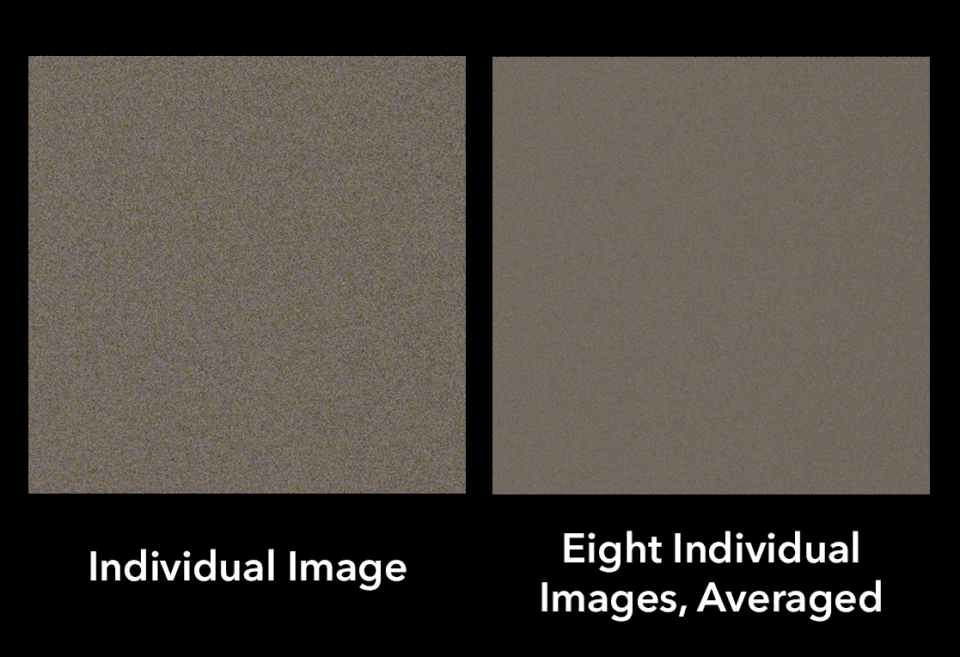
But how do you actually average a bunch of layers together in Photoshop? You could play around with the Opacity slider, but the easier way in many cases is to use a smart object.
First, select all the layers that you want to average by Shift + clicking. Right click to convert them to a single smart object. Then, go to Photoshop’s top menu bar > Layer > Smart Objects > Stack Mode > Mean. (Some photographers prefer Median instead of Mean, but I find that Mean works better.)
The layers will be averaged together perfectly, whether you have two layers or several dozen. (Though the stacking process is far from quick if you have more than a handful of layers, so you might want to take a stretch break while you wait.)
There are more reasons to do image averaging than just reducing noise, including various graphic design applications. You can also experiment with different stack modes than Mean to get some interesting results. Regardless, smart objects are the way to do it.
Drawbacks of Smart Objects
The biggest issue with smart objects is that they take up more space than ordinary layers. You may notice Photoshop slow down if you have too many smart objects (or a lot of smart filters). It will also make your file sizes much larger if you’re saving a file with layers, such as a PSD or PSB.
However, if you export as a JPEG or otherwise flatten the smart object layers, the file size issue goes away. In other words, these drawbacks only apply when there are active smart object layers in your document.
Beyond that, you should keep in mind that some edits are not possible on smart object layers, such as using the brush tool, paint bucket tool, dodge, burn, blur/sharpen/smudge tools, and similar. These aren’t possible because, again, a smart object is the ultimate nondestructive layer. Photoshop doesn’t have a way to revisit these sorts of “paint on the picture” edits, so it just prevents you from doing them on a smart object in the first place.
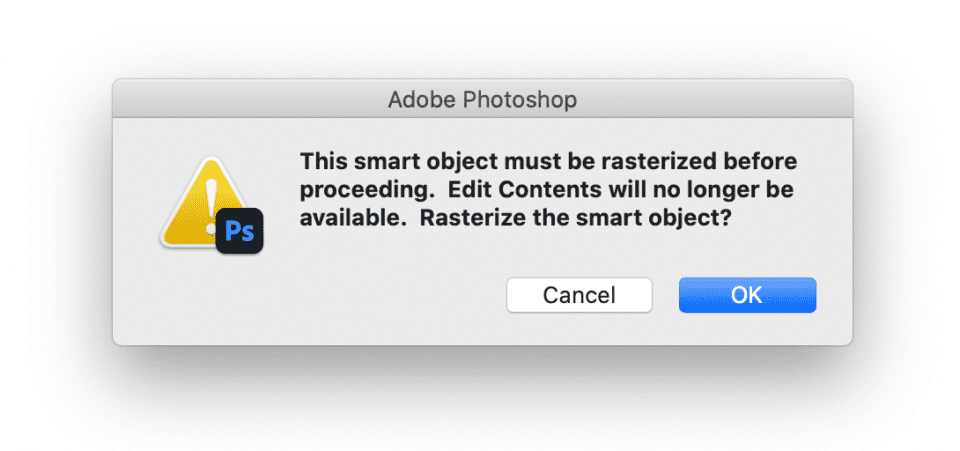
If you’ve decided to do one of these edits anyway, you just need to rasterize the layer first. Rasterizing a layer turns it from a smart object to a regular layer, allowing you to make those edits. Just right click on the layer and select “Rasterize Layer.” You can also rasterize a layer by attempting to do your edit (say, trying to paint on the layer) and selecting “OK” to rasterize the smart object when Photoshop yells at you.
Conclusion
It’s not always necessary to convert a layer to a smart object, which is why Photoshop doesn’t do it by default. If you don’t need to apply filters, average layers, or perform warp/transform adjustments, it’s probably best to keep the layers as they are. By minimizing the number of smart objects, you can shrink the size of your PSD files and speed up Photoshop.
However, smart objects are critical when you’re working with filters, which of course are some of the most popular tools in Photoshop. Filters come into play almost any time you want to sharpen an image, apply an Orton effect, or simply make broad adjustments in Adobe’s Camera Raw dialog. In those cases, it’s usually not ideal to bake the filter into the layer; instead, just convert the layer to a smart object ahead of time so that you can revisit the filter later and adjust it to your liking.
I hope this article helped you understand why smart objects are so useful for photography. They’re also useful for graphic design work; I use them constantly when making the various charts and illustrations you see on Photography Life. In fact, no matter what field of digital art you’re working with, nondestructive editing is critical – and smart objects are an important part of nondestructive editing when you’re working in Photoshop.