Landscape photography requires patience, persistence, and planning in order to successfully capture the “wow” moments. In this article, I’ll walk you through some of the tools and strategies to help you plan your next landscape photography adventure.
Have you ever looked at an amazing landscape photograph and asked, “How did they get so lucky”? Per the ancient Roman philosopher, Seneca, “Luck is what happens when preparation meets opportunity.”
Step 1: Get Inspired
The world is a beautiful and amazing place. With the help of the internet, the growth of social media, and the development of high-quality mobile apps, finding inspiration for landscape photography is easier than ever.
If you are like me, you spend time scanning Instagram each day. Since the platform has so many users it’s a great place for inspiration. You are likely to have something neat in your feed, but don’t underestimate the power of the search feature to find someplace cool.
I’d encourage you to make and keep a list of places you want to visit. Review, update and amend regularly.
Step 2: Research tools
Finding a good location for landscape photography (or at least a good starting point).
Whether you are venturing around the world or to a spot around the corner, you can improve your photography with a little preparation. Let’s start with choosing a location.
For example, I’m traveling to Calgary and Banff (Alberta, Canada) at the end of July for 10 days. Searching through Instagram, one place that is quite popular in that area is Moraine Lake.
As you can see from the screen capture below, high mountain peaks dive sharply into the brilliant blue waters of the lake. This looks like the kind of place that is beautiful enough to do everything but take the photo for you.

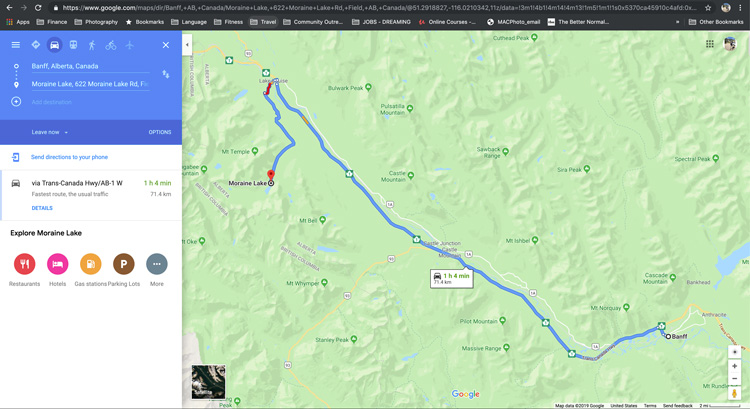
To see whether or not this location is within reasonable driving distance for this trip, I next head to Google Maps to get the estimated driving time.
At just over one hour from my home-base in Banff, Moraine Lake looks like a viable destination. Therefore, I’ll include this location in my Canadian itinerary.
My list of tools
So many cool tools exist to help you research shooting locations these days. I know that I only briefly used Instagram as an example – here is a list of many other tools I use regularly.
- Apps – Instagram and Photopills.
- People – friends, family, strangers, locals, other photographers, groups, direct messages, etc.
- Internet – Google Maps (user posted images/street view), Google Earth Pro, 500px, Flickr, Google image search, tourism websites (Trip Advisor, Yelp), and park websites.
Step 3: Timing
Knowing when you want to visit a certain location is a good place to start your planning. For my girlfriend and I the timeline for this trip is already established.
However, you can also start with a location, define a moment you want to capture, then work backward to establish a time.
An example of picking a specific event and then working backward is astrophotography. Check the moon phase to see what opportunities exist after sunset then pick a date that matches your desired conditions.
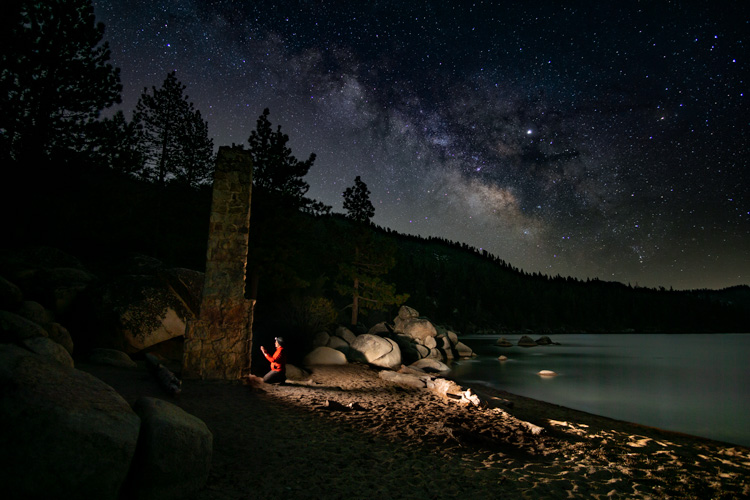
If you want stars and the Milky Way, make sure you choose a date when there is a new moon. If you want to shoot moonscapes at night using moonlight make sure you visit during a full moon (or near that date).
You can find moon phases via Google, Mooncalc, and Photopills. The latter is my usual source because it has a bunch of other planning tools built into the app as well.
Because I enjoy photographing the Milky Way I checked to see which moon phase would be occurring during my upcoming trip. There is a new moon forecast for July 31st, which means good chances to photograph the Milky Way.
That’s pretty exciting and something I will add to my plan for the trip.
A few other examples of when you will want to work backward include:
- Tide charts (if you are interested in photographing a location that requires low tide to access)
- Moon phase (do you want to photograph with the light of the moon or not?)
- You want to shoot something specific – wildflowers, waterfalls, the Milky Way, fall colors, the full moon, etc.
Weather considerations
If I’m planning a trip several months in advance, I like to do a quick search of the average weather conditions and temperatures to start thinking about what to pack. The weather in July/August looks relatively comfortable, but I’ll be sure to add a coat to my list just in case.
As the date of the trip nears, I’ll look for more detailed weather reports via the Weather Channel, Accuweather, etc.
Because I’m also interested in photographing the Milky Way on this trip I’ll check the weather for both day and night time forecasts. At night I’m most concerned with cloud cover obscuring my view of the night sky.

Step 4: Visualization
With a possible location identified, some dates established for your visit, and a brief review of average weather conditions, it’s time to move on to visualizing some landscape photographs.
Visualization just means creating an idea of the photograph you’d like to capture ahead of actually taking the shot. Start by looking at pictures others have captured of a particular location. Then fine-tune your idea once you arrive onsite.
Visualization in Advance
Creating some idea of a photograph you would like to capture usually starts with an internet search.
For this example, I found Moraine Lake on Instagram. Although this is not a classic internet search, it works the same way. Another resource to review is 500px. Rather than using a Google Image Search first, I recommend 500px because it usually offers higher quality images to stoke your creativity.
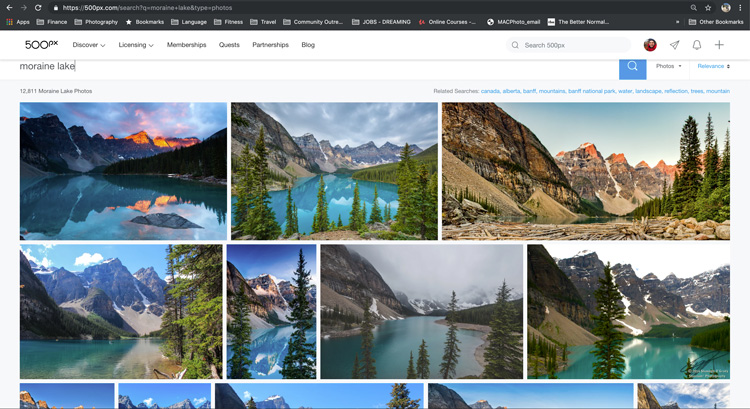
From the screen capture above, notice how the light touches the peaks on the first and third images on the top row.
Another difference you can see is in the perspective between the landscapes shown. Most of the images are shot from a higher camera angle or vantage point that allows both the blue of the lake to be highlighted as well as the reflection of the mountains.
Staying with the lighting conditions, you want to know if these things occur at sunrise or sunset. This goes back to timing the visit, but now focusing on identifying a more specific objective – the direction of light.
In this case, the first and third photographs are titled “… Sunrise”. So sometimes, figuring out whether to arrive for sunrise or sunset is just that easy, other times it is not. Let’s look at another way to determine the time of day you want to get to a given location.
Option 1: Photopills
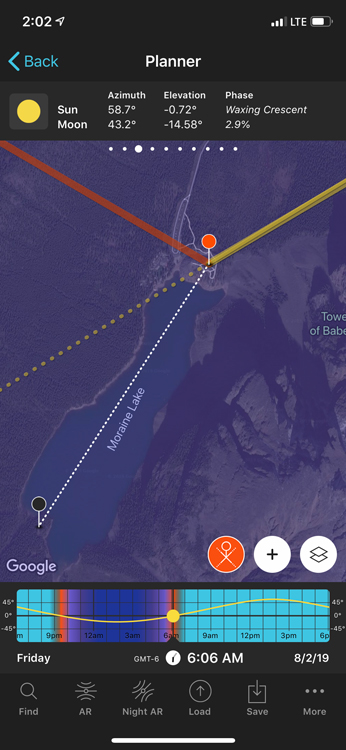
Without going into too much detail about Photopills, let me explain what you see above.
The orange pin represents the exact spot I chose as my shooting location. The black pin represents the relative direction in which I plan to shoot to capture the landscape.
The yellow line coming from the top right of the image shows the orientation of sunrise. The dotted yellow line is included to help you visualize the direction the first rays of the day will travel.
Near the bottom of the image is the time and date of this scene, which you can see is 6:06 AM. This is close to sunrise, which lines up with the titles of the images on 500px.

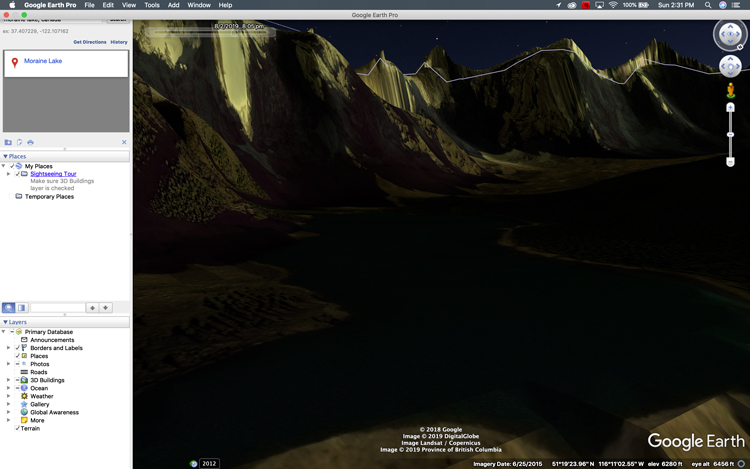
Conversely, you’ll notice that at 9:31 pm on August 2nd, the orange line shows the direction of the sun at sunset. This means that the likelihood of capturing the light hitting the distant mountains is quite low.
So based on the two maps above, you can see that in order to capture light on the mountains over the lake I will need to be there for sunrise!
Option 2: Google Earth Pro
As you have seen with Photopills and 500px, the best time of day to photograph this scene will be at or near sunrise. But, what if you want to double check these results virtually? Enter Google Earth Pro.
I know that with the newer releases of Google Maps you can see 3D renderings of the world. However, one tool that is not yet included that makes Google Earth Pro so useful is the “Time” function.
It allows you to move forward or backward through time in a virtual rendering of the world. A neat thing is that it will even render the shadows racing across the landscape.
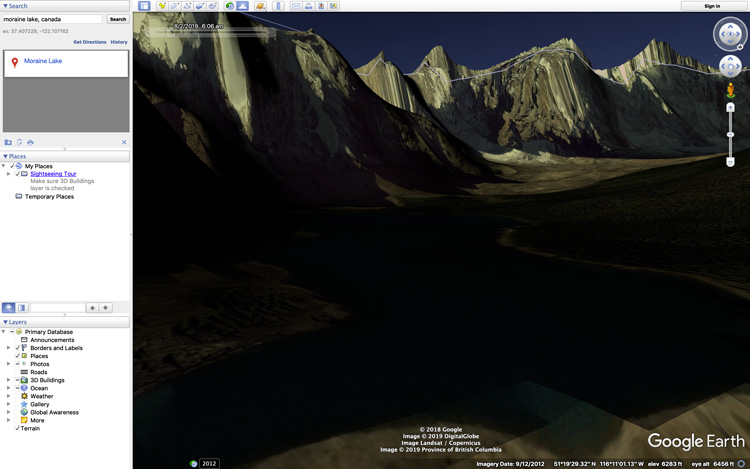
Comparing the rendering of sunrise above and sunset below, you’ll see that sunrise is going to be the better time to photograph at this location. If you’ve never used this tool before I’d encourage you to try it out. I think you’ll really like what you find.
I’ve only shown you two options for determining the time of day that you’ll want to be on location. There are plenty of other tools available to you, these are just the ones I use most often. If you use another one I haven’t mentioned, please share it in the comments section at the bottom of the article.
NOTE: One thing to note while visualizing a popular location. Instagram, 500px, and other tools are great for helping you visualize a portion of the scene. However, they are often filled with nearly identical images. So, when you are planning a visit to a popular spot, set a goal to explore a bit to capture something unique about the landscape. Don’t get me wrong, I’d love to capture something similar to what I see in my research, but I also want to push my creativity whenever I can.
Visualization Onsite
Congratulations. You’ve arrived on site at a beautiful location and you are excited to see that your advanced work brought you to a good place. However, you want to really refine your landscape photographs. You want to know exactly when and where the sun will rise so you can be ready to capture a photo that meets your vision.
My go-to tool for this type of fine-tuning is Photopills. The built-in augmented reality feature is invaluable for evaluating the scene around you.
The following image shows an example of this feature. See how the path and location of the sun and moon are overlaid onto what my phone saw in real time. You can slide the time forward and backward to show the path of the sun/moon across the scene.
This feature is incredibly powerful because it allows you to fine-tune your shooting location to capture the exact composition you visualized.
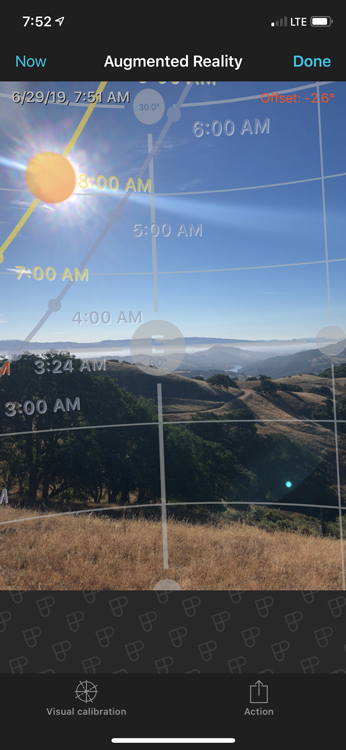
This feature also works at night. The overlay includes the motion of the stars across the sky as well as the position of the Milky Way.
When I’m onsite I start fine-tuning the details of the photograph I want to capture. Questions I ask myself, usually out loud because I spend a lot of time alone, include the ones below. Use mine or add and create your own list to go over yourself:
- Composition – What method do you want to use? Rule of thirds, leading lines, etc.
- Imagination – What would you like to do that might be different from what you’ve seen of this location?
- Message – Are you trying to tell a story of some kind?
Working to answer these questions helps me to set up and focus on the task at hand. Here’s a handy landscape photography checklist you can review to help ensure you get stunning photos every time. Download a copy of it to have with you on your phone or tablet.
Step 5: Gear Selection
All roads lead here. Creating your packing list is an important part of planning that shouldn’t be overlooked. Start with your camera equipment then move on to clothes, food, shelter, etc.
One thing that’s going to set some limitations is your method of travel.
For us, we are going to be flying to Canada, then renting a vehicle. So, my first parameter is going to be the size and weight of my luggage. Do I want to pay to check a bag or travel light with only a carry-on? Based on that decision I can start putting things together.
Camera Gear
If the photographer was kind enough to include it, 500px allows you to see the camera, lens, and camera settings used to capture a particular image. This information gives you a big head start when it comes to packing your equipment.
From a review of a few interesting landscape photos of Moraine Lake, I was able to determine that most people used focal lengths of 14mm to 20mm. In addition to my camera, I’ll plan to bring my 16-70mm lens in order to work with such a large landscape.
Another lens to consider packing is my 12mm f/2.0. I want to bring this lens in order to capture the Milky Way in the night sky. This lens allows me the flexibility I need to capture a scene at night.
Fellow landscape photographer Kav Dadfar recommends an ND filter and recently did a review of K&F Concept graduated neutral density filter and holder and was quite impressed.
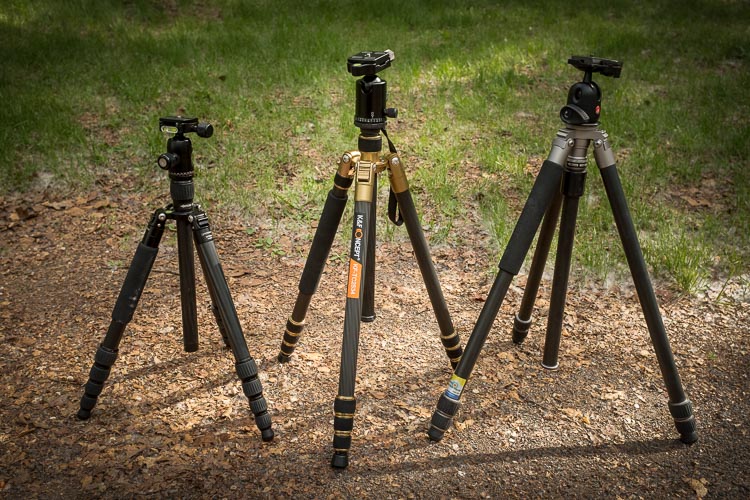
The next piece of equipment to pack is a tripod. Because I want to capture photographs at night and in the early morning a tripod is a must. When I find a cool location, I can set up my camera and tripod then wait for the right moment.
Miscellaneous items include memory cards, batteries, lens cloths, shutter release cable/remote, tripod plate, etc. Don’t forget the small stuff. I’ve definitely walked out to a location only to discover that I’d forgotten a memory card, or had a dead battery without a backup.
Please learn from my mistakes, because all you can do is laugh at yourself (or cry) when it happens.
Non-Camera Gear
I know this is an article about planning your landscape photography, but it doesn’t stop with the camera bag. Being prepared for the elements is just as important. From the average weather information, I plan to bring some warm clothes and rain protection, because sitting in the cold and/or being wet is not that fun.
Additionally, I’ll bring a flashlight and headlamp with me so I can travel safely in the dark. My personal preference is to use a red light, which allows me to preserve my night vision.
Finally, food, water, and first aid considerations should also be made depending on the duration of the shoot and travel.
Step 6: Be prepared to throw the plan out of the window
Now, I know this is not an exhaustive list when it comes to planning a landscape photograph, but it is a good start. However, as the saying goes, “man makes plans and God laughs”. No matter how good your plan, always be prepared to throw it out the window.
Things will likely happen that are out of your control. Maybe when you check the weather before getting in the car, an unexpected storm will have moved in that will mean no sunrise light. Do you still go?
Or, you spend the time to plan your shot and when you arrive there are 50 other people standing in your chosen spot. Do you get angry or just make the best of the situation?
These are things that you will have to decide on the fly. They are also things that make your photographs unique. No one else will have the same exact story as yours. My advice is to not let this dissuade you from planning your next landscape photograph. Just keep in mind that it is always good to be flexible.
Summary
Enjoy your next adventure.
Please share your landscape photos in the comments below, and tell me where you are going next or what’s on your dream list to go photograph.