A polarizing filter is one of the most essential tools in a landscape photographer’s bag. It is typically the first filter landscape photographers buy to instantly improve their pictures by adding vividness and contrast to them. In this article, we will go through detailed information on polarizing filters, what they do, why they are important and why you should consider using them for your landscape photography.
1) Why Use a Polarizing Filter?
One of the biggest frustrations when shooting landscapes has to do with lack of color. Due to the fact that sunlight gets bounced all over atmosphere and objects present in a landscape, eventually making its way into your camera at specific angles, many photographs end up looking bland and lifeless. A quick way to reduce such reflections is to use a polarizing filter. Once attached to the front of a lens and rotated to a particular angle, it is capable of cutting out most of the reflected light in a scene, instantly enhancing resulting photographs by increasing color saturation and contrast. When photographing distant subjects such as mountains, a polarizing filter can also help in reducing atmospheric haze. So if you are wondering how some photographers manage to get rich colors in their photographs, particularly when it comes to the sky, foliage and distant subjects, you will find that in many cases, they heavily rely on polarizing filters. Although color can certainly be added to photographs in post-processing, the effect of a polarizing filter cannot be fully replicated in software, especially when it comes to reducing reflections and haze in a scene, making the filter indispensable for landscape photography.
Most lenses are designed to have a screw-on filter thread in the front part of the lens, allowing one to mount any matching size filter. Such lenses can accommodate a circular polarizing filter, also known as a “circular polarizer”. A circular polarizer is very easy to use and once it is attached to the front of the lens, it can be rotated either clockwise or counter-clockwise to increase or decrease the effect of polarization. Polarization can vary greatly depending on the celestial position of the sun, so it is important to understand that both time of the day and time of the year can impact the amount of polarization one can obtain from a polarizing filter.
2) Maximum Degree of Polarization
The maximum degree of polarization occurs in a circular band 90° from the sun, so it is relatively easy to pinpoint exactly where the sky will appear at its darkest in your photographs. A simple trick is to form a pistol with your index and thumb fingers, then point your index finger straight at the sun. Now rotate your thumb clockwise or counter-clockwise (while keeping your index finger directed at the sun). The parts of the sky where your thumb points towards are going to have the maximum degree of polarization, as they are at the right angle from the sun. This means that when the sun is directly overhead close to the zenith, the sky will be polarized horizontally, making the sky appear more or less even in all directions. Take a look at the below photograph taken at high noon:

NIKON D750 + 15-30mm f/2.8 @ 15mm, ISO 100, 1/250, f/11.0
On the other hand, when the sun is closer to the horizon at sunrise and sunset times, the sky will be polarized mostly vertically. This can present problems when photographing landscapes with a wide-angle lens, since the more polarized areas of the sky will be visible in the frame, as shown below:
NIKON D810 + 20mm f/1.8 @ 20mm, ISO 100, 1/10, f/11.0
With the sun rising from the left of the frame, it is very clear that the right side of the sky in the image is where the maximum degree of polarization is, making that particular part of the sky much darker compared to the left. Such situations are commonly encountered when photographing landscapes at the golden hour, so one must be careful when using a polarizing filter, especially when shooting with a wide-angle lens. In some cases, it might be helpful to switch to a telephoto lens and concentrate on a much smaller area of the scene, effectively concealing the uneven sky.
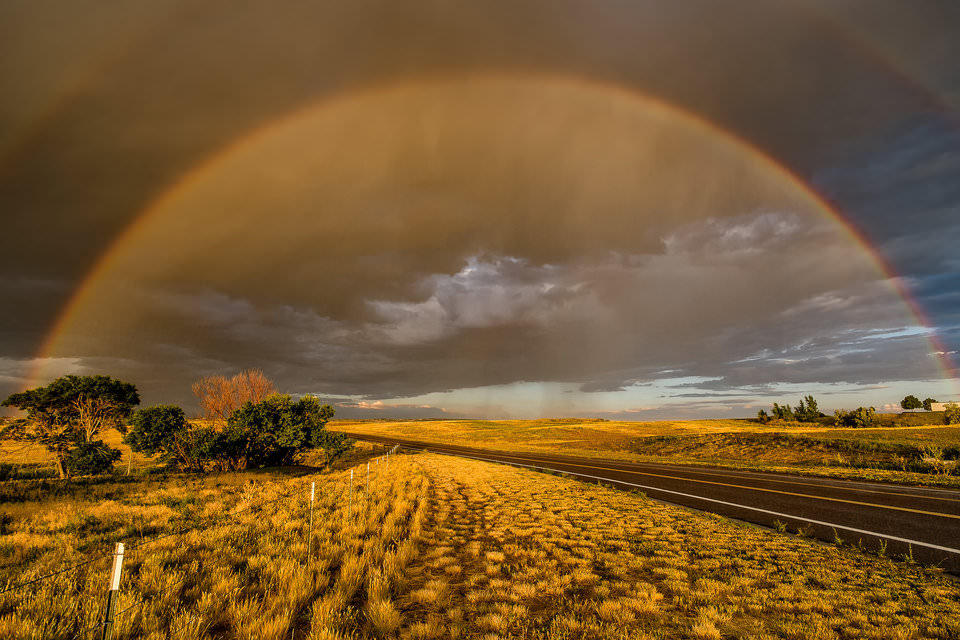
Here is a more extreme example of the same problem appearing at sunset:
PENTAX K-1 + HD PENTAX-D FA 24-70mm F2.8ED SDM WR @ 24mm, ISO 200, 1/125, f/4.5
Due to my proximity to the Morning Glory hot spring in Yellowstone National Park and lack of an ultra wide-angle lens, I had to shoot a panorama at 24mm focal length, composed of several vertical frames. Once the panorama was stitched in Lightroom, the problem with the polarization in the sky became very apparent. Here, one can clearly see that the center of the sky is where the maximum degree of polarization is – both left and right sides of the frame look much brighter in comparison. This is because the sun was setting on the right side of the frame, which means that the darkest part of the sky would have been vertical, as seen here.
Gradient skies can be very difficult to deal with in post-processing, so one must be very careful when using polarizing filters close to sunrise and sunset times, especially when using wide-angle lenses. In many cases, cutting the amount of sky captured in a scene and rotating the polarizing filter to reduce its effect can prove to be effective, as seen below. However, in some cases where re-framing is not desired, it might be better to remove the polarizing filter completely to avoid capturing gradient skies.
3) Handling of Unnaturally Dark Sky
When your camera is pointed towards the part of the sky that has the maximum degree of polarization and the circular polarizing filter is at its strongest point, the sky might appear unnaturally dark in images, making it look very fake. In such situations, rotating the filter further and thus reducing the effect of the polarizing filter can take care of the problem, creating not only a brighter sky, but also addressing the potential of having a gradient sky in the photograph. Take a look at the two images below:
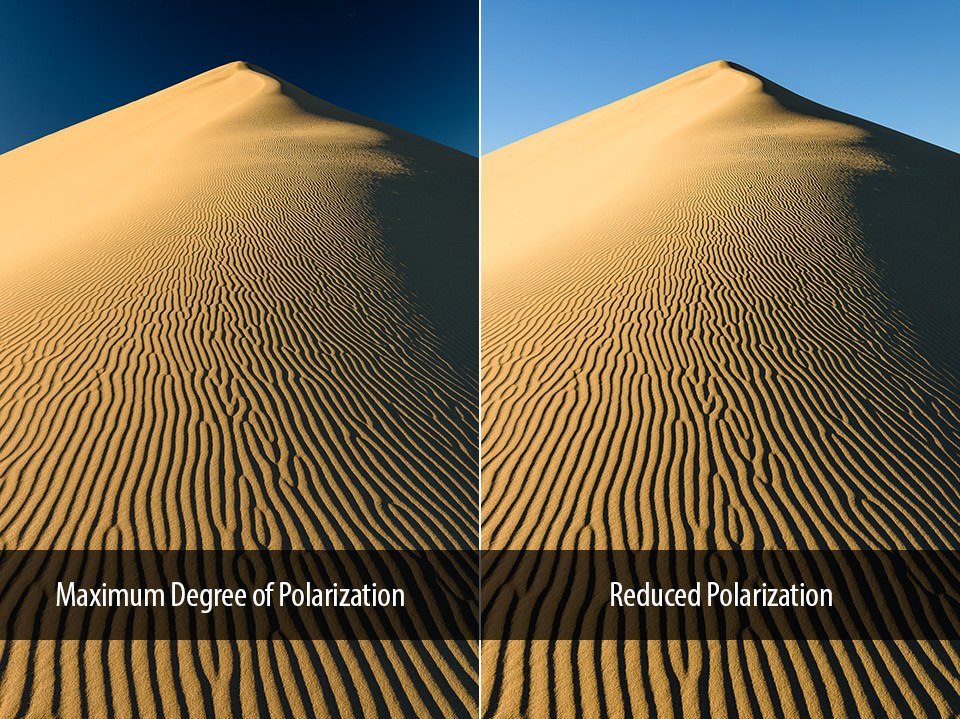

I captured the first image with the polarizing filter rotated to yield the maximum polarizing effect, which unnaturally darkened the sky and made it appear uneven. To take care of the problem, all I had to do was rotate the filter until the sky returned to a much brighter state. As you can see, the photograph on the right looks much better in comparison and with just a single turn, I was able to address the issue without having to remove the filter.
4) Reflection Reduction
One of the main reasons why photographers use polarizing filters, is to reduce reflections in a scene. Reflections are everywhere around us and they are very common in nature. Aside from common water reflections originating from ponds and lakes, we might be dealing with window reflections or perhaps even tiny reflections of light bouncing off vegetation or rocks surrounding waterfalls. In such situations, using a polarizing filter can help dramatically reduce reflections, even potentially adding contrast and saturation to the image. Take a look at the image below:
As you can see, the pond was reflecting the sky and the trees in the background into my camera. By using a polarizing filter, I was not just able to cut down most of the reflections from the pond, but also reduce the micro reflections coming from the surrounding grass the scene, which changed the appearance and the color of the glass in the resulting photograph. Such effects can never be replicated in post-processing software.
5) Haze and Contrast Reduction
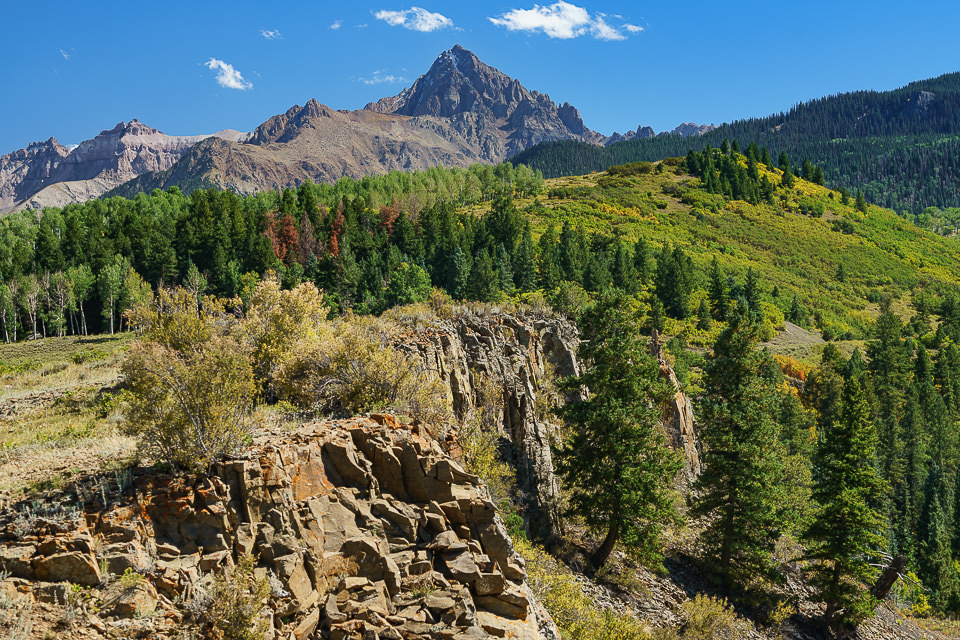
One of the main reasons why I personally take a polarizing filter everywhere I go, is because I often rely on it to reduce haze in my images. Haze is something we landscape photographers have to deal with very often, so being able to use a polarizing filter in such situations helps quite a bit during post-processing, since we can take it one step further and reduce haze even more through various “dehaze” and contrast adjustment tools in software. Some haze is relatively easy to deal with in post, but when there is a lot of it, a circular polarizing filter can definitely help. Take a look at the below image comparison:
It is very clear that there is a dramatic difference between the two images. Both are “as is, straight out of the camera”, meaning, I did not apply any post-processing to them. The “Before” image is the one I captured before mounting a circular polarizing filter and the “After” image was captured with a polarizing filter attached and rotated to reduce the reflections in the scene. As you can see, there are huge differences throughout the image. First, the image with the polarizing filter has significantly less haze in the distant mountains. Second, take a look at the colorful areas of the image: the reds and the yellows appear much more saturated. Note how the evergreens appear completely different, looking greener and lighter in comparison. This is all the result of reduced reflections in the atmosphere and reduced reflections originating from objects in the scene. Without a polarizing filter, the greens appear “dirty”, giving evergreens a much darker and uglier tone. Lastly, note the difference in the sky – the clouds appear to pop out much more and the sky looks a bit more saturated and darker. This is something you could never replicate in post! The image goes from “bland and lifeless”, to “colorful and natural” in less than a minute…
The only downside here is the gradient sky introduced by the polarizer (you could tell it was early in the morning), but with a couple of simple techniques in software, I can address such problems very easily. Just by using a graduated filter tool in Lightroom, along with a couple of small tweaks, I was able to make my image look even better:

If I had not used a circular polarizing filter, it would have taken me a significant amount of time to try to replicate these changes in Photoshop and I am fairly confident that the result would not even come close in comparison.
6) Color Enhancement
The same goes for photographing waterfalls and foliage – a polarizing filter in such cases can be invaluable. The below image would have looked vastly different without a polarizing filter:
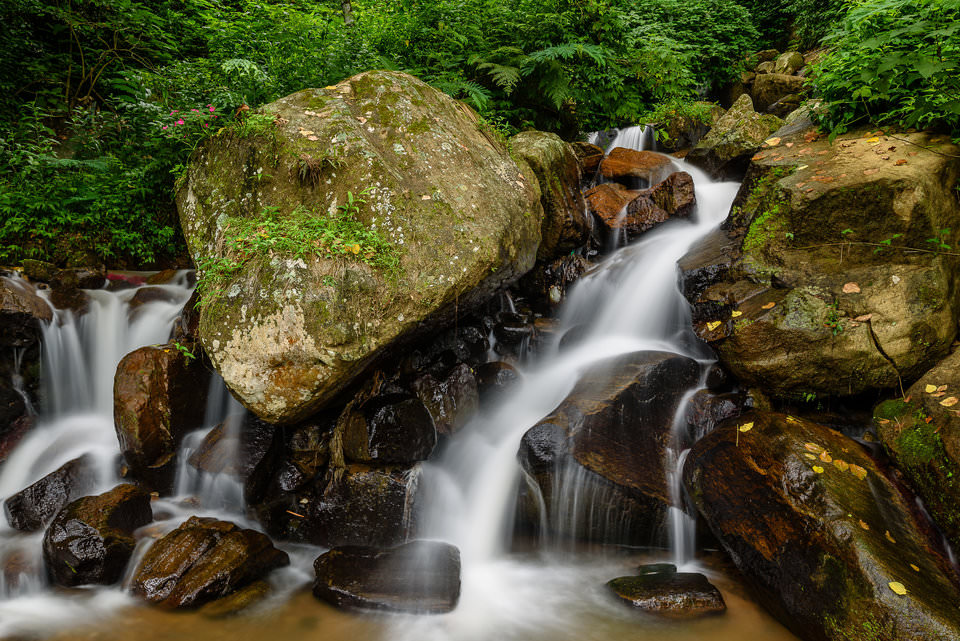
NIKON D750 + 24mm f/1.4 @ 24mm, ISO 50, 5/1, f/11.0
When photographing waterfalls, you deal with highly reflective rocks, since they have water and other wet vegetation on them, all of which send nasty reflections right into your camera. A polarizing filter makes a huge difference in such situations, not only significantly cutting down on those reflections, but also increasing the overall saturation and contrast of the image.
Here is another example of fall foliage captured with a polarizing filter:
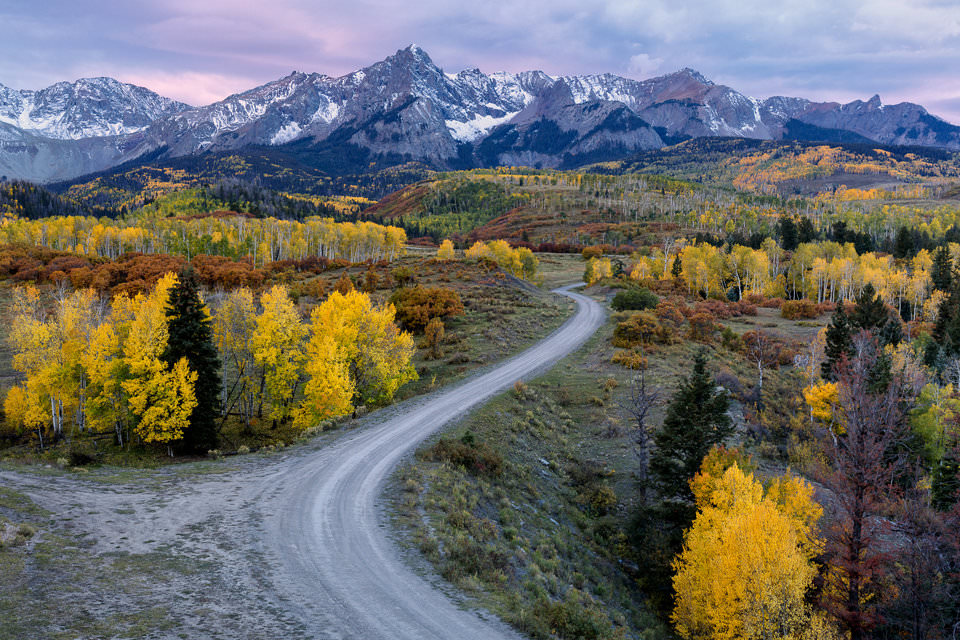
Canon EOS 5D Mark IV + EF24-70mm f/4L IS USM @ 39mm, ISO 200, 1/4, f/8.0
7) Disadvantages
Unfortunately, polarizing filters do come with a set of disadvantages and problems. Here are a few other things you be aware of:
- Polarizing filters can mess up the sky: as explained in sections #2 and #3, using a polarizing filter on a wide-angle lens near sunrise and sunset times can potentially make your sky appear gradient and uneven. The same goes for panoramas – be extra careful when shooting panoramas, as you could end up with a sky that is very difficult to fix in post-processing.
- Polarizing filters require more time to set up and use: when taking pictures with a polarizing filter, one has to pay a bit more attention to the picture taking process, since circular polarizers require adjustment each time framing changes significantly, as the effect of the polarizing filter varies greatly depending on the position of the sun and the direction of the camera. Also, sometimes it is hard to see changes in the viewfinder when rotating circular polarizing filters, especially when using cameras with smaller viewfinders.
- Polarizing filters rob light: one of the main disadvantages of polarizing filters, is that they reduce the amount of light entering your lens. Some filters are worse than others in this regard, but in general, you can expect polarizing filters to decrease your exposure time by 2-3 stops. Highest quality B+W filters typically block very little light between 1-1.5 stops, but some older and poor quality polarizing filters can bring your shutter speed down by 3+ stops, which is significant. For this reason alone, polarizing filters should be used sparingly, only when they are needed.
- High quality polarizing filters are expensive: depending on the size of the filter, the quality of glass, multi-resistant coatings and brand, high-quality polarizing filters can be quite expensive, especially if you want to buy a polarizer for each filter size you have. Instead of buying many different size filters, my recommendation would be to buy one filter (pick the largest filter thread size you have) and for all other lenses you have, get much cheaper step-up rings. This way, you can easily use the same filter on different lenses. It might take more time to set up in the field, but you won’t have to pay hundreds of dollars to get CPL filters on all your lenses.
- Polarizing filters can add more ghosting and flare to images: since it is another piece of glass in front of your lens, there is always a potential to see more ghosting and flare in your photographs, especially when using a cheap quality polarizing filter. Additionally, you must always make sure to keep both your lens front element and your polarizing filter clean, as dust particles and other debris could add to more internal reflections, reducing both contrast and image quality of your photographs.
- Polarizing filters can add vignetting: when using polarizing filters with some wide-angle lenses, you might see noticeable vignetting in the corners of the frame. To avoid vignetting issues, we recommend not to stack filters and only buy “slim” or “nano” type polarizing filters, which are much thinner compared to full-size polarizing filters (please note that some thinner filters can make it difficult to use lens caps).
8) Conclusion
Overall, a circular polarizer is a must-have tool in a photographer’s bag, especially when photographing landscapes. As you can see, a circular polarizer is not just something that can help enhance the color of the sky – it is a much more versatile tool that can reduce reflections and haze, and effectively boost both colors and contrast in your images. A polarizing filter is not something you want to leave on your lenses at all times though, since it can rob between 1-3 stops of light and it can potentially make the sky look unevenly gradient when using wide-angle lenses. High-quality circular polarizing filters can also be rather expensive to buy and can take some time to get used to. However, those are small disadvantages compared to the benefits they bring…
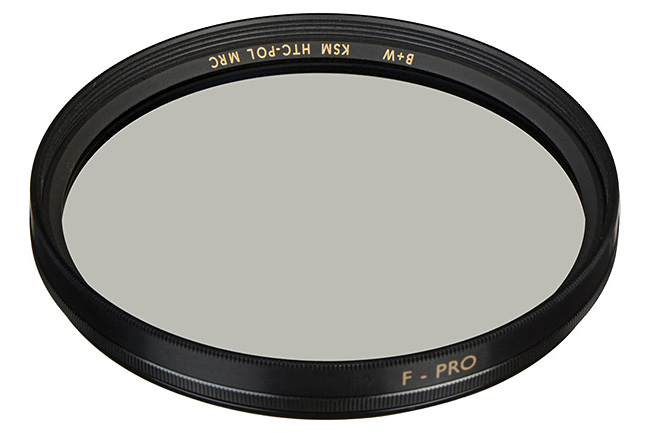
I personally use and highly recommend the B+W 77mm XS-Pro Kaeseman Circular Polarizing MRC Nano filter, because of its top notch optics, small footprint and very little light loss of 1-1.5 stops, but there are many other high-quality polarizing filters available on the market today – some cheaper, others more expensive. Please make sure to only buy high-quality polarizing filters – you do not want to put a cheap piece of glass in front of your expensive lens, only to be later disappointed by poor image quality and unwanted ghosting and flare. Bad quality filters are not worth wasting your money and time on!