(source)
Almost every photography enthusiast today has heard of Lightroom –Adobe’s photo editing program that lets you make both small –and significant adjustments to your images.
But while you’ve most likely heard of it, you may not have taken the plunge and invested in it yet. Or maybe you have signed up, but you just haven’t had much success so far.
If this sounds like you, you’re not alone! Learning to use Lightroom can be a bit of a challenge. Like everything, there’s a bit of a learning curve. However –the good news is if you’re serious about being able to edit your images in post-processing, then it’s nothing that you can’t handle!
To help make the process easier, and give you a chance to familiarize yourself with this program, here’s a quick overview of Lightroom –what you should know about it, and tips for getting started!
You’ll wonder why you didn’t start sooner!
What Is Lightroom?
In short, Lightroom is a program that allows you to store, manage, and most importantly –edit your images; all in one place. While there are tons of features, options, and confusing-looking buttons and sliders that you can use, don’t let this overwhelm you.
The truth is that you can get as deep or as simple as you’d like with Lightroom. Make simple adjustments or try your hand at in-depth tutorials, it’s really up to you.
One great thing about Lightroom is the fact that no edits are made to the original photos. All of the edits you make are done on a ‘preview’ photo, and nothing overwrites the original file. Once you are done making your changes, you simply export the photo. We’ve all been there before, accidentally deleting an original file, saving changes we didn’t mean to, or ruining something beyond repair. Lightroom though, essentially makes this impossible. Since you never edit the original photo, Lightroom is considered to be a ‘non-destructive’ editing program, and quite frankly that’s something almost every photographer can appreciate!
Getting Started
To get started, you will need to download your own copy of Lightroom. You can start your subscription here.
Perhaps the most intimidating part of using Lightroom is when you’re first getting started. The option-packed layout, along with the imposing gray background can make the program feel just a bit daunting. But don’t throw in the towel yet! The more you learn, the more familiar it’ll become, and the more capable you will be at handling Lightroom and fully utilizing it.
Getting to Work
Once you’ve successfully installed Lightroom, you can get started digging into all that is has to offer.
Keep in mind too that there are many different ways to use Lightroom, and lots of shortcuts too. In this article we’re going to uncover the basics –that is;
• Importing
• Getting Familiar With Your Workspace
• Organizing
• Editing, and
• Exporting
This will give you a good basic overview –a starting point if you will, if you’re new to the program and would just like to familiarize yourself with the program’s layout, and basic functions.
1. Importing
First, you’ll need to import your images into Lightroom.
There are a number of different ways that you can do this but I’ve found the simplest way is to create a file on your desktop, and then put the photos that you’d like to edit in there. From there, you can open up Lightroom, click File > Import Photos and Video. You’ll then have an option to select a source. Click on Desktop, and your file that you created should appear. Select all of the images that you’d like to edit, go to the bottom of the page, and hit Import.
If you have a ton of images from a photoshoot that you’d like to view in Lightroom, there’s a faster option. Just connect your memory card to your computer and you will be greeted with a grid full of tiny thumbnail previews. Then simply select the ‘copy’ option to copy your pictures to your computer and add them to a Lightroom catalog.
2. Getting Familiar With Your Workspace
At this stage you may find yourself staring at the different images, thumbnails, and options, wondering what you’ve gotten yourself into! If that’s the case, don’t worry, we’ll take you through the basic layout to help you get familiar with what you’re working with.
First, you should note the main menu located at the top of your workspace. This menu includes the tabs: Library, Develop, Map, Book, Slideshow, Print, and Web. The main two tabs that we’ll be working with today are Library and Develop.
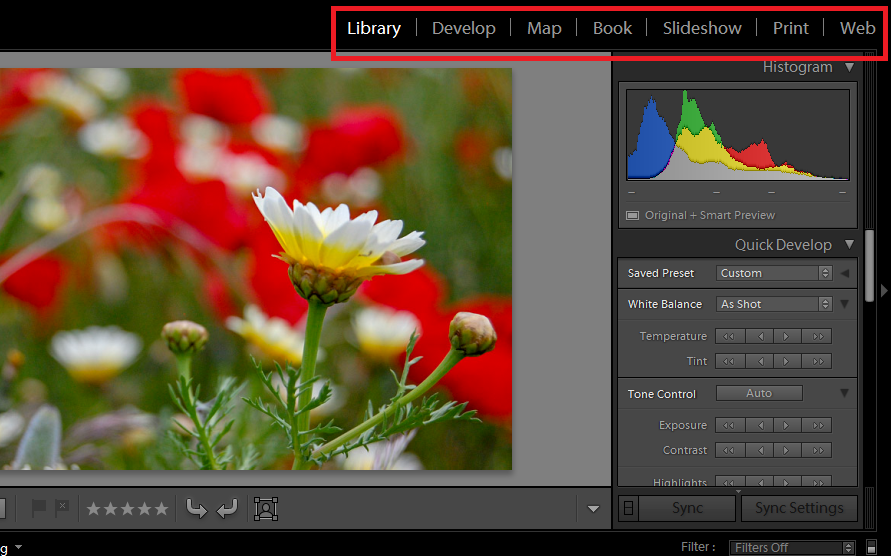
The main menu, located at the top of the workspace.
Go ahead and click on the Library tab now. This should bring up a menu on the right-hand side of your program. You should see the Histogram in the top right corner, and below that, a number of options including Quick Develop, Keywording, Keyword List, Metadata, and Comments. You may also see a small arrow button pointing at the words. Click this arrow to bring up the options located under the main tabs. Click it again to make the options disappear.

Clicking the arrow brings up more options.
The Disappearing Menu: Now, if at any stage throughout the process, you find that your toolbar disappears –don’t worry! Just click the little arrow button on the far right-hand side of your workspace. Then right click the area and select “Manual.” This should keep the menu from disappearing while you’re trying to work.
Filmstrip: Finally, at the bottom of the page is what’s known as a filmstrip. This allows you to see all of the photos in a collection or album. To view the filmstrip, click the small arrow located at the very bottom of the workspace. To hide it, click the arrow again.

The filmstrip, located along the bottom of the workspace
3. Organizing
Now, let’s look at organizing your photos. This will prove to come in handy once you start using Lightroom more frequently
Remember, the original files are safely on your hard drive where they will remain untouched. For now, you can set to work sorting your photos. Lightroom makes it easy for you to sort your images and gives you multiple ways to do it:
• The Star System
The star system allows you to ‘rate’ your photo from 1-5 stars. Rating your photo is simple. Once you have an image up, simply click the number of stars that you’d like to give your image, then move onto the next one. Ranking your images by stars allows you to find the best ones easily later on.
• Flagging
Flagging photos is similar to the star system, but in some ways it’s a bit more useful. You can flag photos you wish to return to later or want to delete. To flag an image, right click on the photo and then click “Set Flag.” Then select “Flagged.”
• Keywords
If you are looking for an easy way to locate photos in the future, then keywords is the way to go. Add as many keywords as you’d like, separated by a comma. In the future when you are looking for a specific picture or set of pictures all you have to do is type in the keywords to pull them up.
To access keywords, click the Library tab at the top of the workspace, then head to Keywording on the right-hand side. Then enter your keywords into the Keyword Tags section.
• Collections
Finally, Lightroom collections allow you to put one photo in multiple collections, without having to duplicate that image. No wasted space, lost photos, or confusing duplicates. To create a collection, find the Collections tab on the left hand side of your workspace. Then click the + symbol, and click Create Collection. To add images to a collection, simply click on an image’s thumbnail –either in the library view or in the filmstrip at the bottom of your page, then drag and drop it into your preferred collection –again, located at the right-hand side.
Finally, the fun begins! Lightroom offers an array of tools for you to play with! Adjust the exposure, crop your image, tweak the white balance, increase vibrance, and more.
For quick editing tasks, simply click the Library tab, located at the top of your workspace. Then navigate to the Quick Develop section on the right-hand side of the program.
From there you’ll have the option to adjust the White Balance, Tone Control –including Exposure, Contrast, Highlights, Shadows, Whites, Blacks, Clarity, and Vibrance.
Finally, you can also access keywords in this section, allowing you to easily tag images with keywords.
For more extensive editing options, and a complete range of tools, click the Develop tab on the top of the workspace. The editing options should appear on the right-hand side of the page. You’ll be able to see everything here, including Tone Curve, Noise Reduction, HSL/Color, Split Toning, Detail, Lens Corrections, and more. Most of the advanced tutorials that you find online will involve using this section.
5. Exporting
Finally, we arrive on exporting your image. Essentially known as “Save As” this saves your photo the way it looks. Once you’re done editing, simply right click your image to export, or go to File > Export to save it. Be sure to label your photo with keywords and file it in the right category so you can easily find it in the future.
So there you have it! A basic rundown of Lightroom. Take a few minutes to familiarize yourself with the interface; the arrows, tabs, and basic options –and then get ready to do more powerful edits and enhancements by following helpful tutorials later on!
Are you a Lightroom pro or new to the program? What are your thoughts on it?