Sathya loves to travel, capture, and share the beauty of what connects with him. LikeTheOcean—the travel & photography brand that he started couple of years back—has become part of his journey to see the world in a new way. Lately he has been exploring the world of starscapes and nighscapes. You can download his Adobe Photoshop Script that helps you make your startrails awesome on his blog.
Feel free to connect with him through 500px, his blog, Facebook, or subscribe to his weekly travel shots.
This guide was originally published here, and is being republished on 500px ISO with express permission.
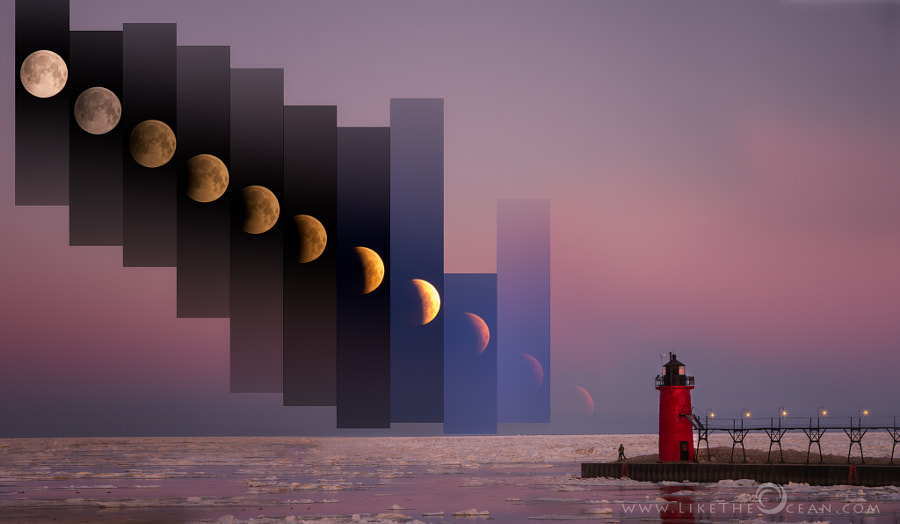
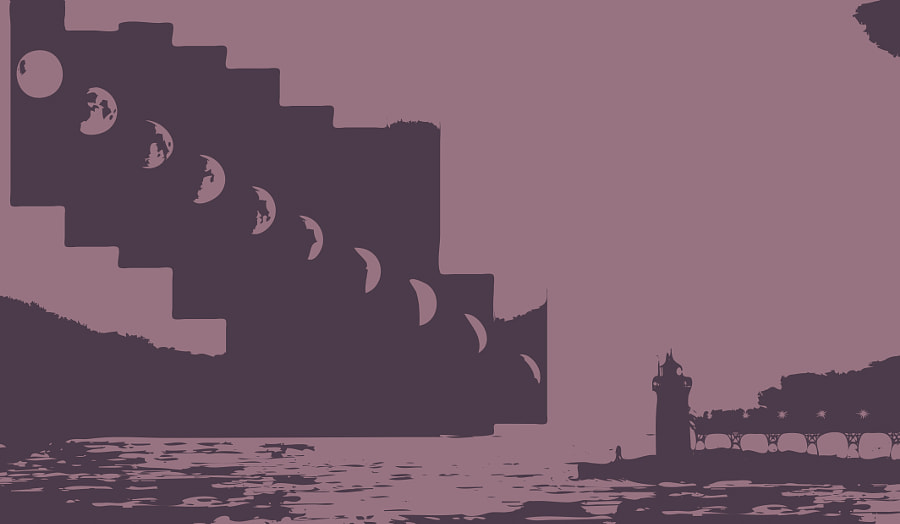
Time Slice of Lunar Eclipse; 04.04.2015 ; South Haven, Michigan, USA
It all started with a idea …
This guide is about how this Time Slice shot of a Lunar Eclipse was made. Its focus is mainly on the planning that went into it, even before the first shutter click. Let us start off by getting some key details of the event.
There are several websites that provide details on the astro events (like Space, SpaceDex, TimeAndDate, EclipseWise to name a few) and social channels. Here’s the info I found for the April eclipse:
| EVENT | UTC TIME | TIME IN CHICAGO | VISIBLE IN CHICAGO |
|---|---|---|---|
| Penumbral Eclipse began | Apr 4 at 9:01 AM | Apr 4 at 4:01 AM | Yes |
| Partial Eclipse began | Apr 4 at 10:15 AM | Apr 4 at 5:15 AM | Yes |
| Full Eclipse began | Apr 4 at 11:57 AM | Apr 4 at 6:57 AM | No, below horizon |
| Maximum Eclipse | Apr 4 at 12:00 Noon | Apr 4 at 7:00 AM | No, below horizon |
| Full Eclipse ended | Apr 4 at 12:02 PM | Apr 4 at 7:02 AM | No, below horizon |
| Partial Eclipse ended | Apr 4 at 1:44 PM | Apr 4 at 8:44 AM | No, below horizon |
| Penumbral Eclipse ended | Apr 4 at 2:59 PM | Apr 4 at 9:59 AM | No, below horizon |
Though the complete eclipse wasn’t visible, this turned out to be an advantage. As the moon was setting, it appeared to be dissolving into the the horizon!
Visualize
It is the vision, that drives the planning, that drives the execution.
Create a vision in your mind’s eye of how you want to capture the event. This might not sound crucial, but it drastically increases the success rate of the final shot.
It all starts with the vision. It is the vision, that drives the planning, that drives the execution. I have seen this to be true not just for photography, but in other walks of life too ?
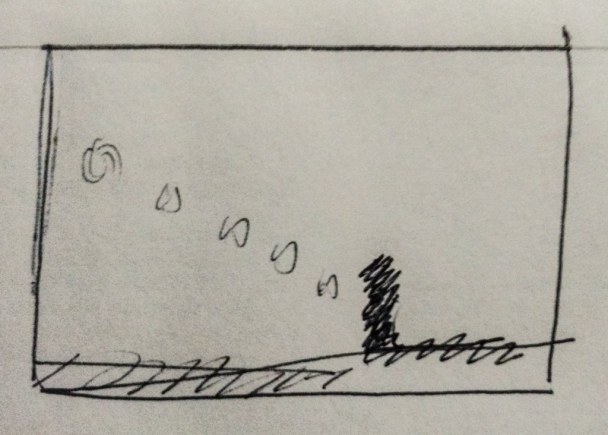
Initial sketch on Napkin
There are a multitude of ways to capture the lunar eclipse. You can focus on getting the different phases of the eclipse, or you can focus on getting a lovely composition of the landscape along with the blood red moon. It can even be a composite of the foreground along with the lovely moon set as depicted above!
Many times, the final shot is NOT going to be a result of just a random snapshot. It is something that starts with the vision, evolves as you go thru the different phases of planning, and culminates in the final shot. Have the planning phase fluid enough to accommodate changes as needed.
Location, Location, Location
If you don’t know where you’re going, You’ll probably end up someplace else!
If you are planning to capture the Lunar eclipse along with the landscape, the location is very critical. Great foreground elements generally add a lot to the shot. They not only define the foreground composition, but also aid in perspective by contrasting with the size of the moon (read more on how this compression effect can be taken advantage of).
The planning in this case becomes even more significant, as the path of the moon is not static even for a given landscape. Below are some of the tools that aid in zeroing down on that particular spot, and identifying when and how the moon would rise for the identified landscape.
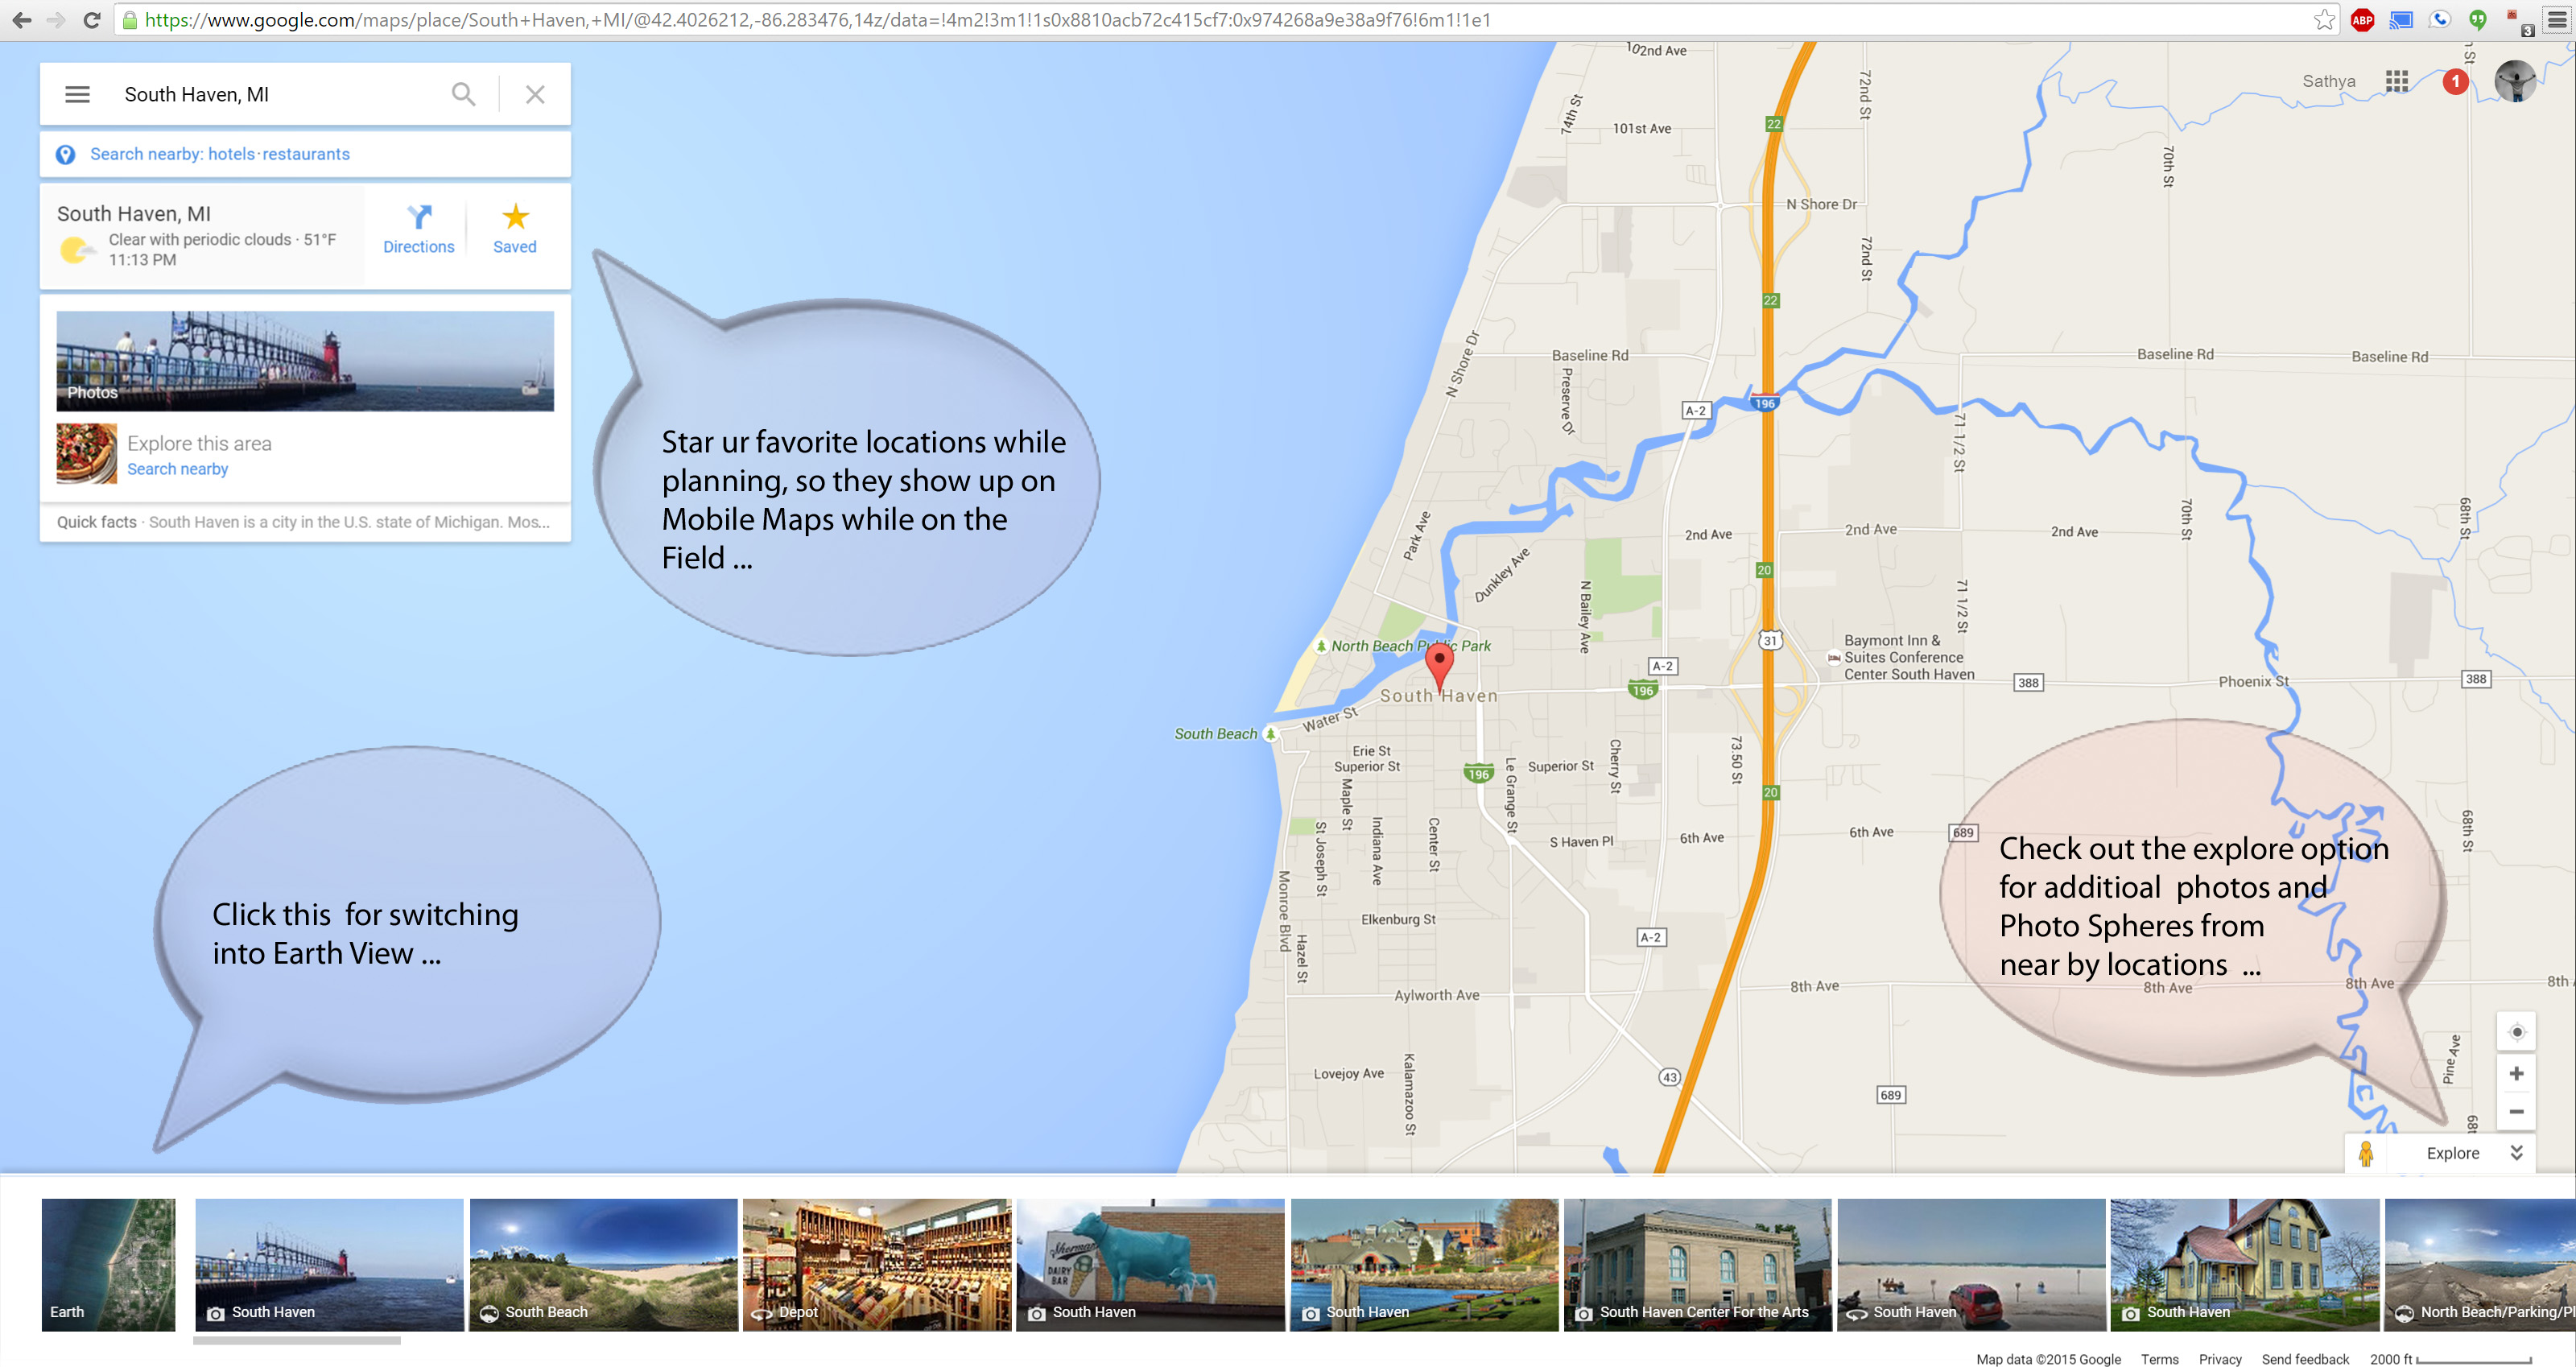
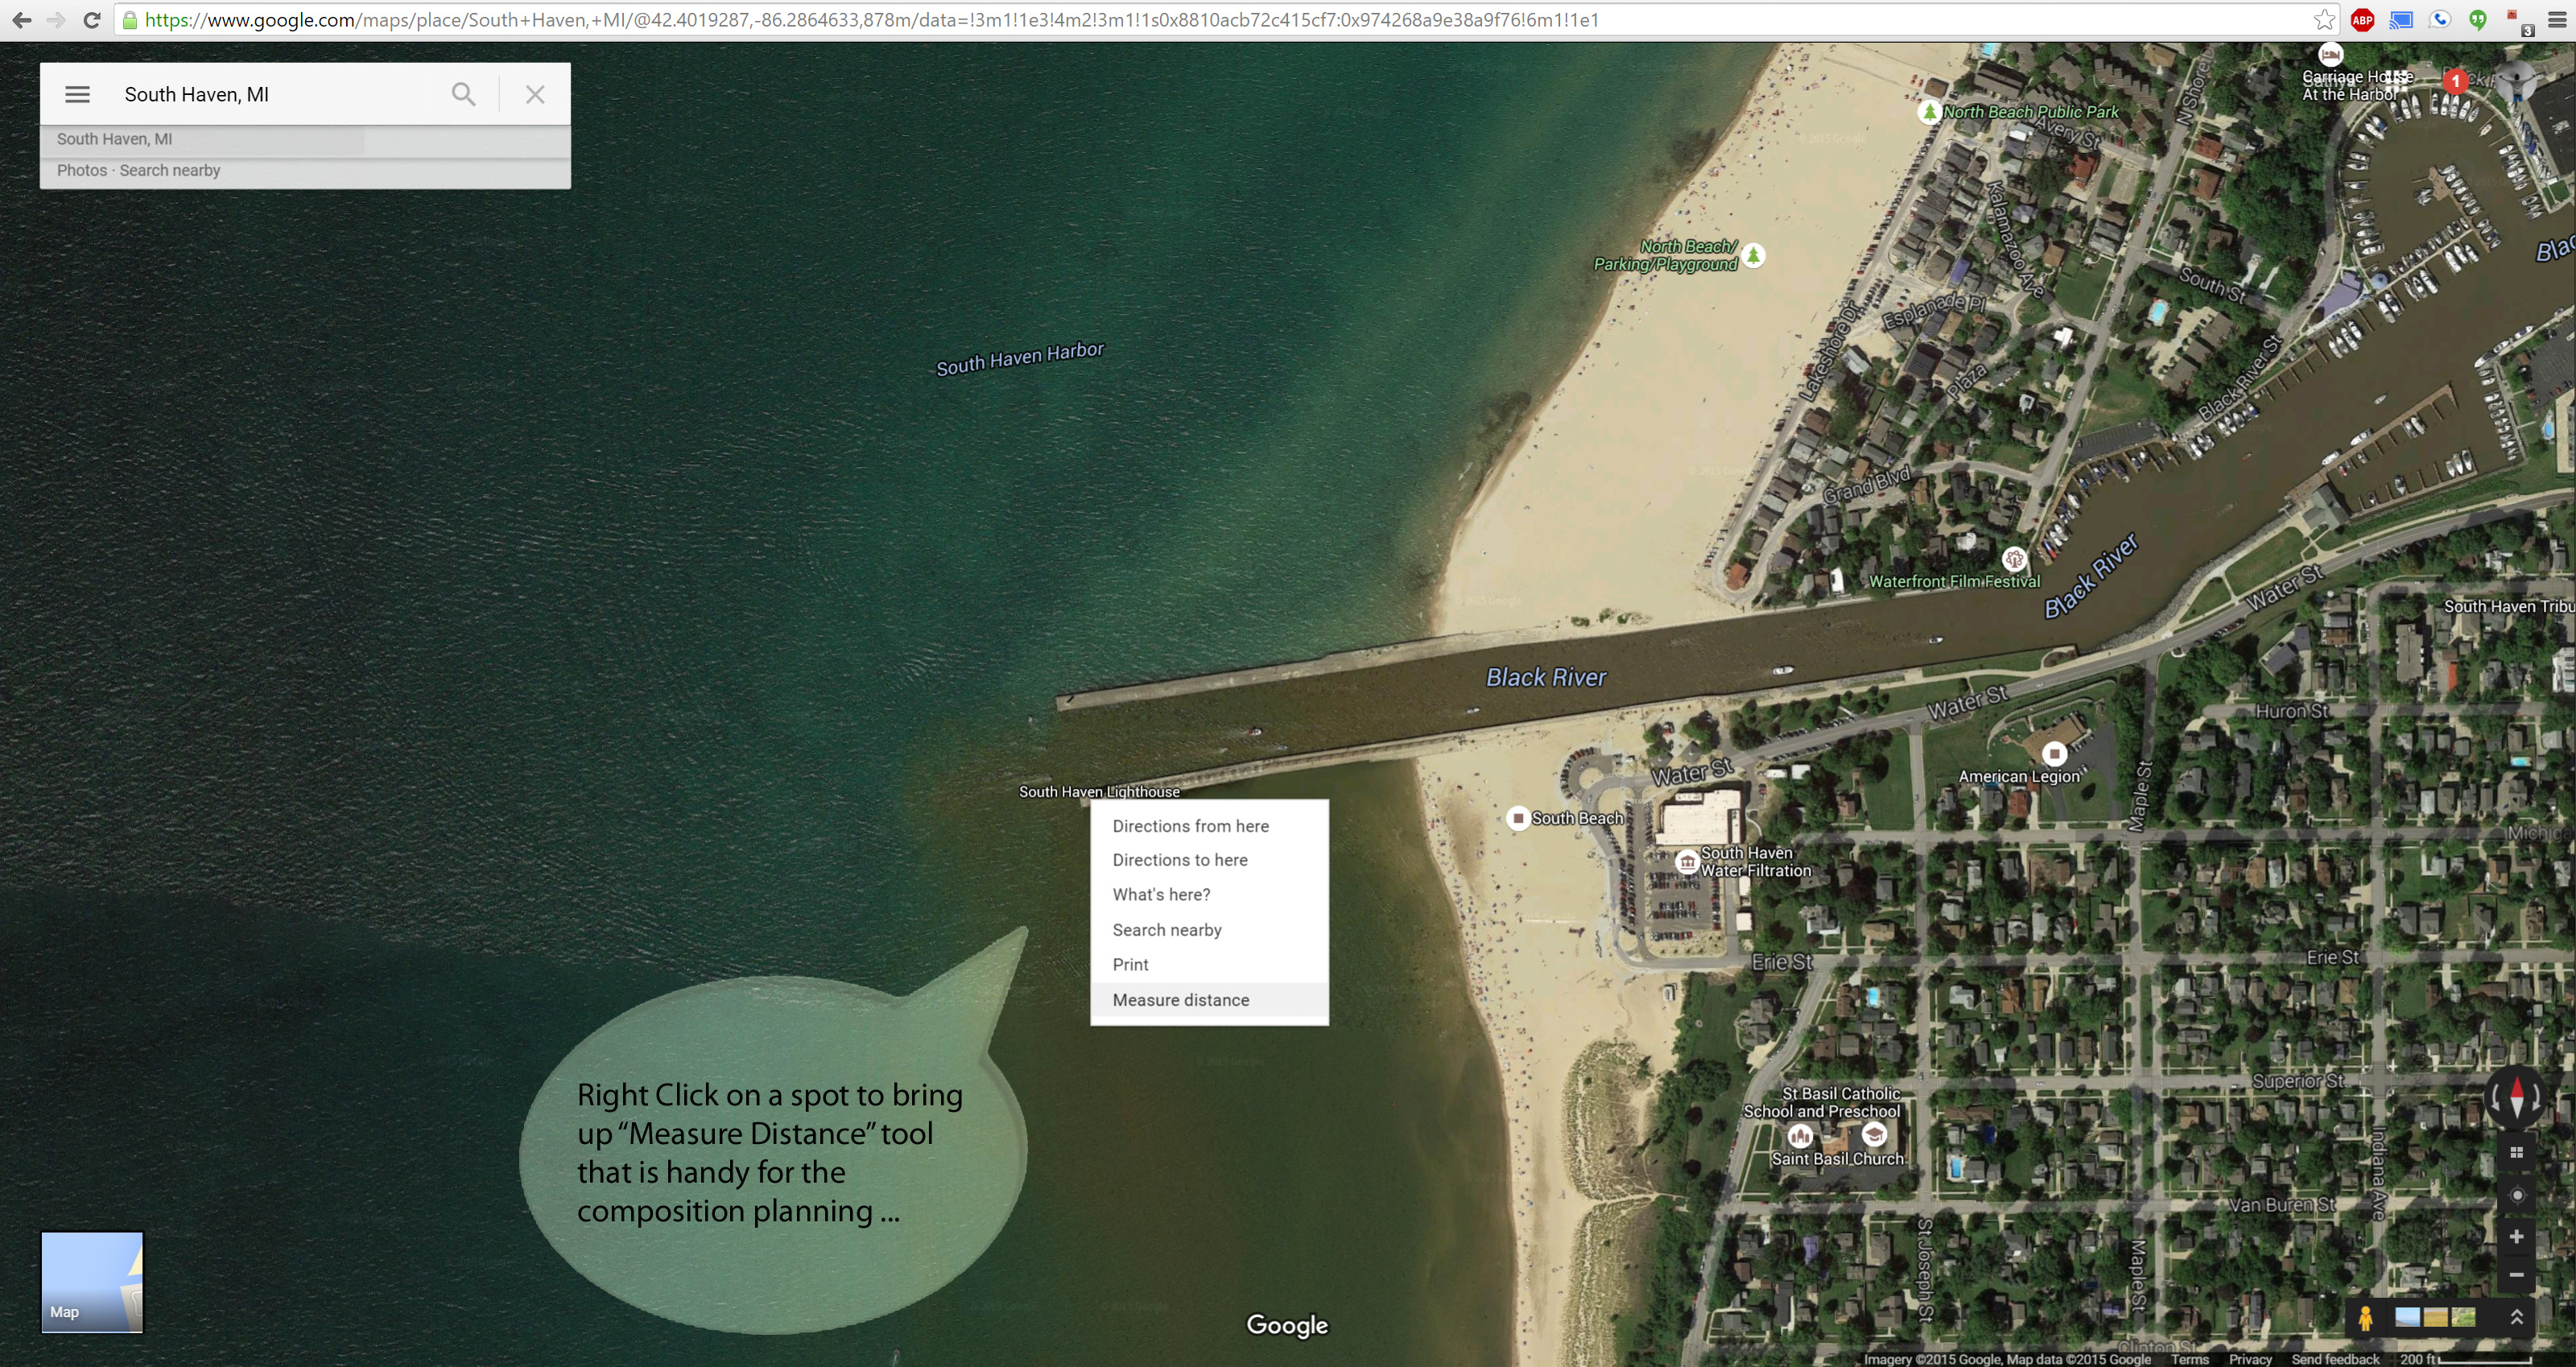
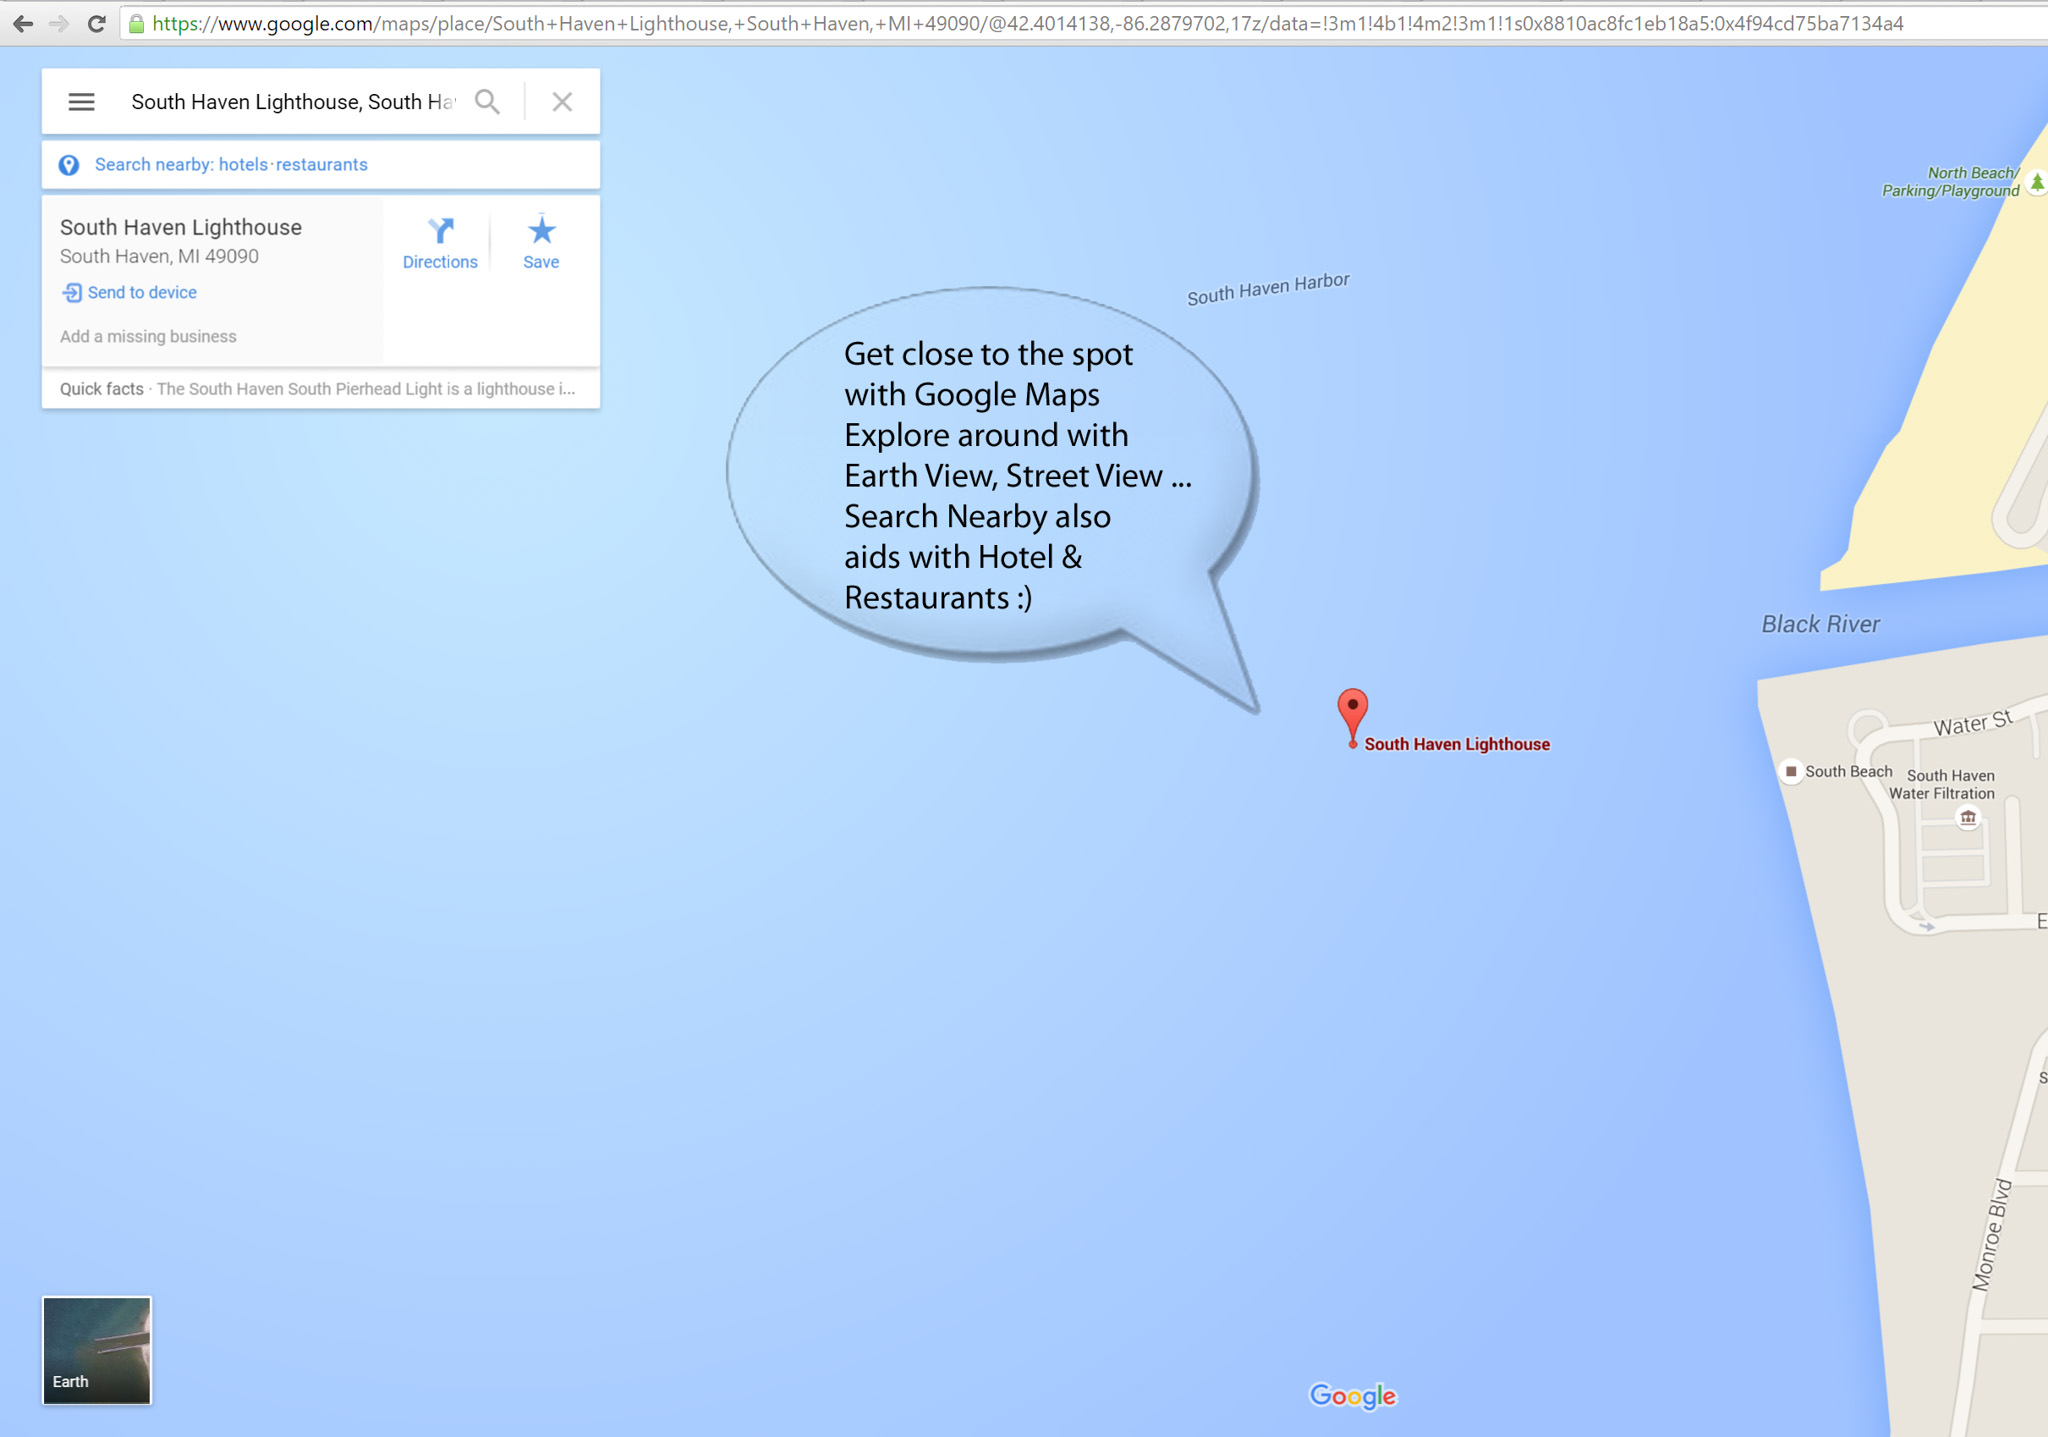
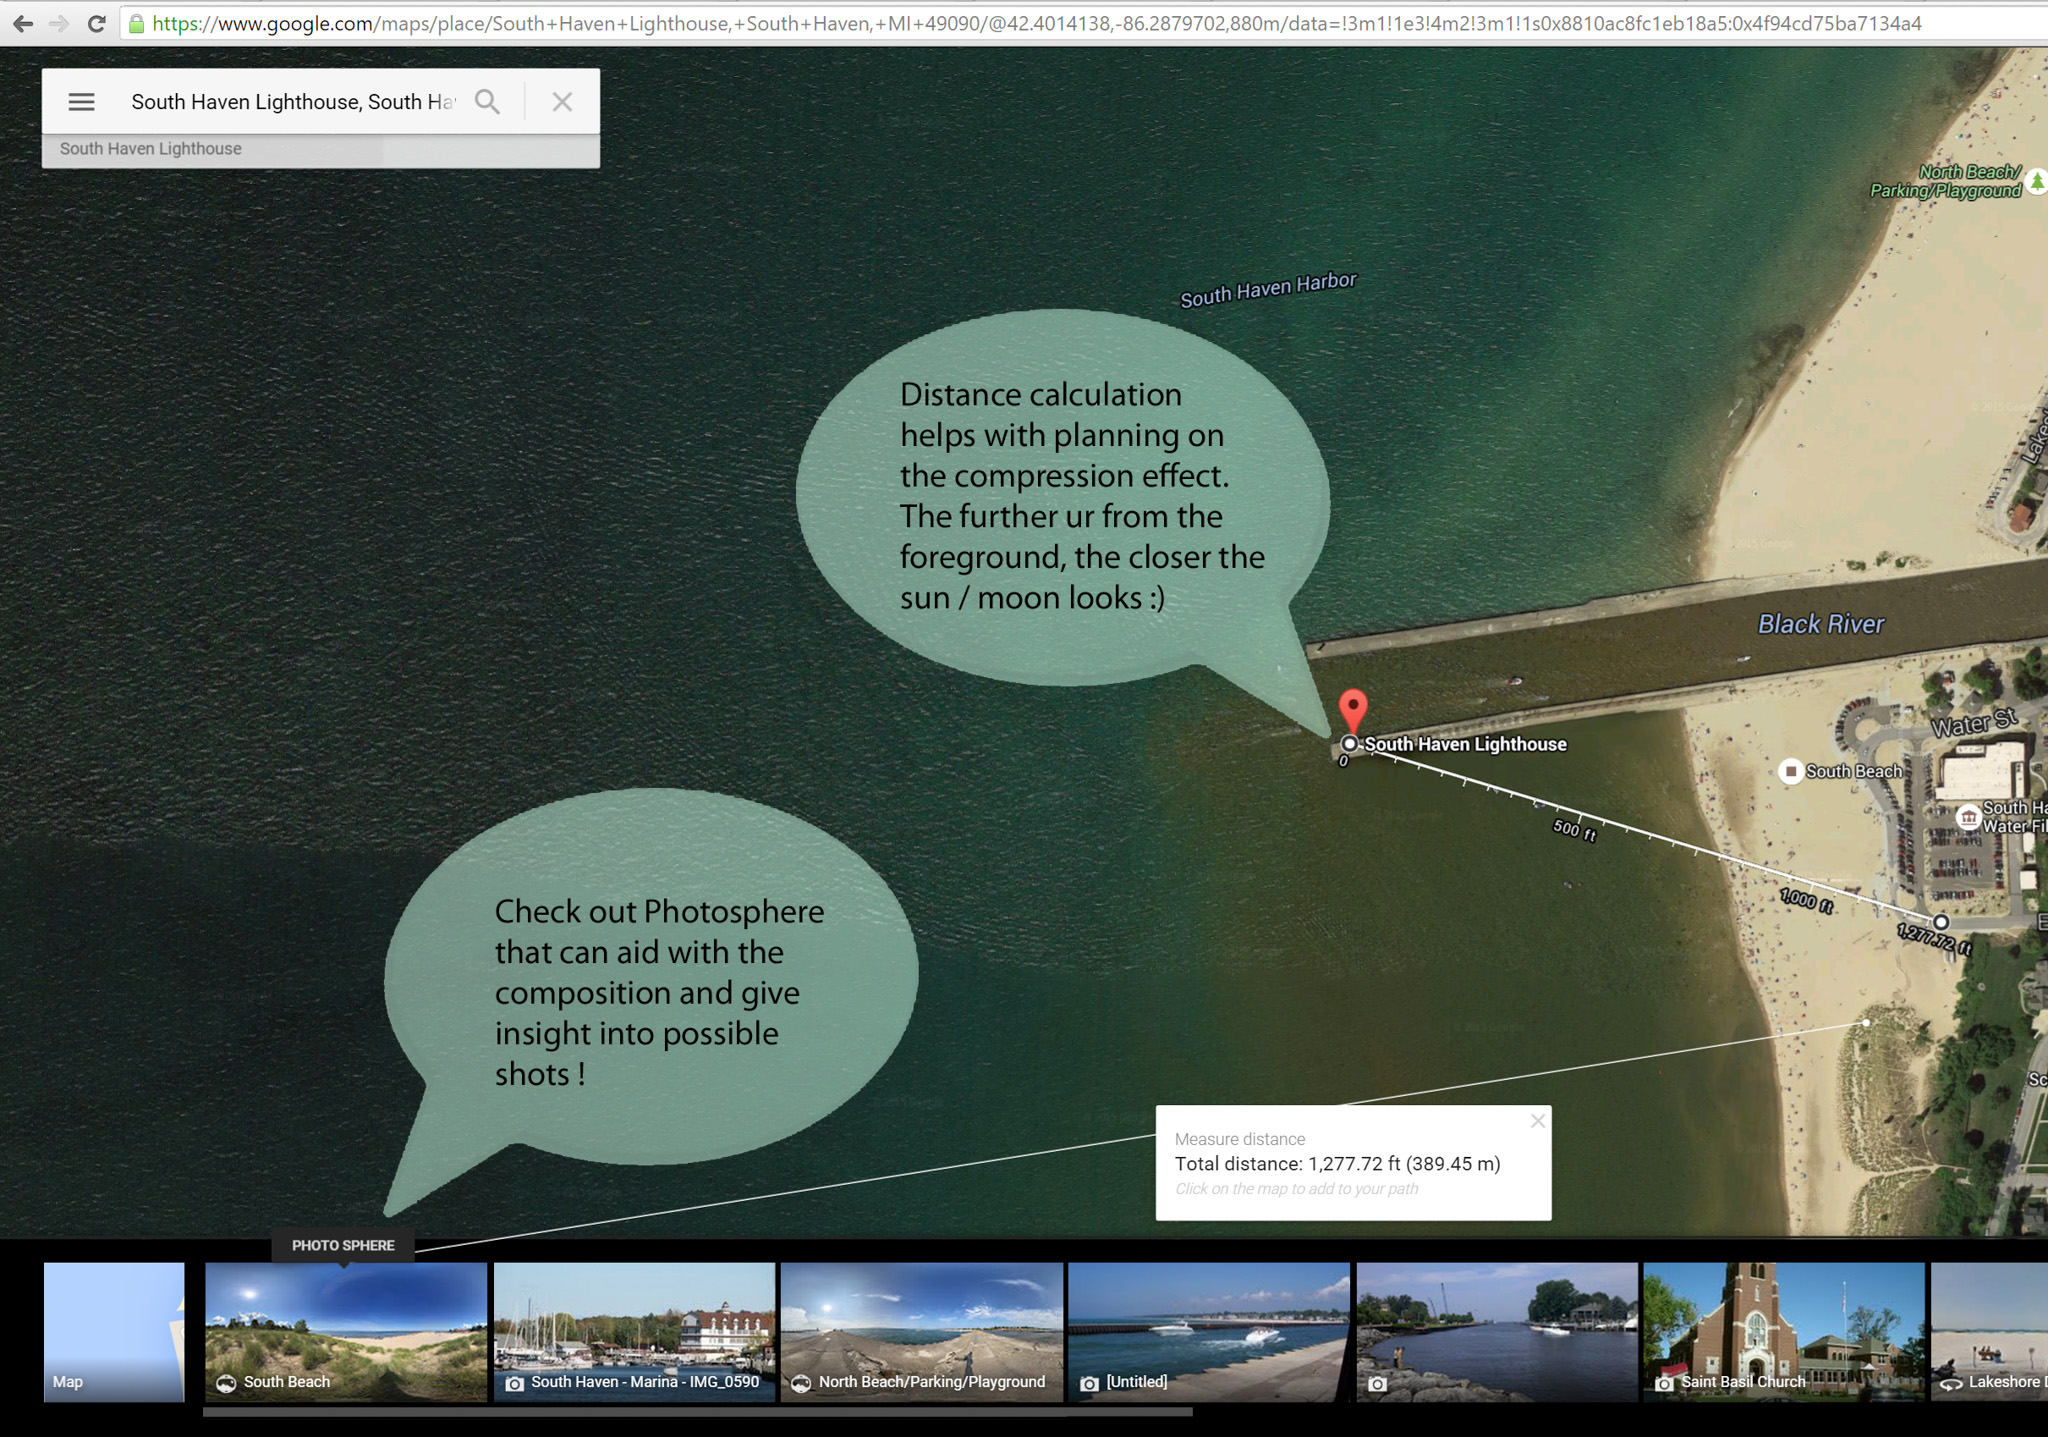
Google Maps
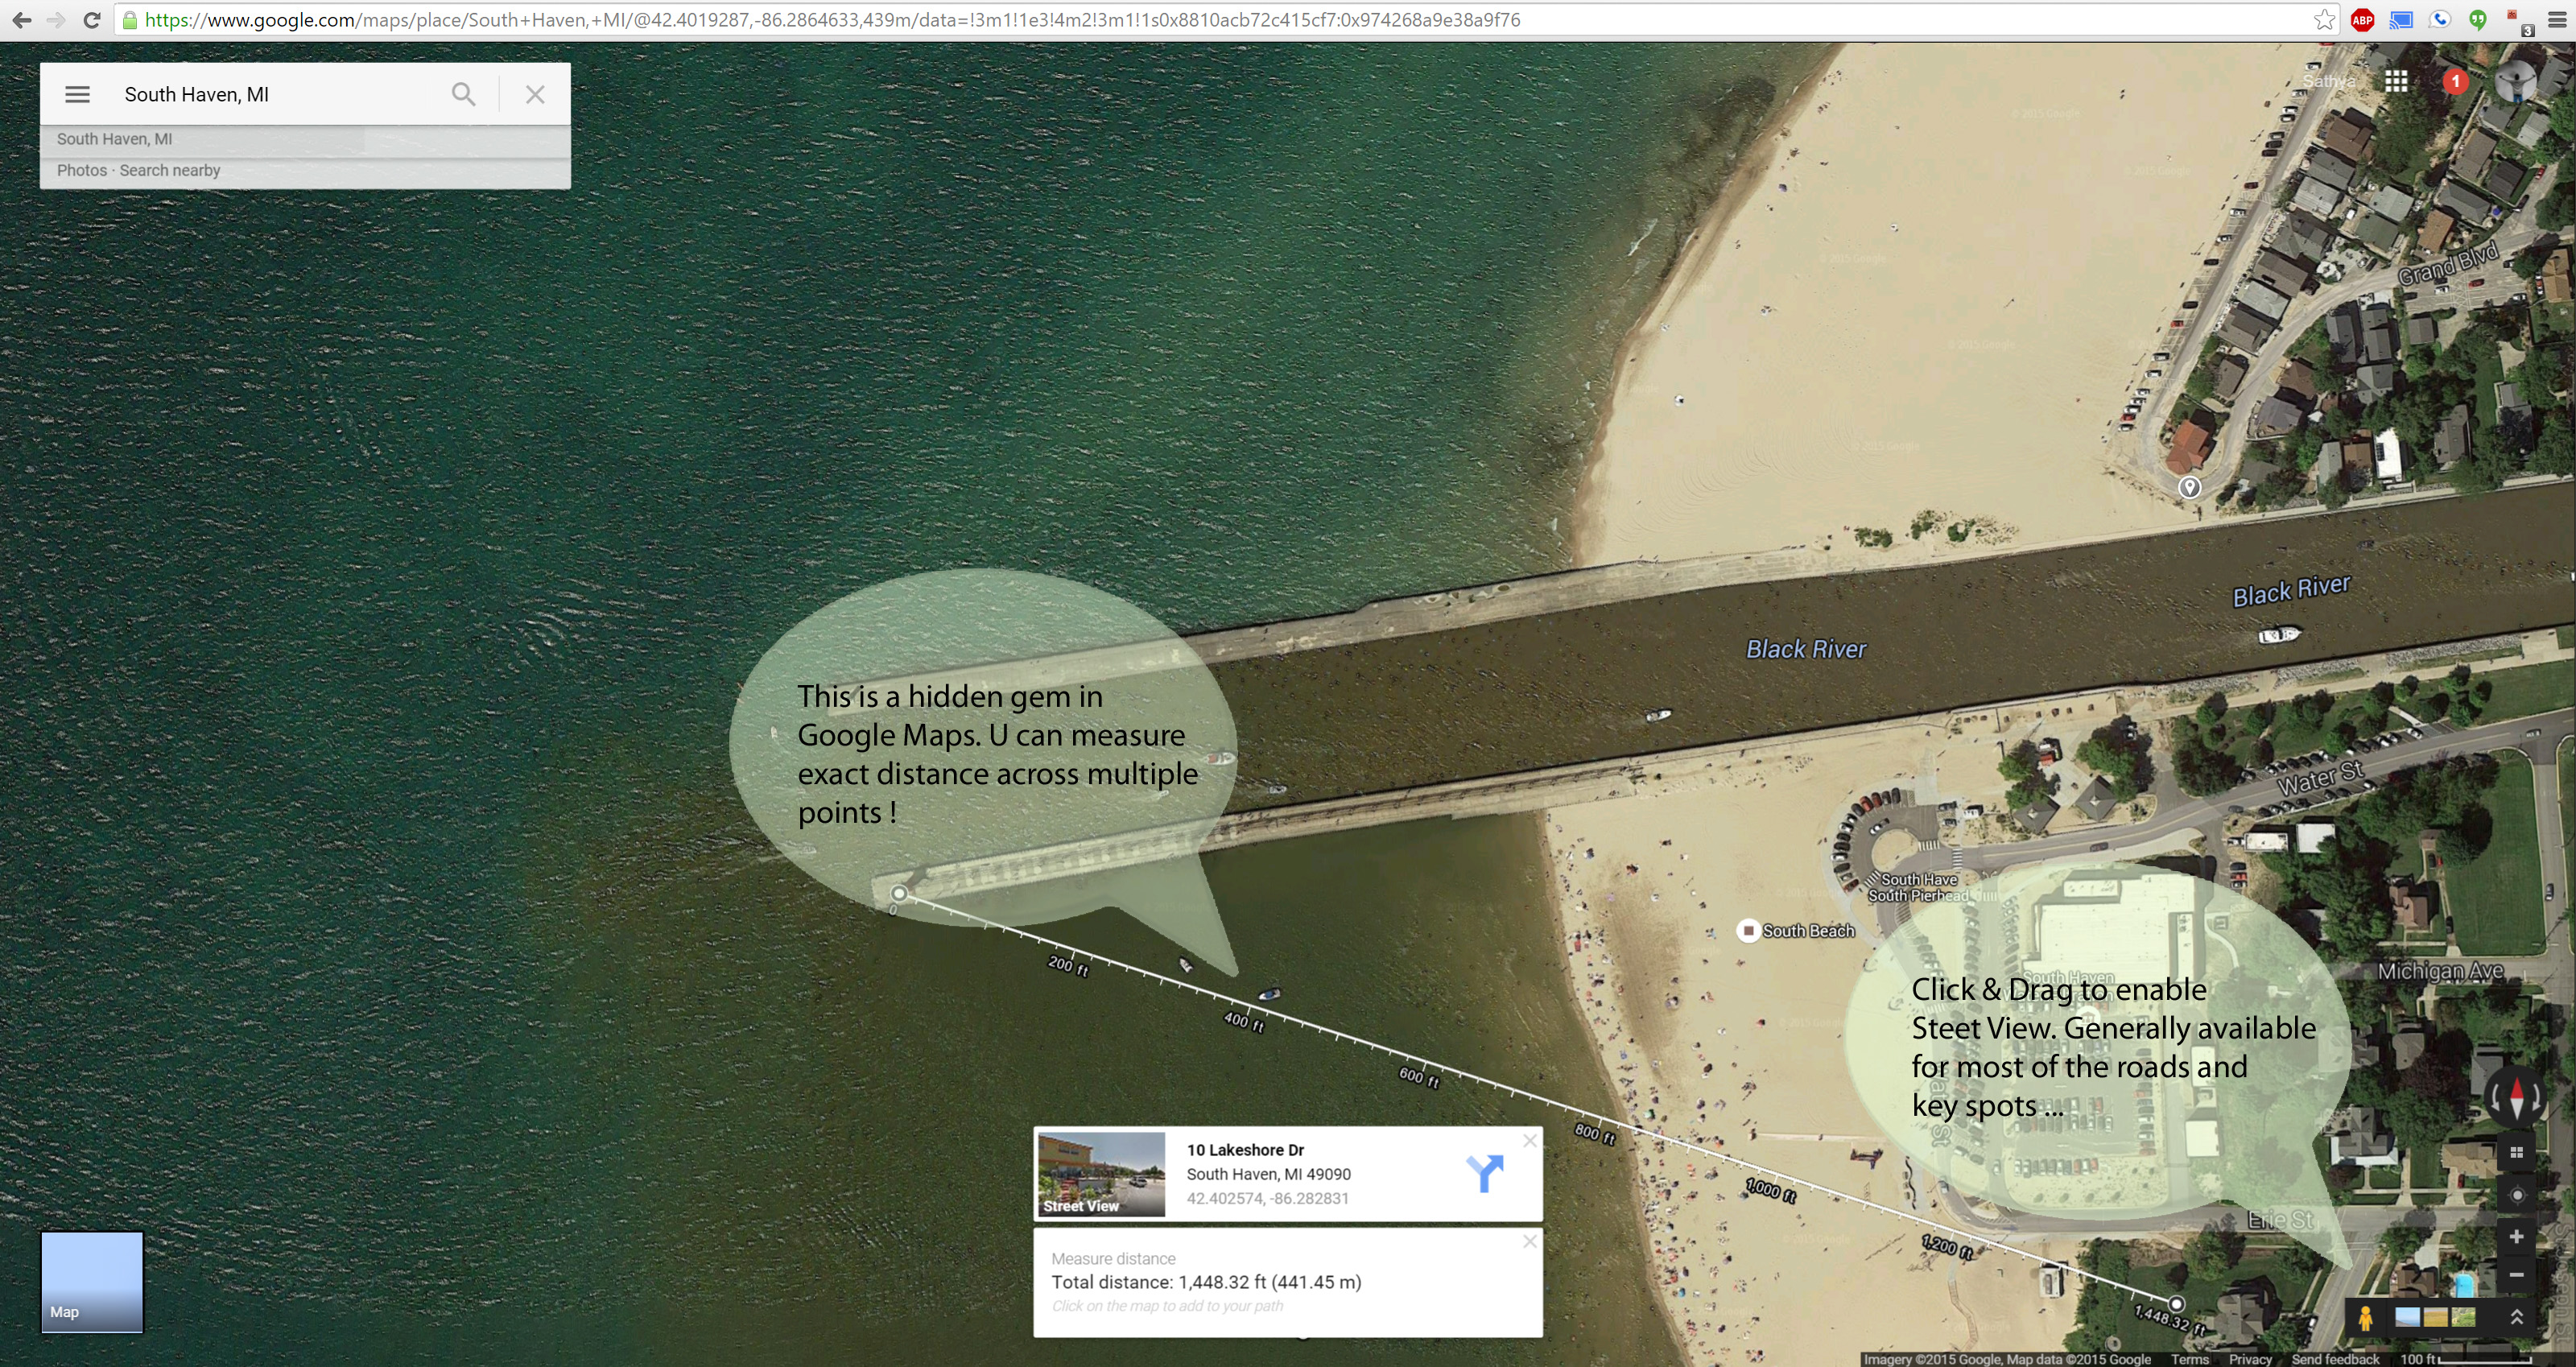
Google Maps – Yeah, the same application that you use to get directions has a lot of data that can be used for photo shoot pre-planning. From Street View to photos of a given location, it is very handy.
The first use of the tool is for virtual scouting of any given location. It has amazing amounts of data that can literally help you get a feel for the area without being anywhere close to it. Google Maps is almost always my go-to tool for scouting.
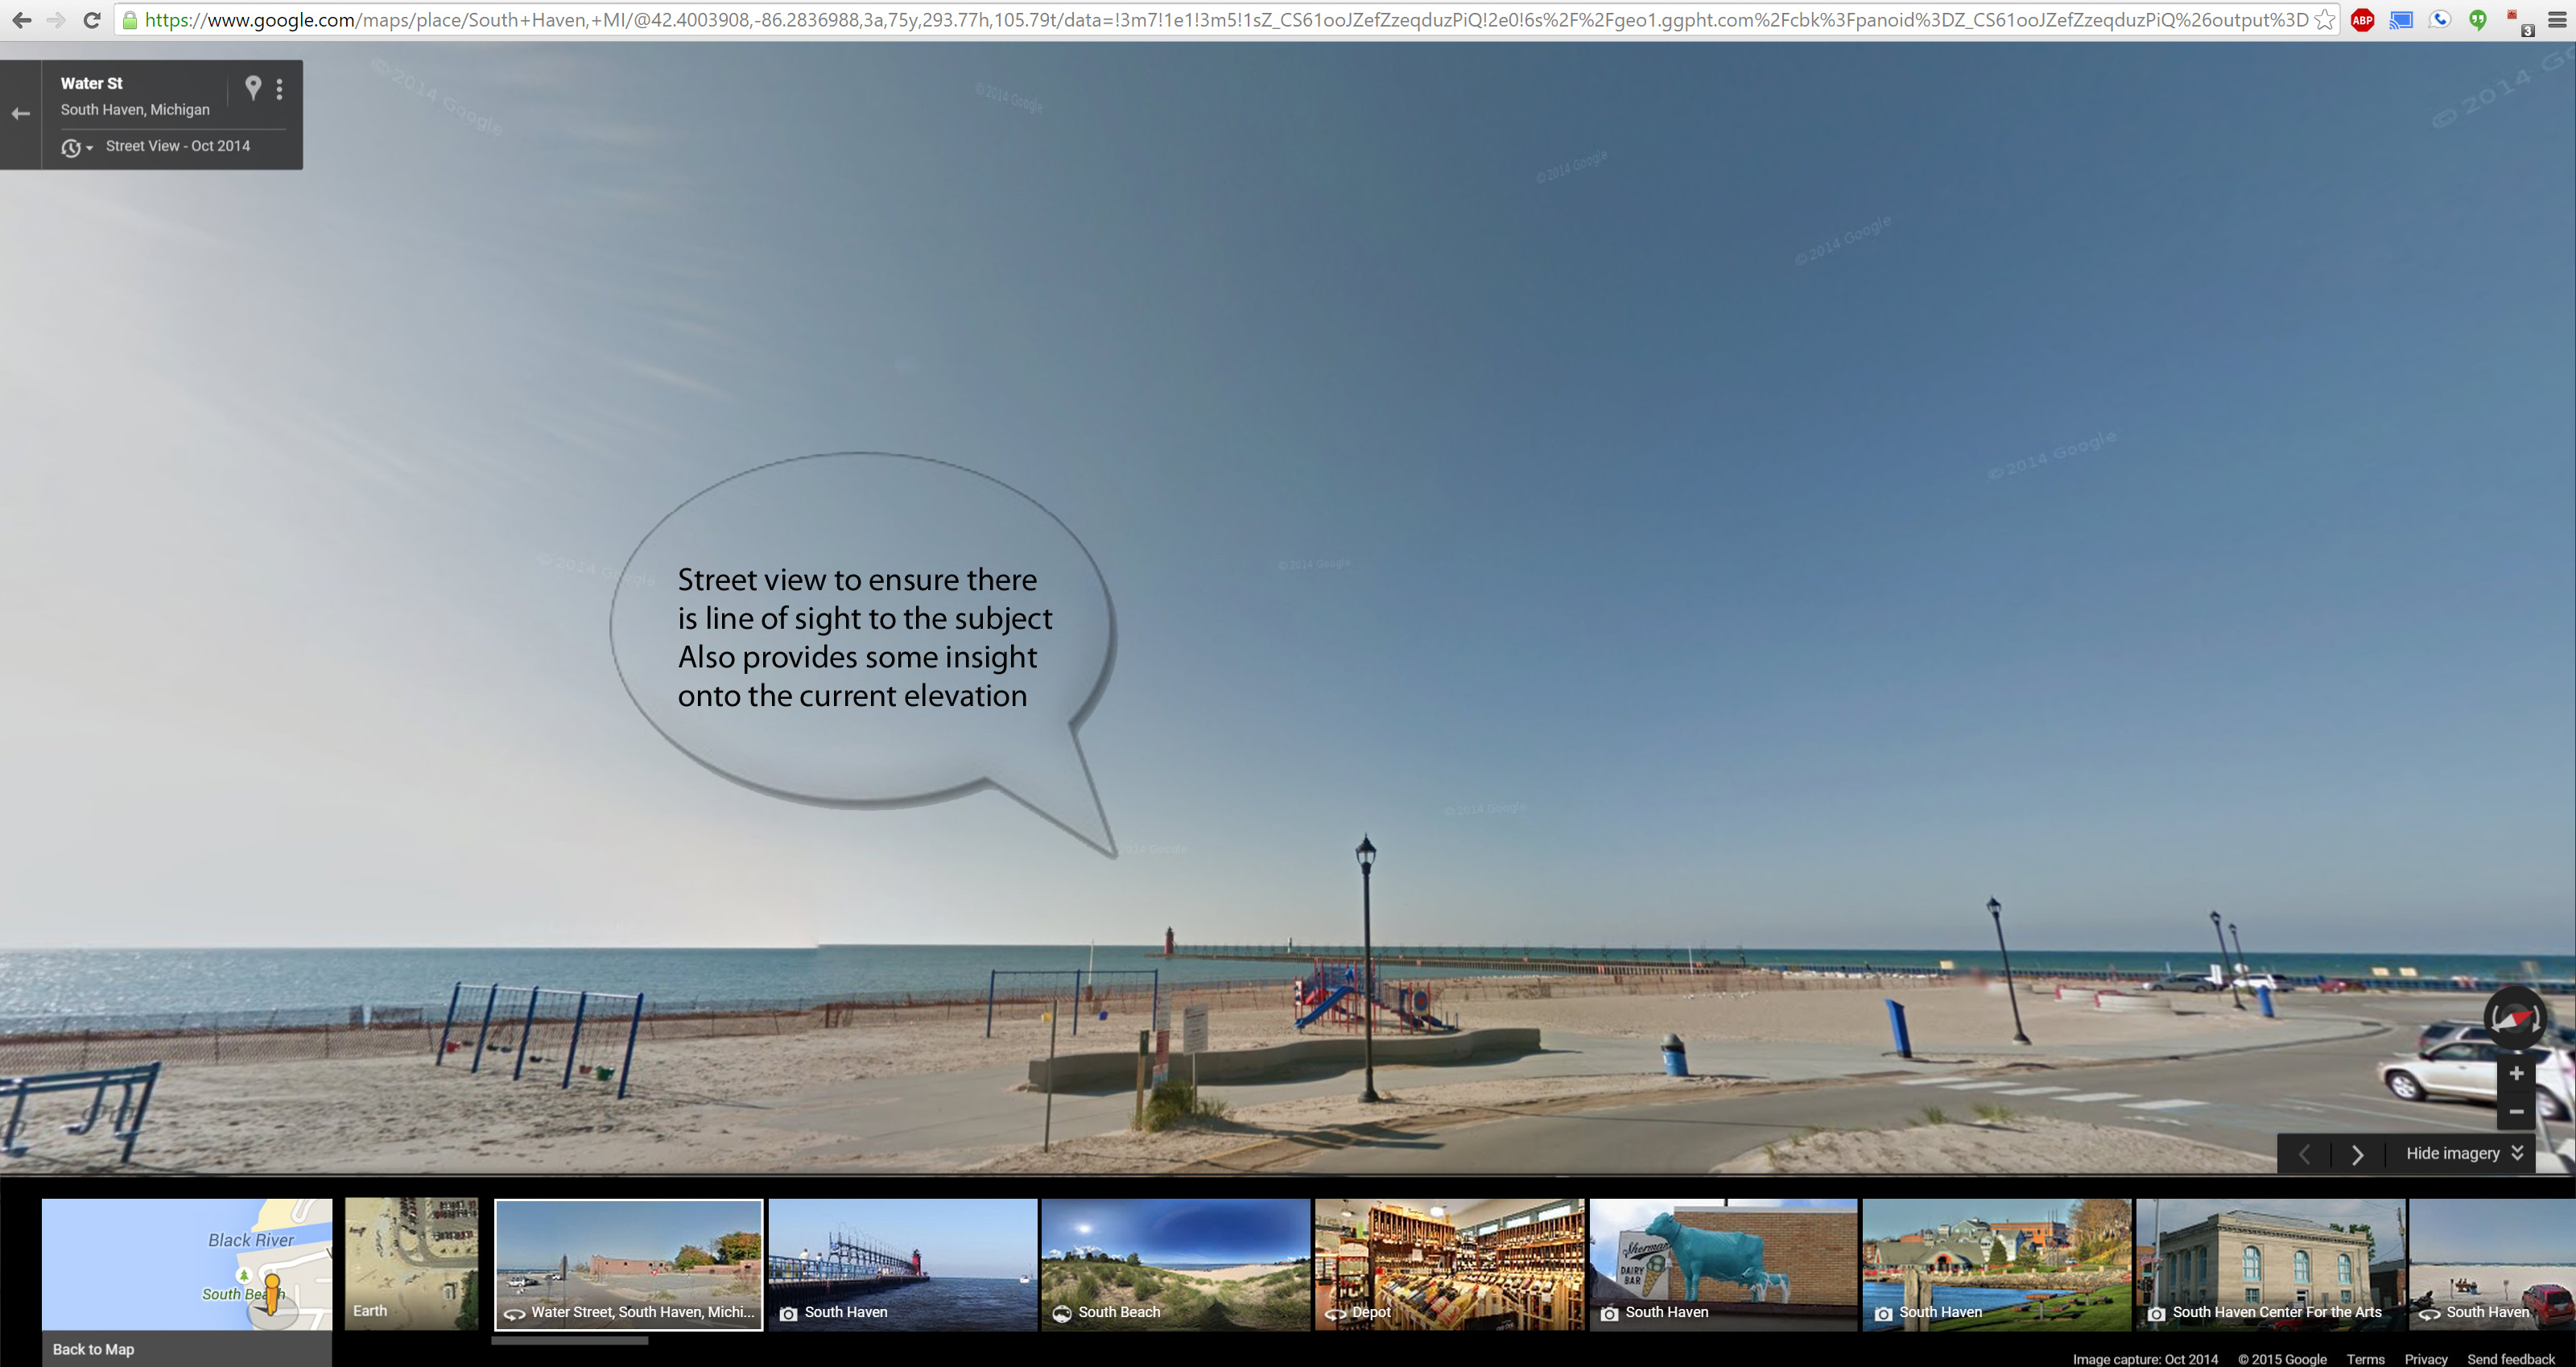
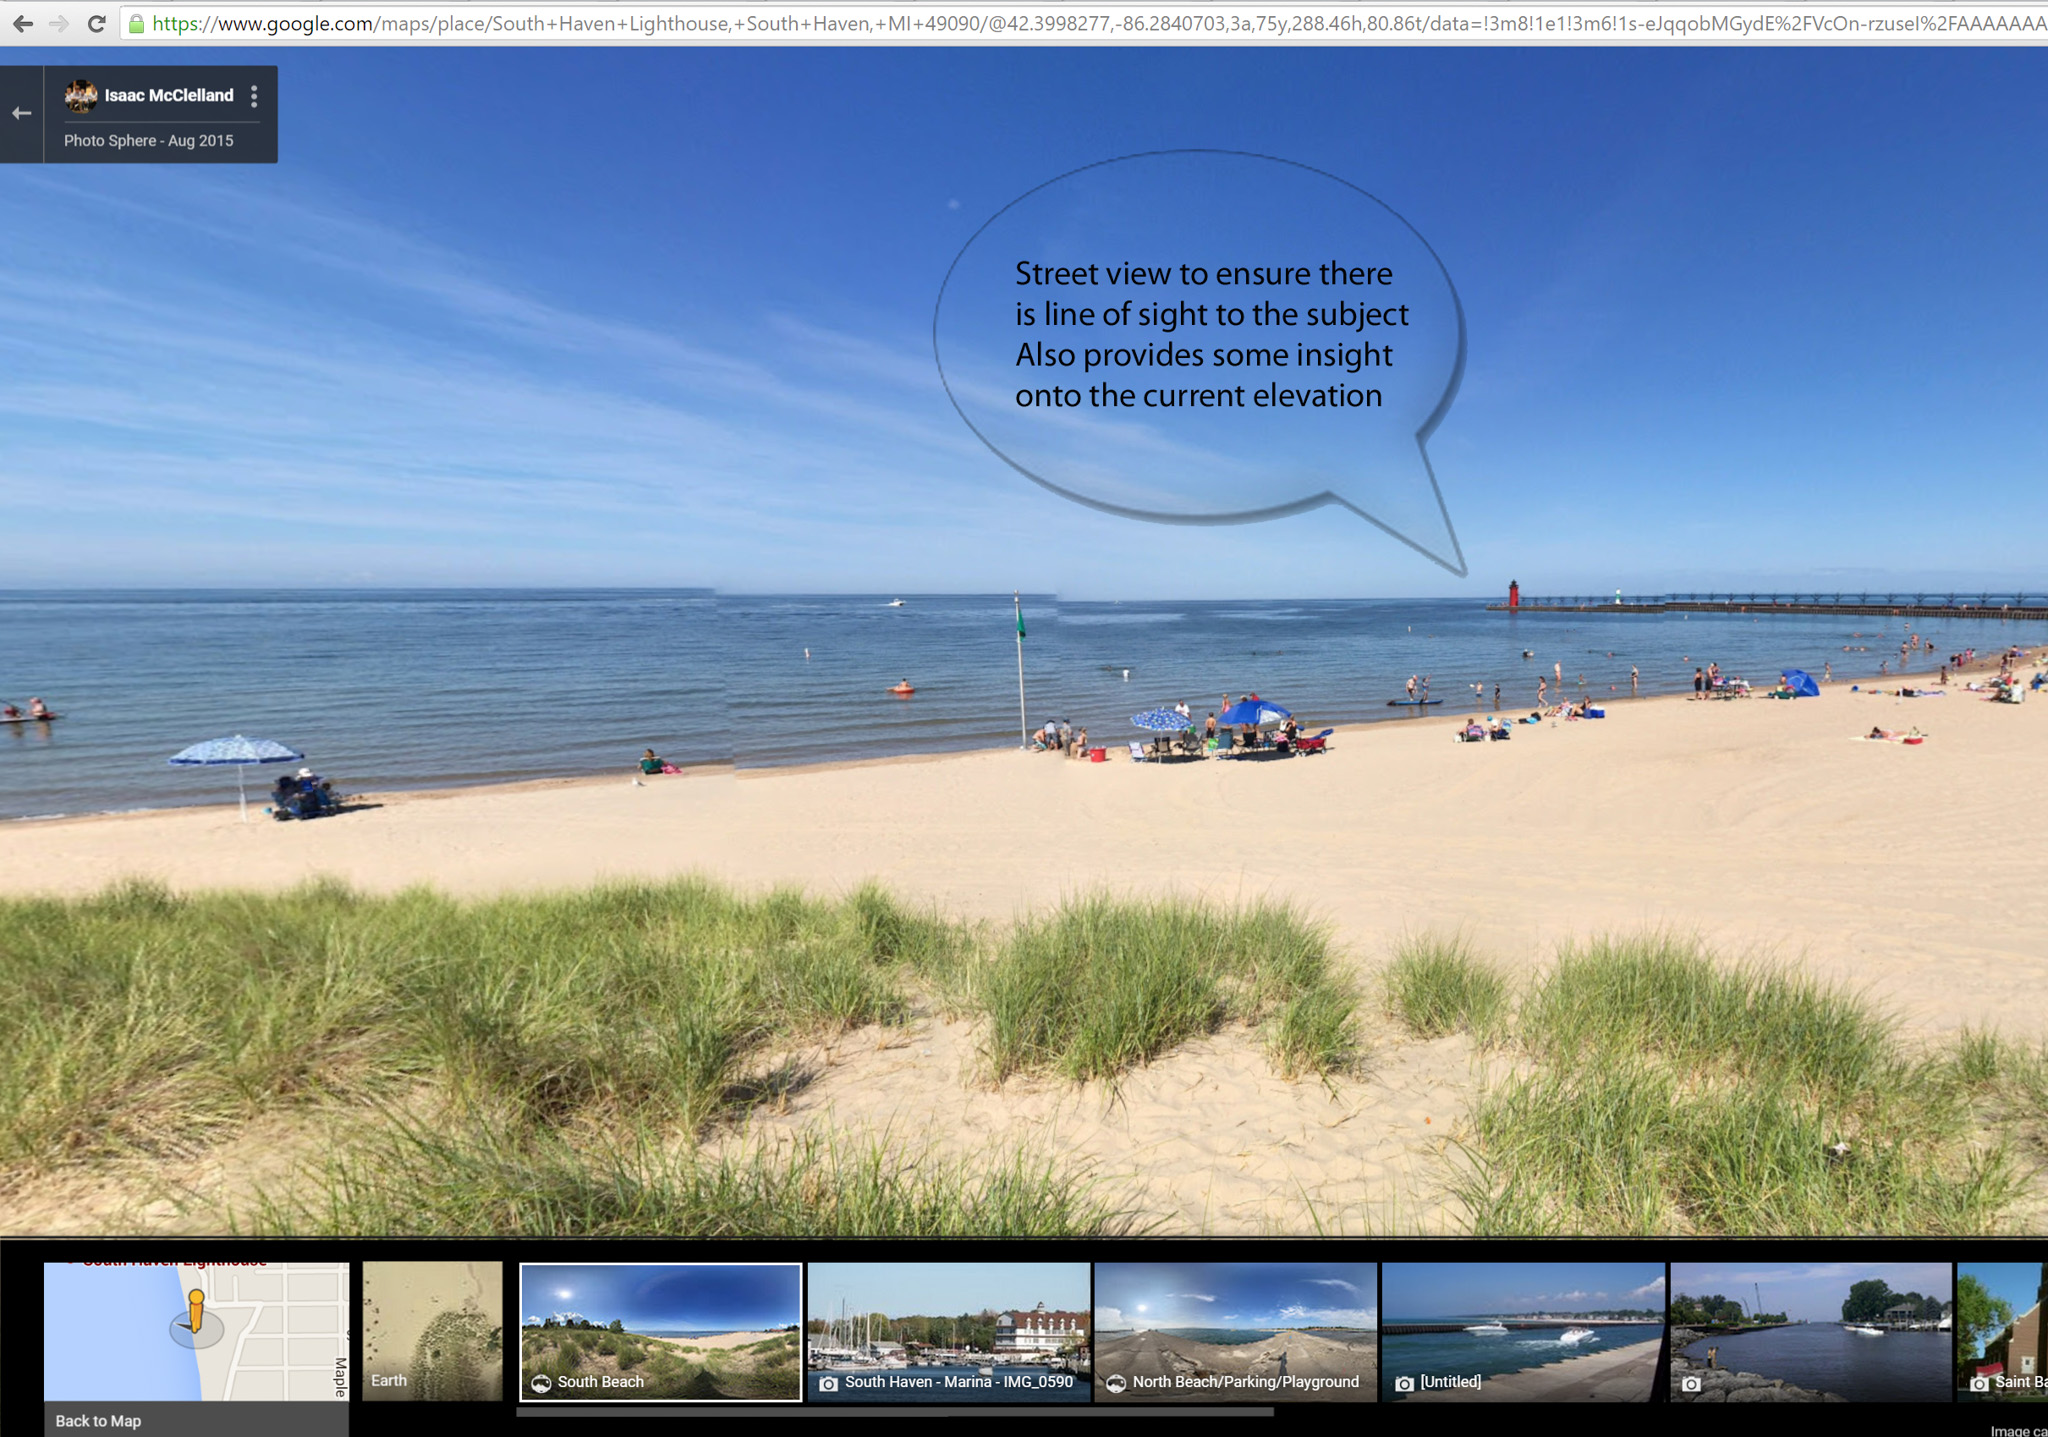
Play around with the Street View and Earth View as you look around the environment. Street View helps to visually see how the foreground is laid out, where that one tree is located, or if you have an open corn field toward your right. And while you are there, check out photos of the key spots on the bottom bar. This is not as great as a photo sharing site, but does provide details on the surroundings.
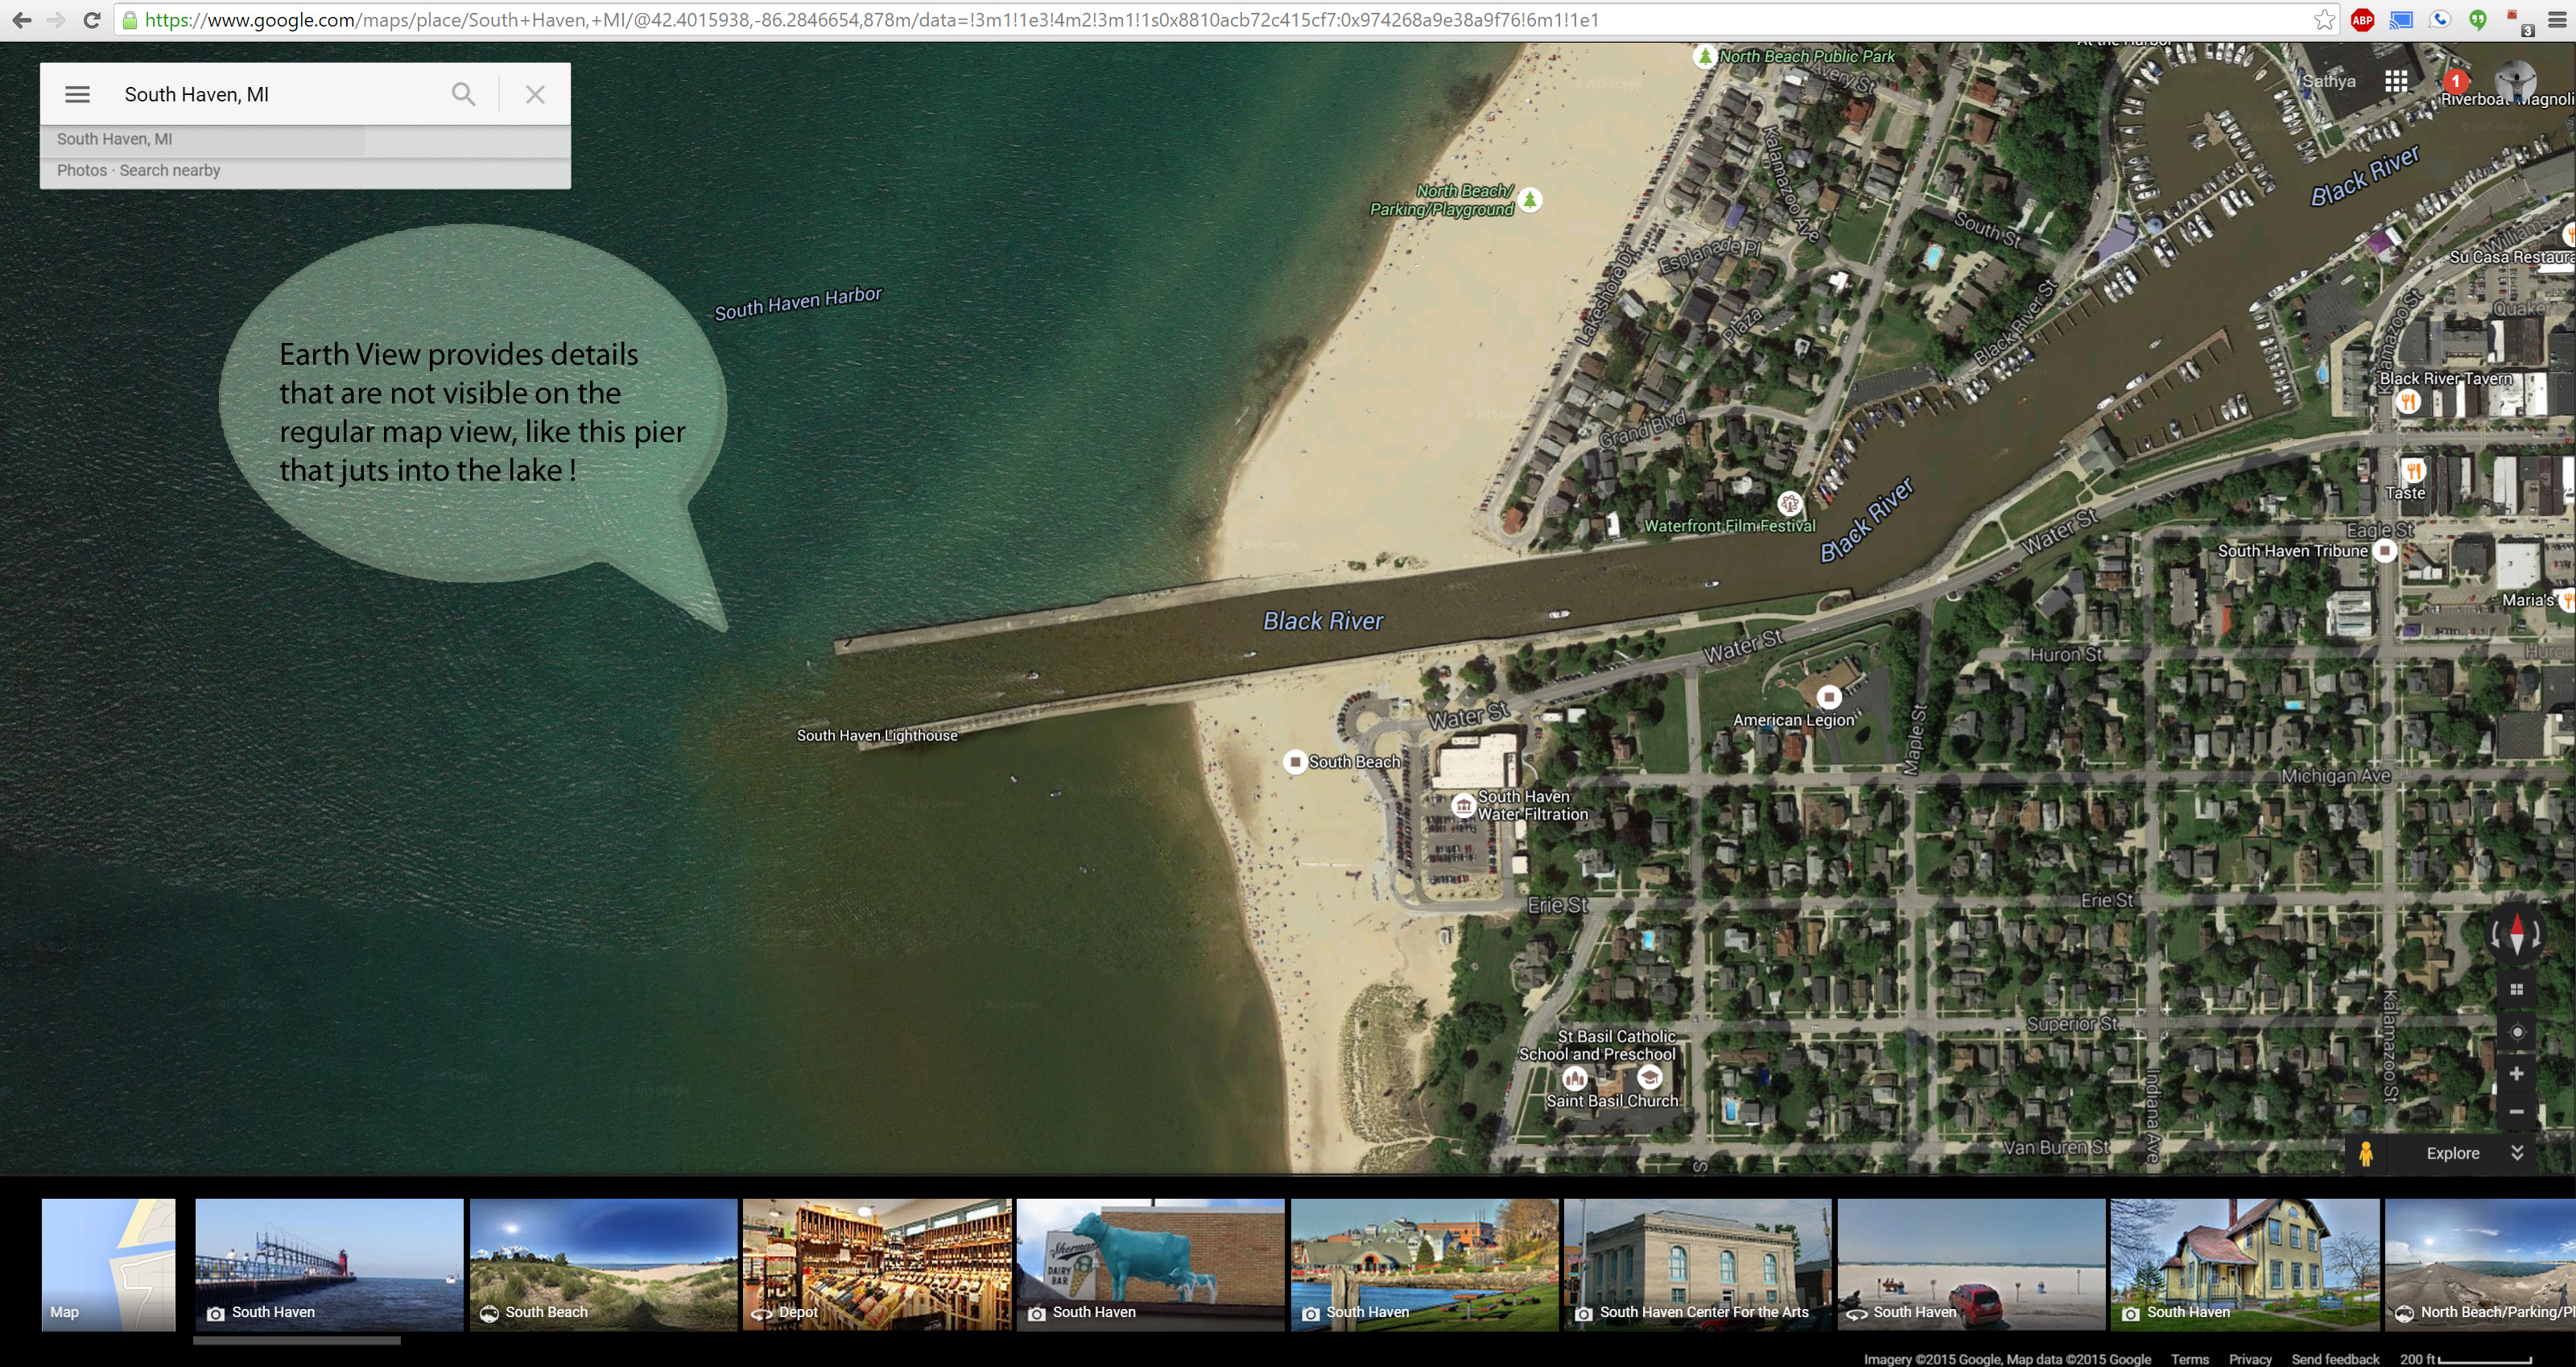
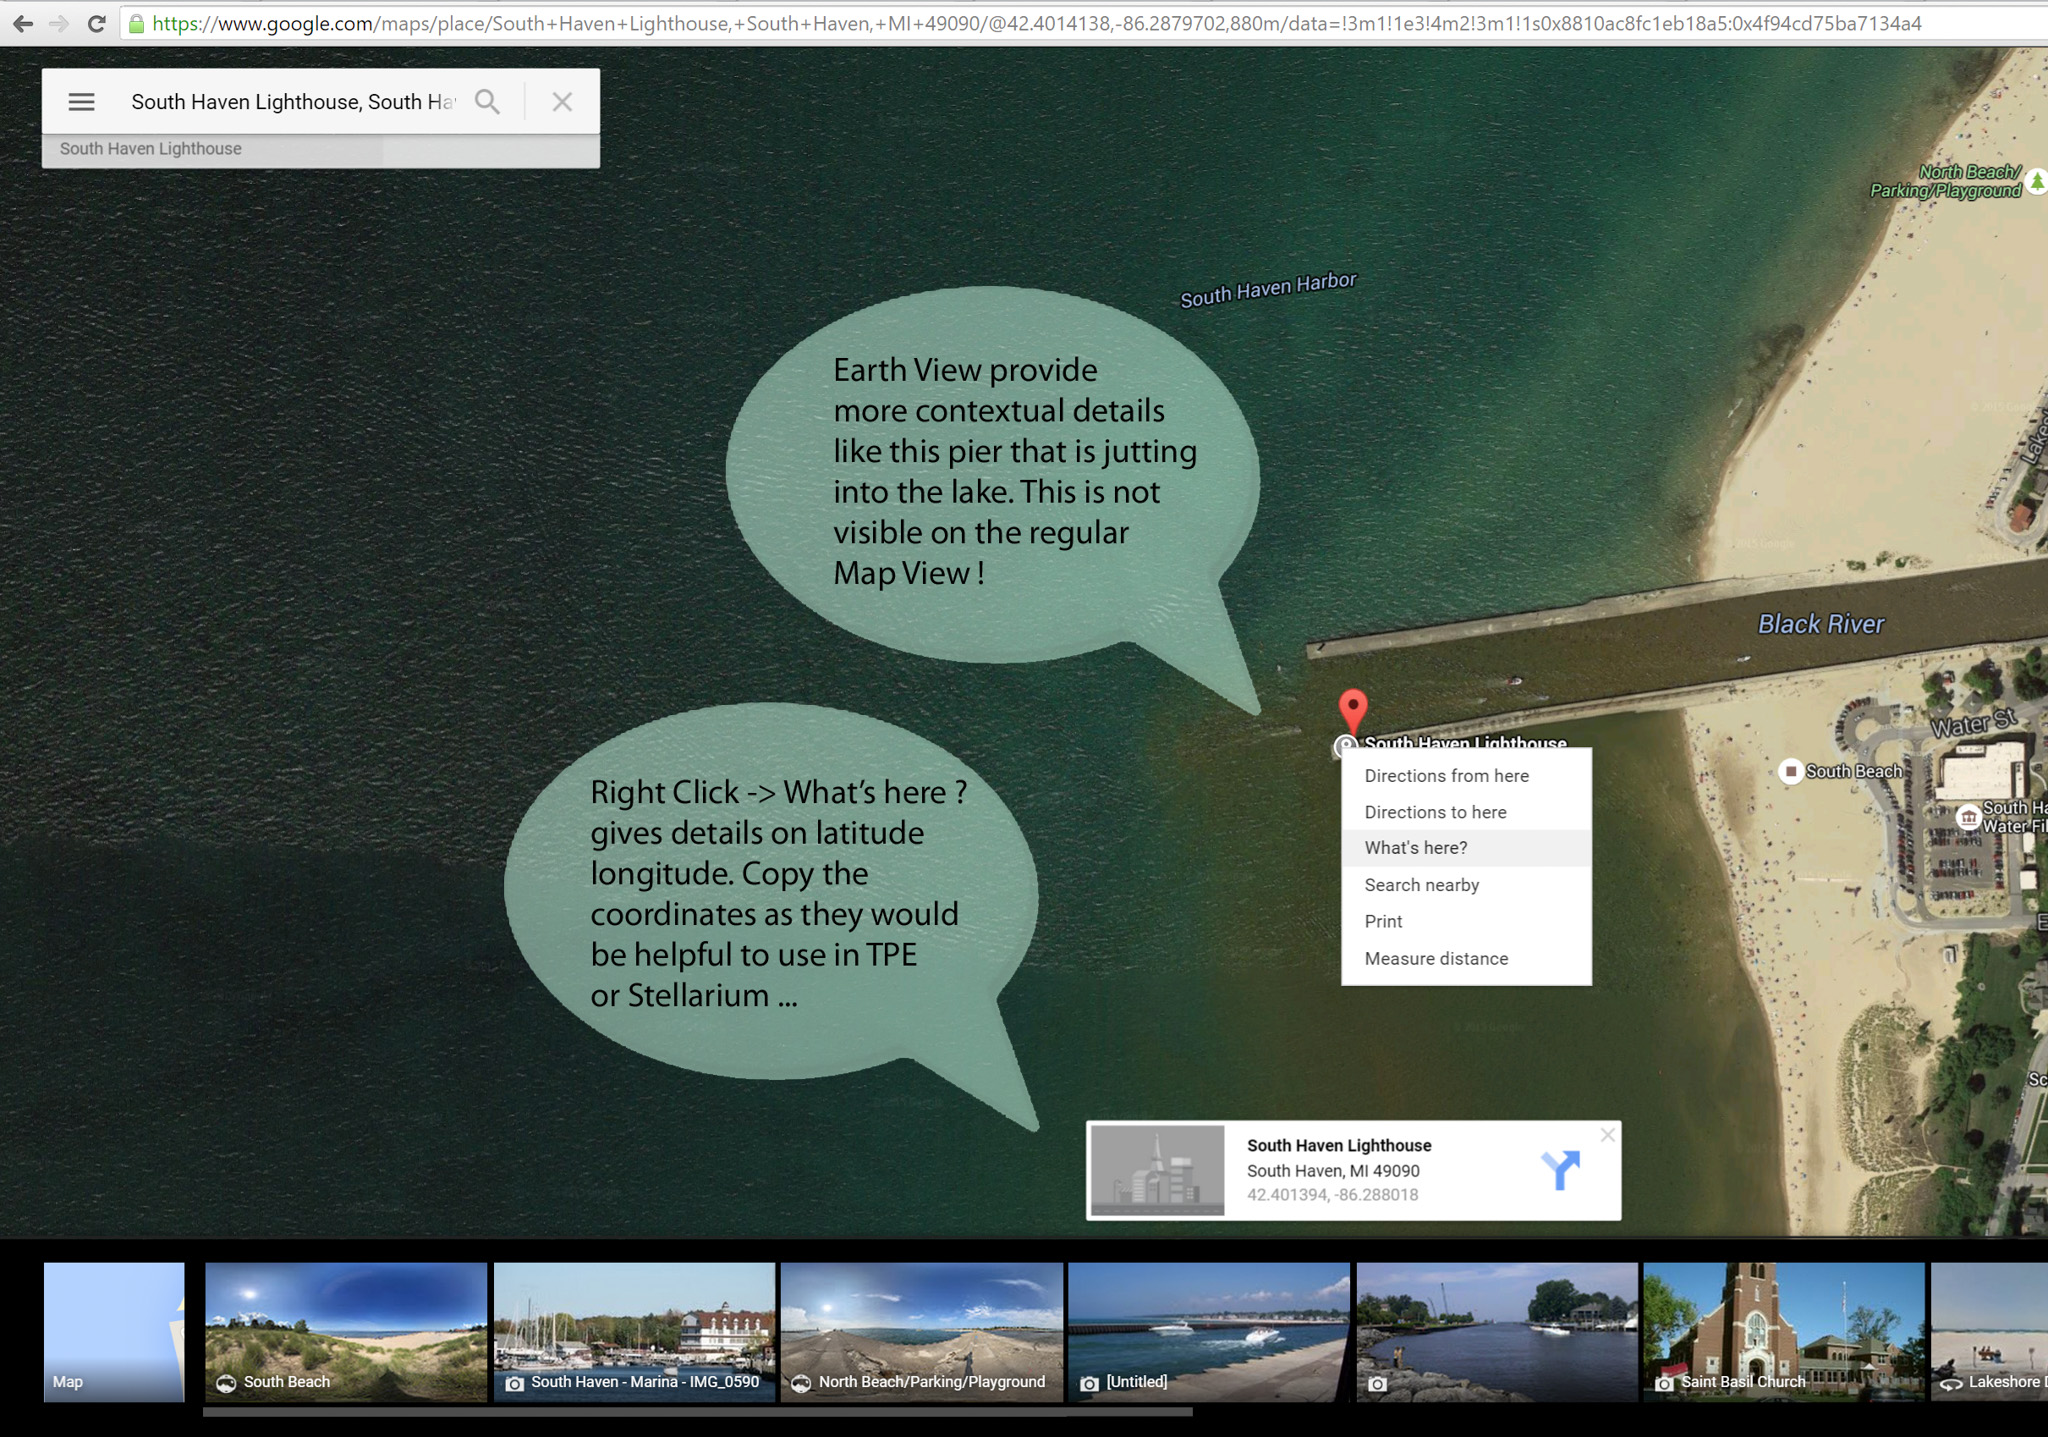
In case of remote locations or countryside, the Street View might not be available. In those cases, the Earth View and the photos listed provide the required contextual information. It is really handy to see if a road leads to a particular river bank, or if there is a path way to get to a particular spot where you can set up your tripod.
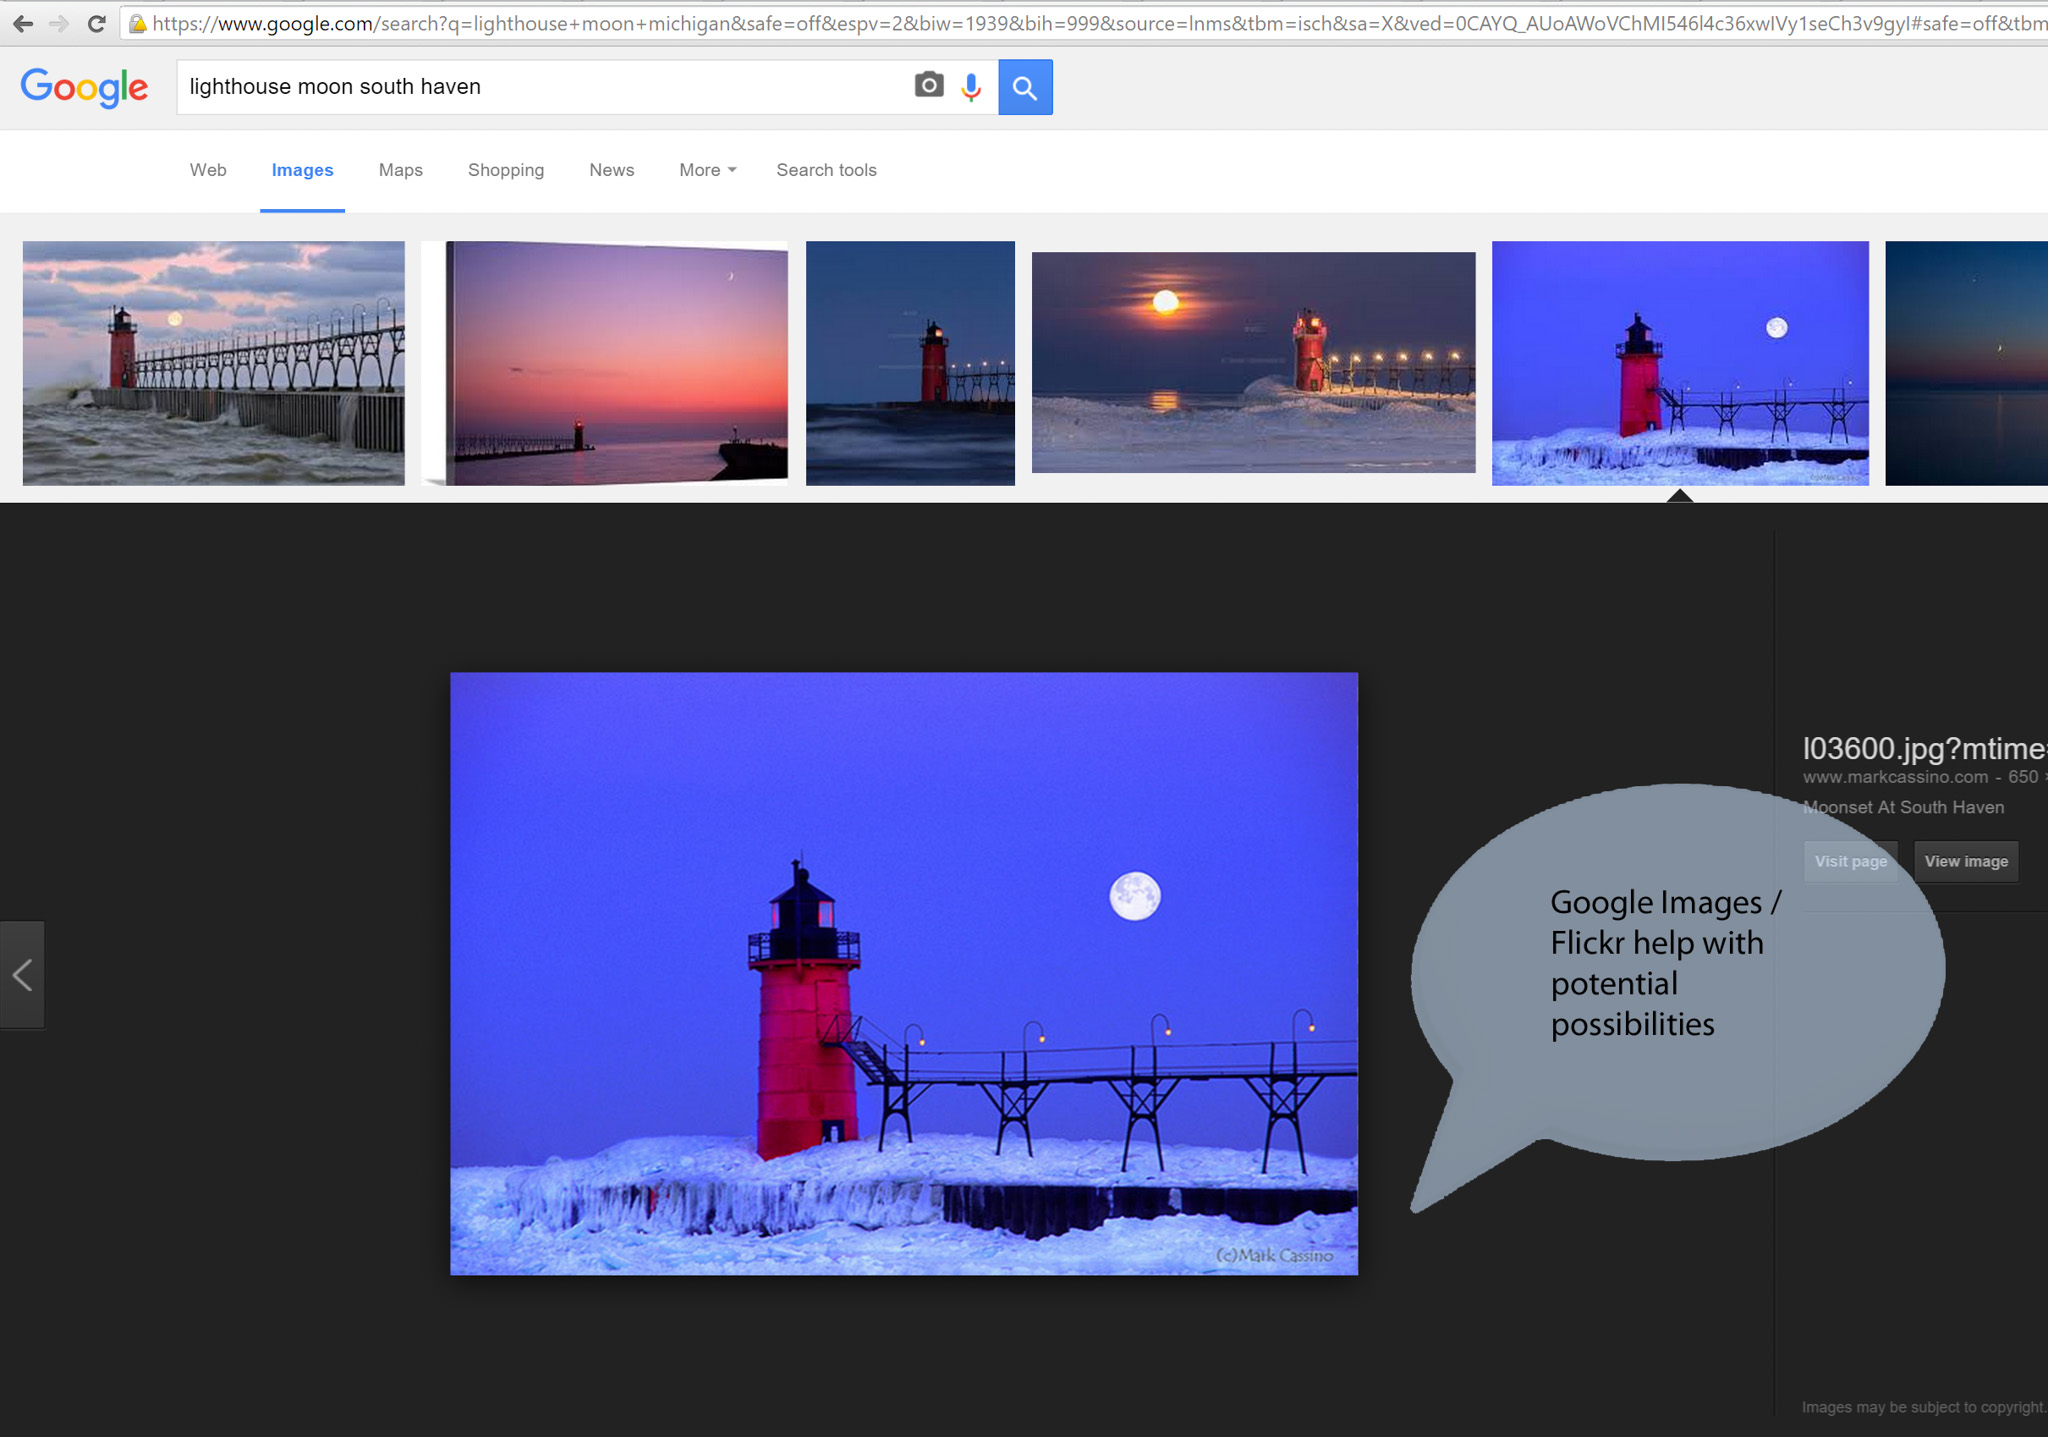
Flickr
Flickr might not be as popular now, but it still hosts an amazing number of images for any given location. I generally search in Flickr with the location details [maps view] to get a feel for what kind of shots/views are possible at a given spot.
Don’t forget to check out the EXIF information: this can provide valuable inputs on focal length, giving you a hint on where the shot might have been composed from.
If I am not able to get any hits, I fall back to Google Images.
Google History
Google History – Nothing beats being there in person, but not every place has a fixed address. There might be a tree that you remember from a drive that you took 3 months ago that might make a great foreground, but you’re not sure of its exact location. Fear not, Google comes to the rescue again.
Android users, if you have not explicitly disabled it, all your location history is saved in your account (visible only to you). This is very handy to get back to a specific date & time and reverse look up in the Street View to get the location of that scene you want to get back to.
Scouting from the previous night!
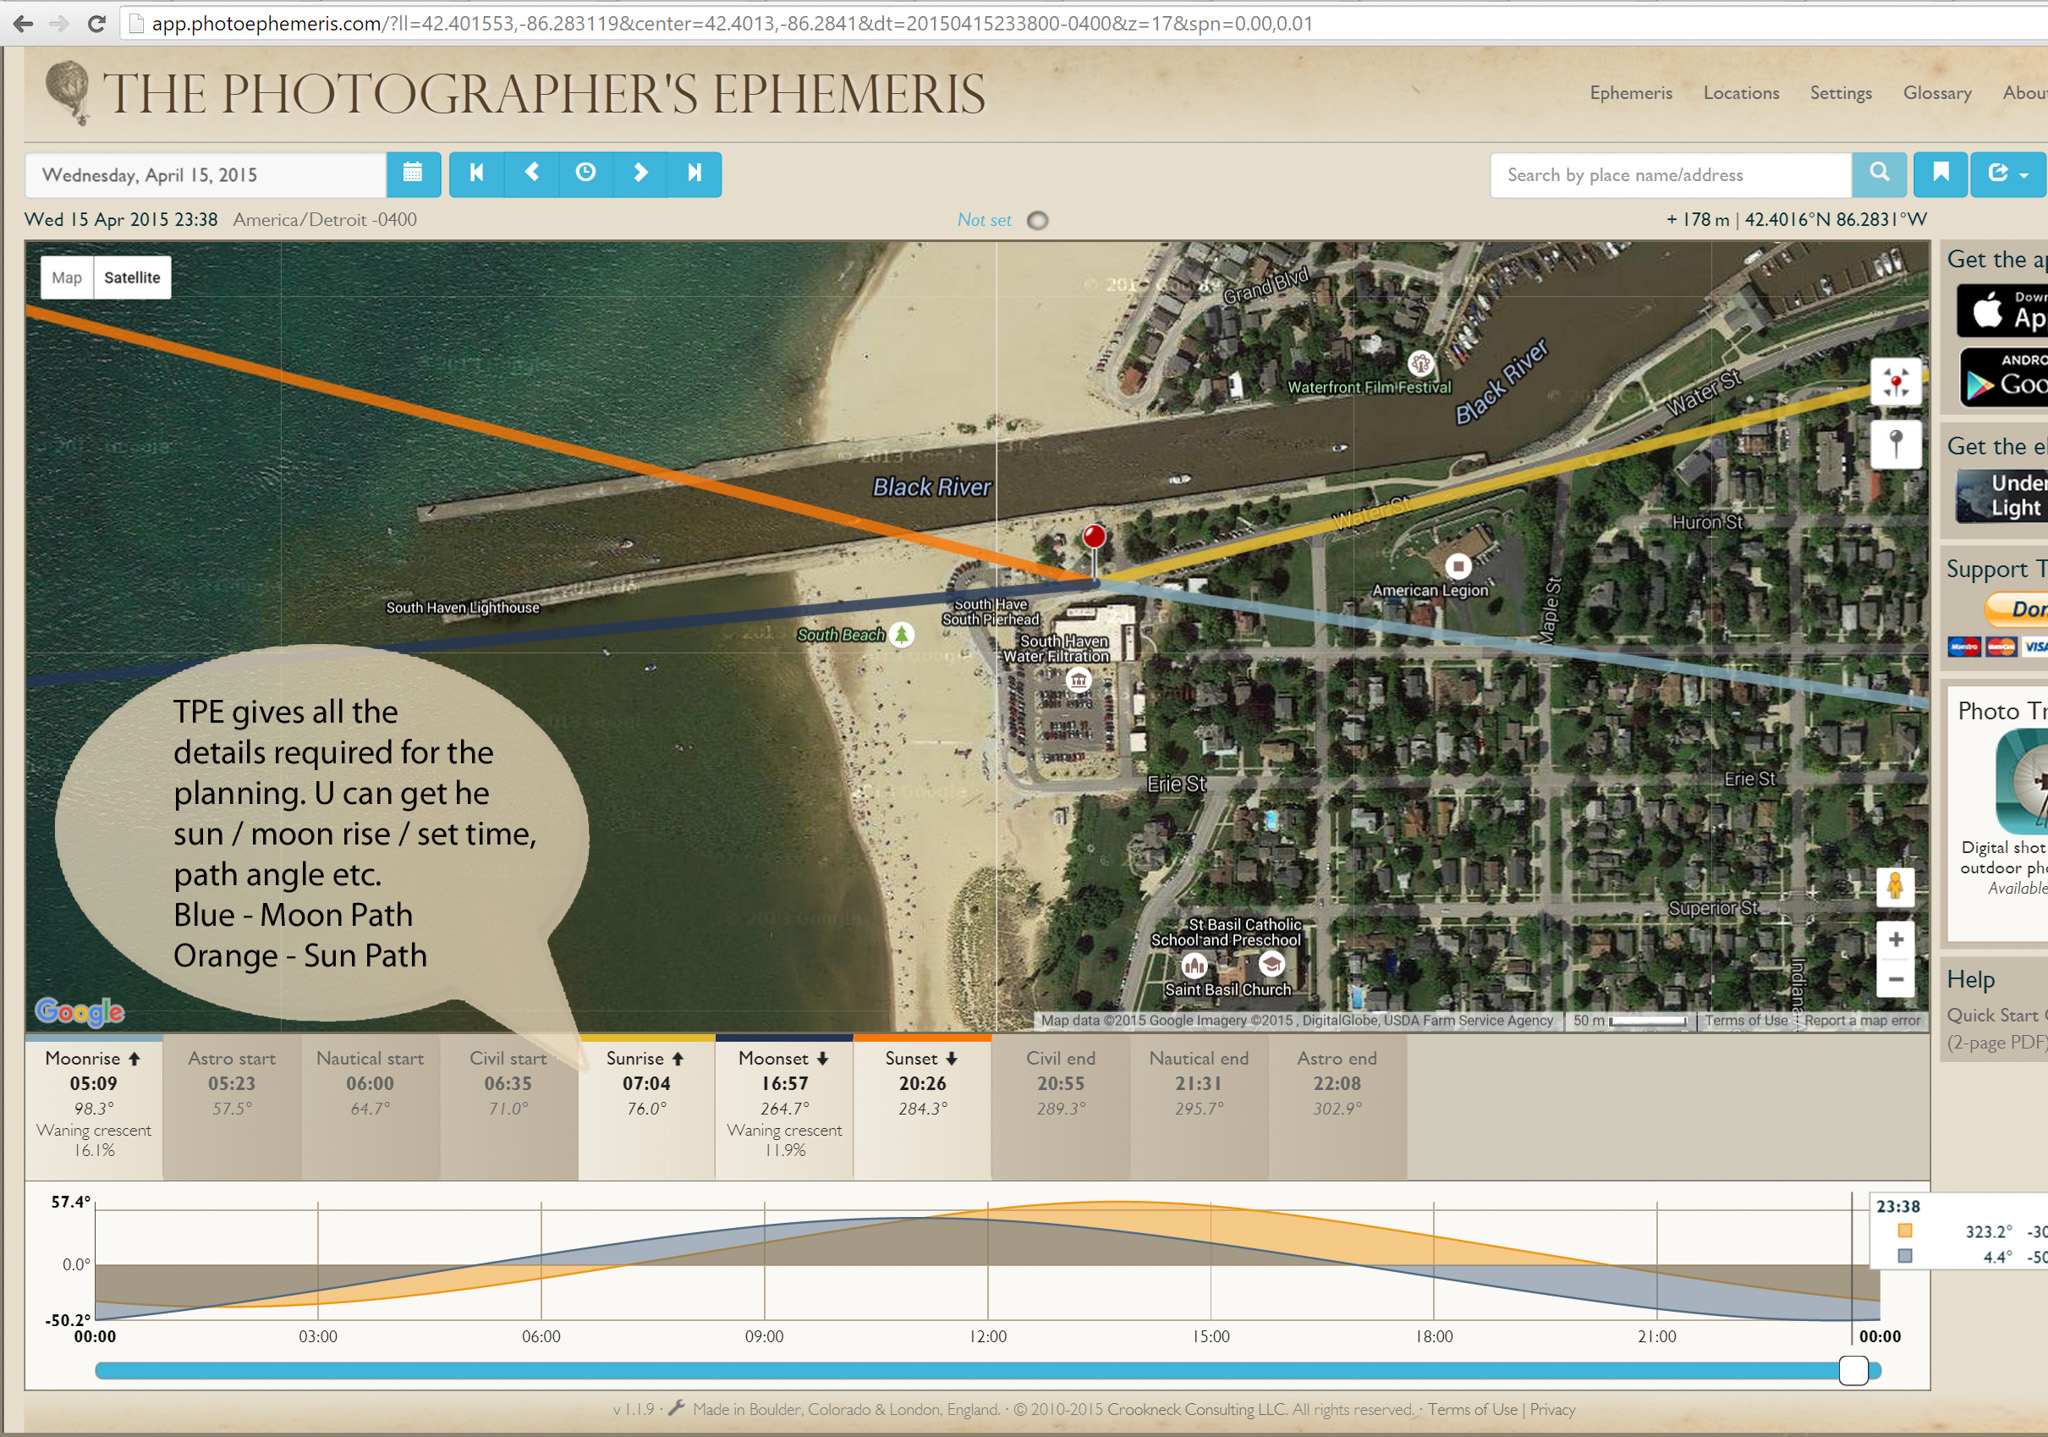
TPE
The Photographer’s Ephemeris (TPE) helps plan landscape and urban scenes. It’s a map-centric sun and moon calculator: allowing you to see the the path of the sun or moon, and direction of the light for any location on Earth. Of course, there is an app for that ?
Check out this article for a step by step guide to using TPE to shoot the moon against a given landscape or even a cityscape.
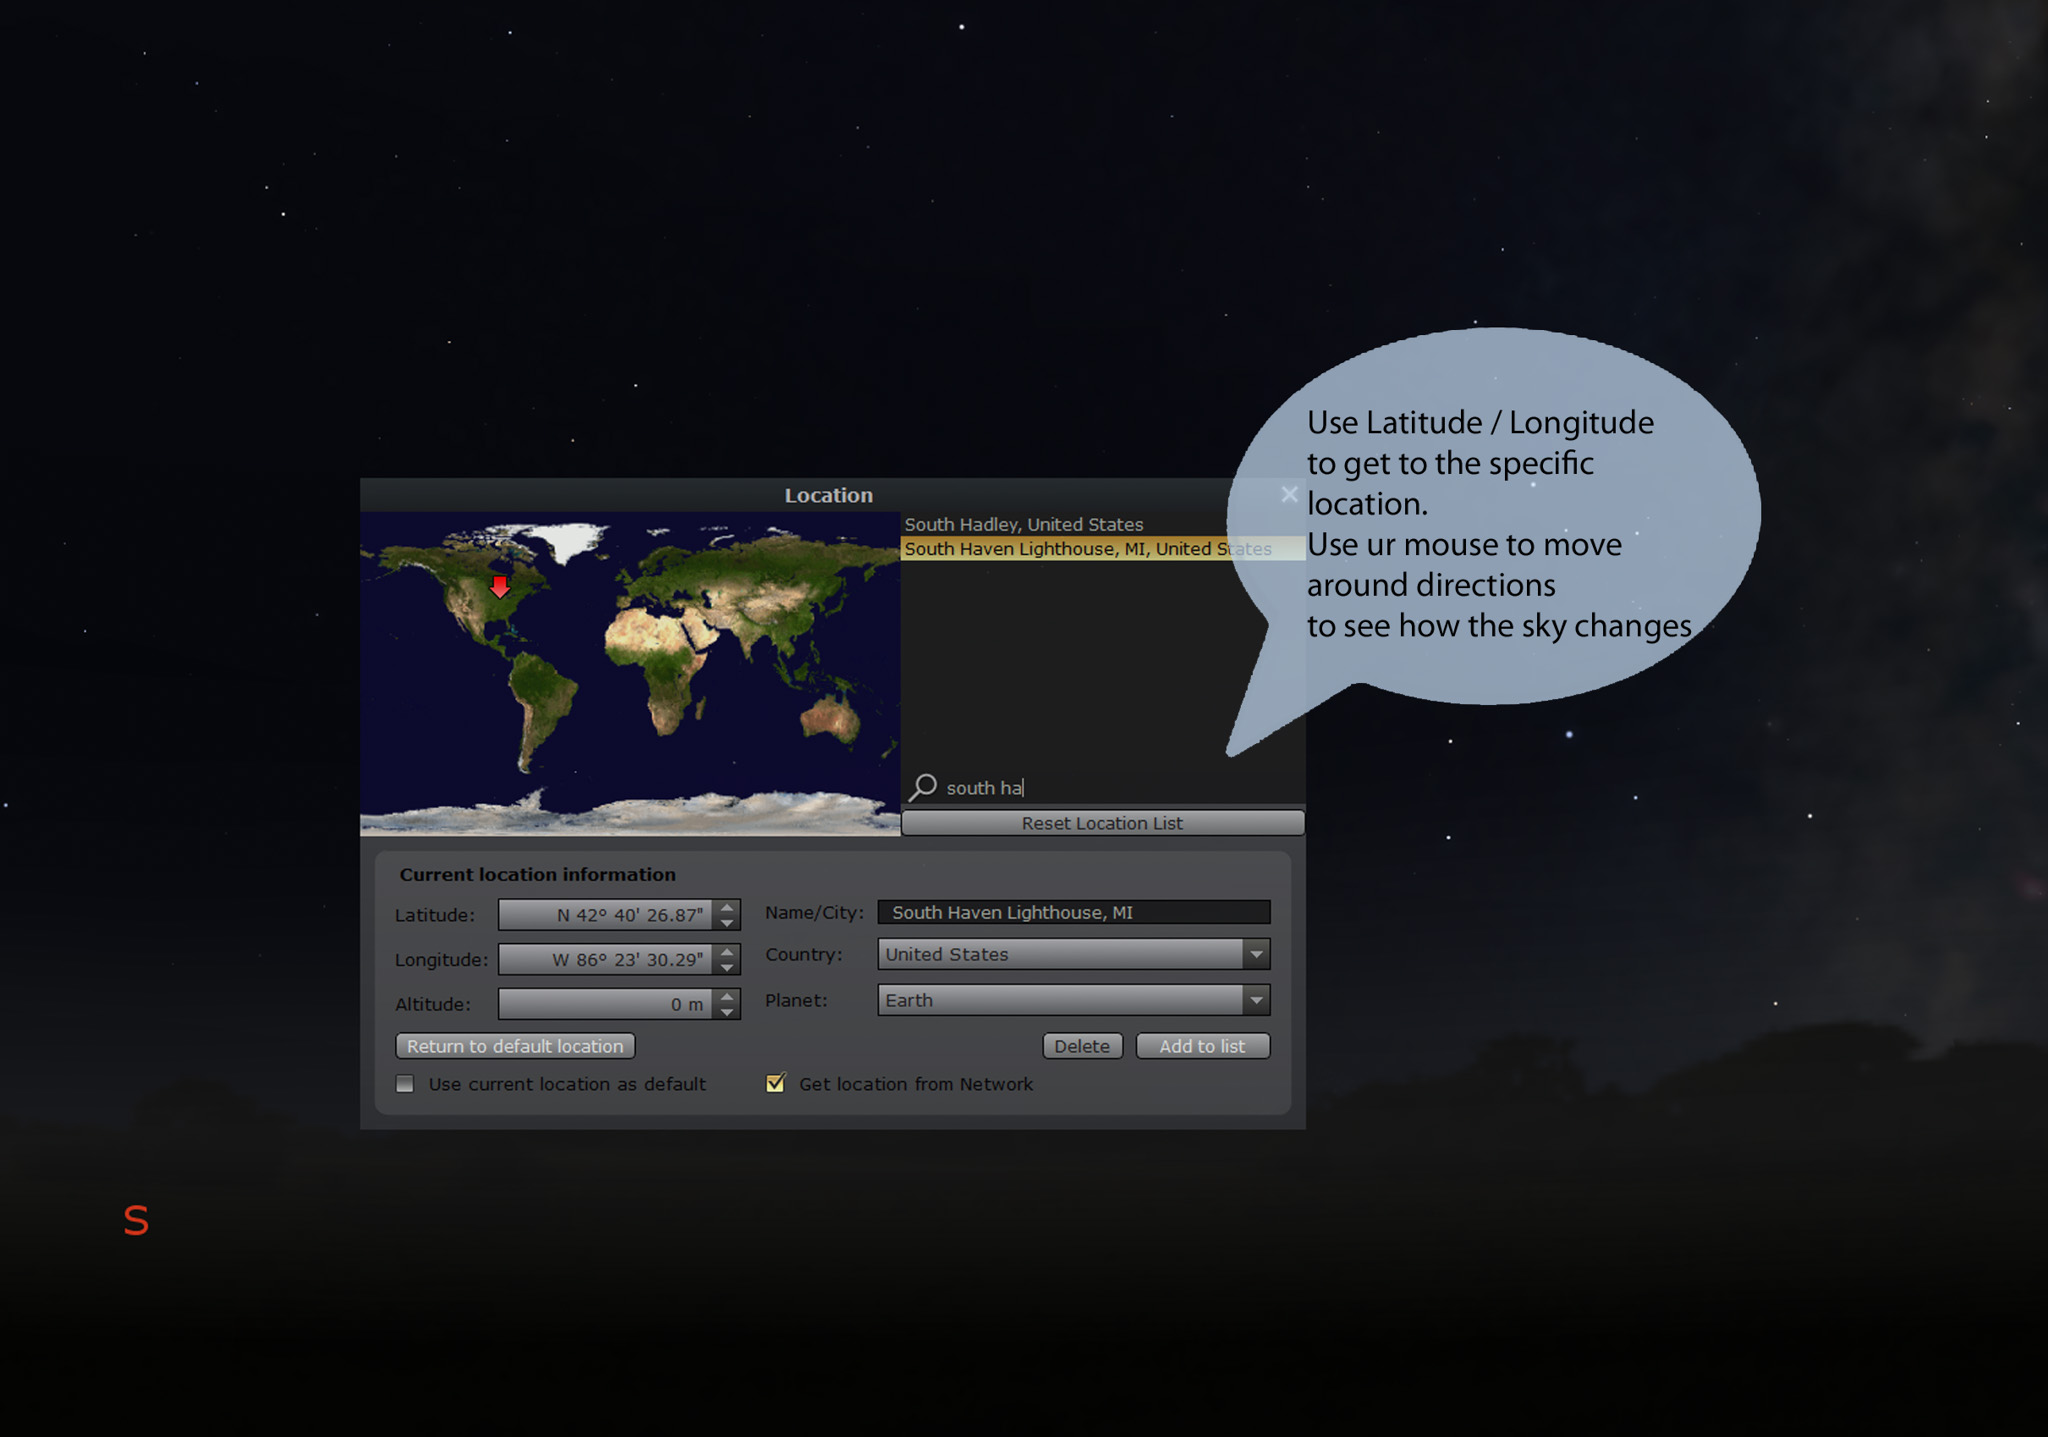
Stellarium
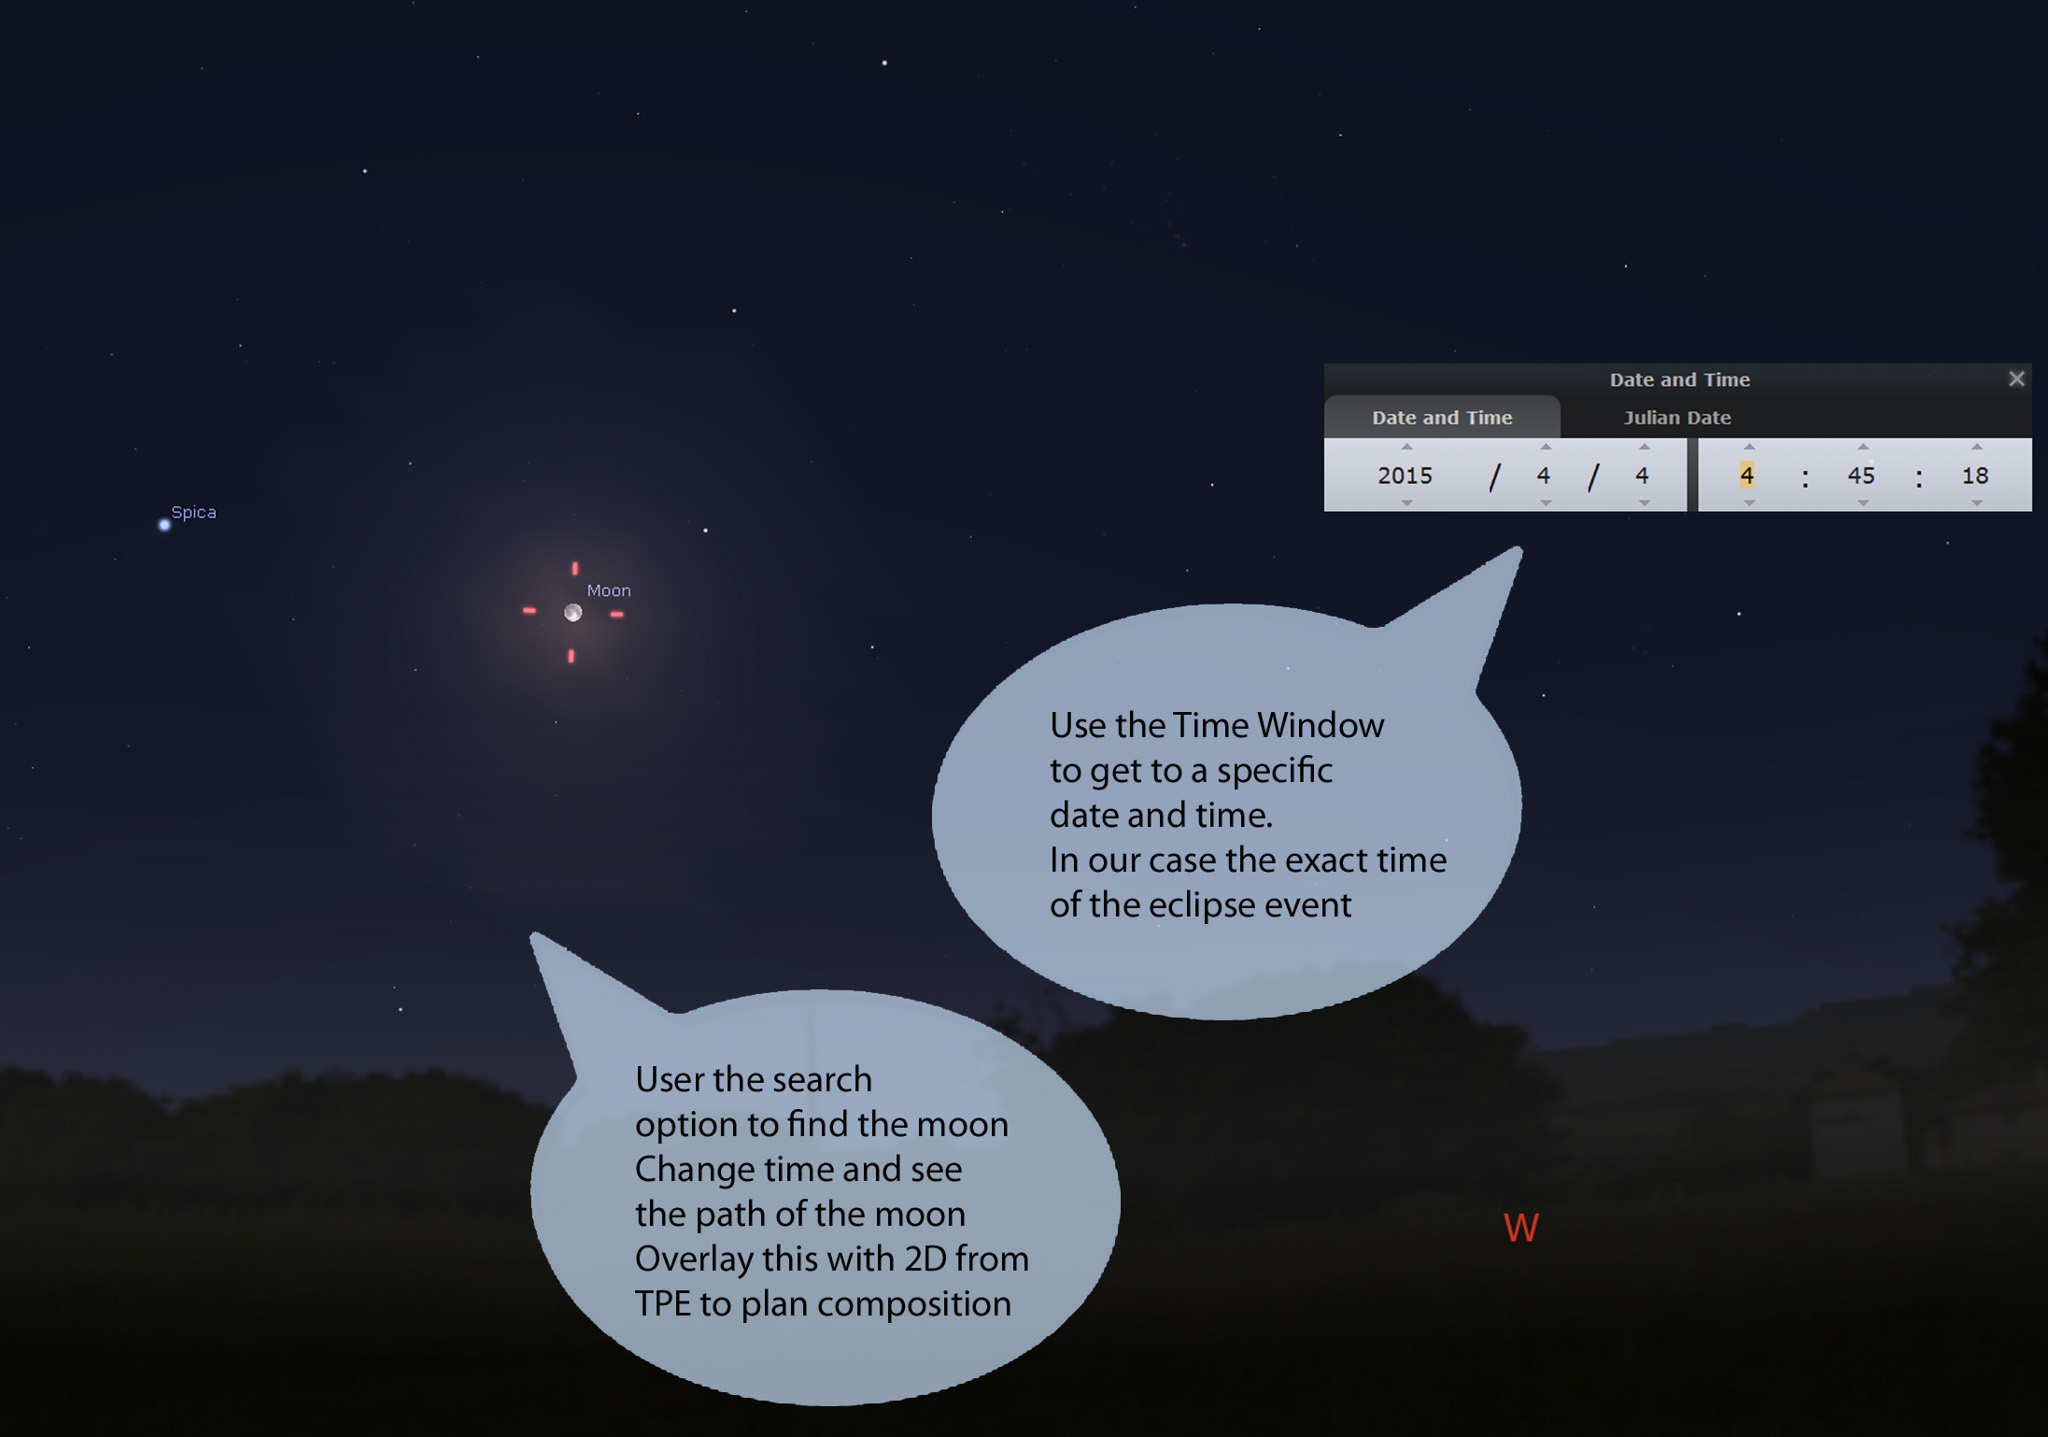
Stellarium, especially the desktop version, is very handy for pre-planning. One can easily see the stars/galaxies that would be prominent for any given coordinates and time.
To locate the Milky Way, look SE in the Spring a couple hours before sunrise, look South in the Summer around midnight, and look SW during the Fall an hour after sunset.
You can even download landscapes for prominent locations or create custom skyline for your particular location. In addition you can also look for specific galaxies, planets, or even check if the International Space Station (ISS) will be crossing the frame while you’re shooting.
In our case, just search for the moon and then play around with the date/time to see how its position changes.
Weather, Weather, Weather
Now that you’ve zeroed in on the right spot, you want to make sure that clouds or rain don’t spoil the show!!!
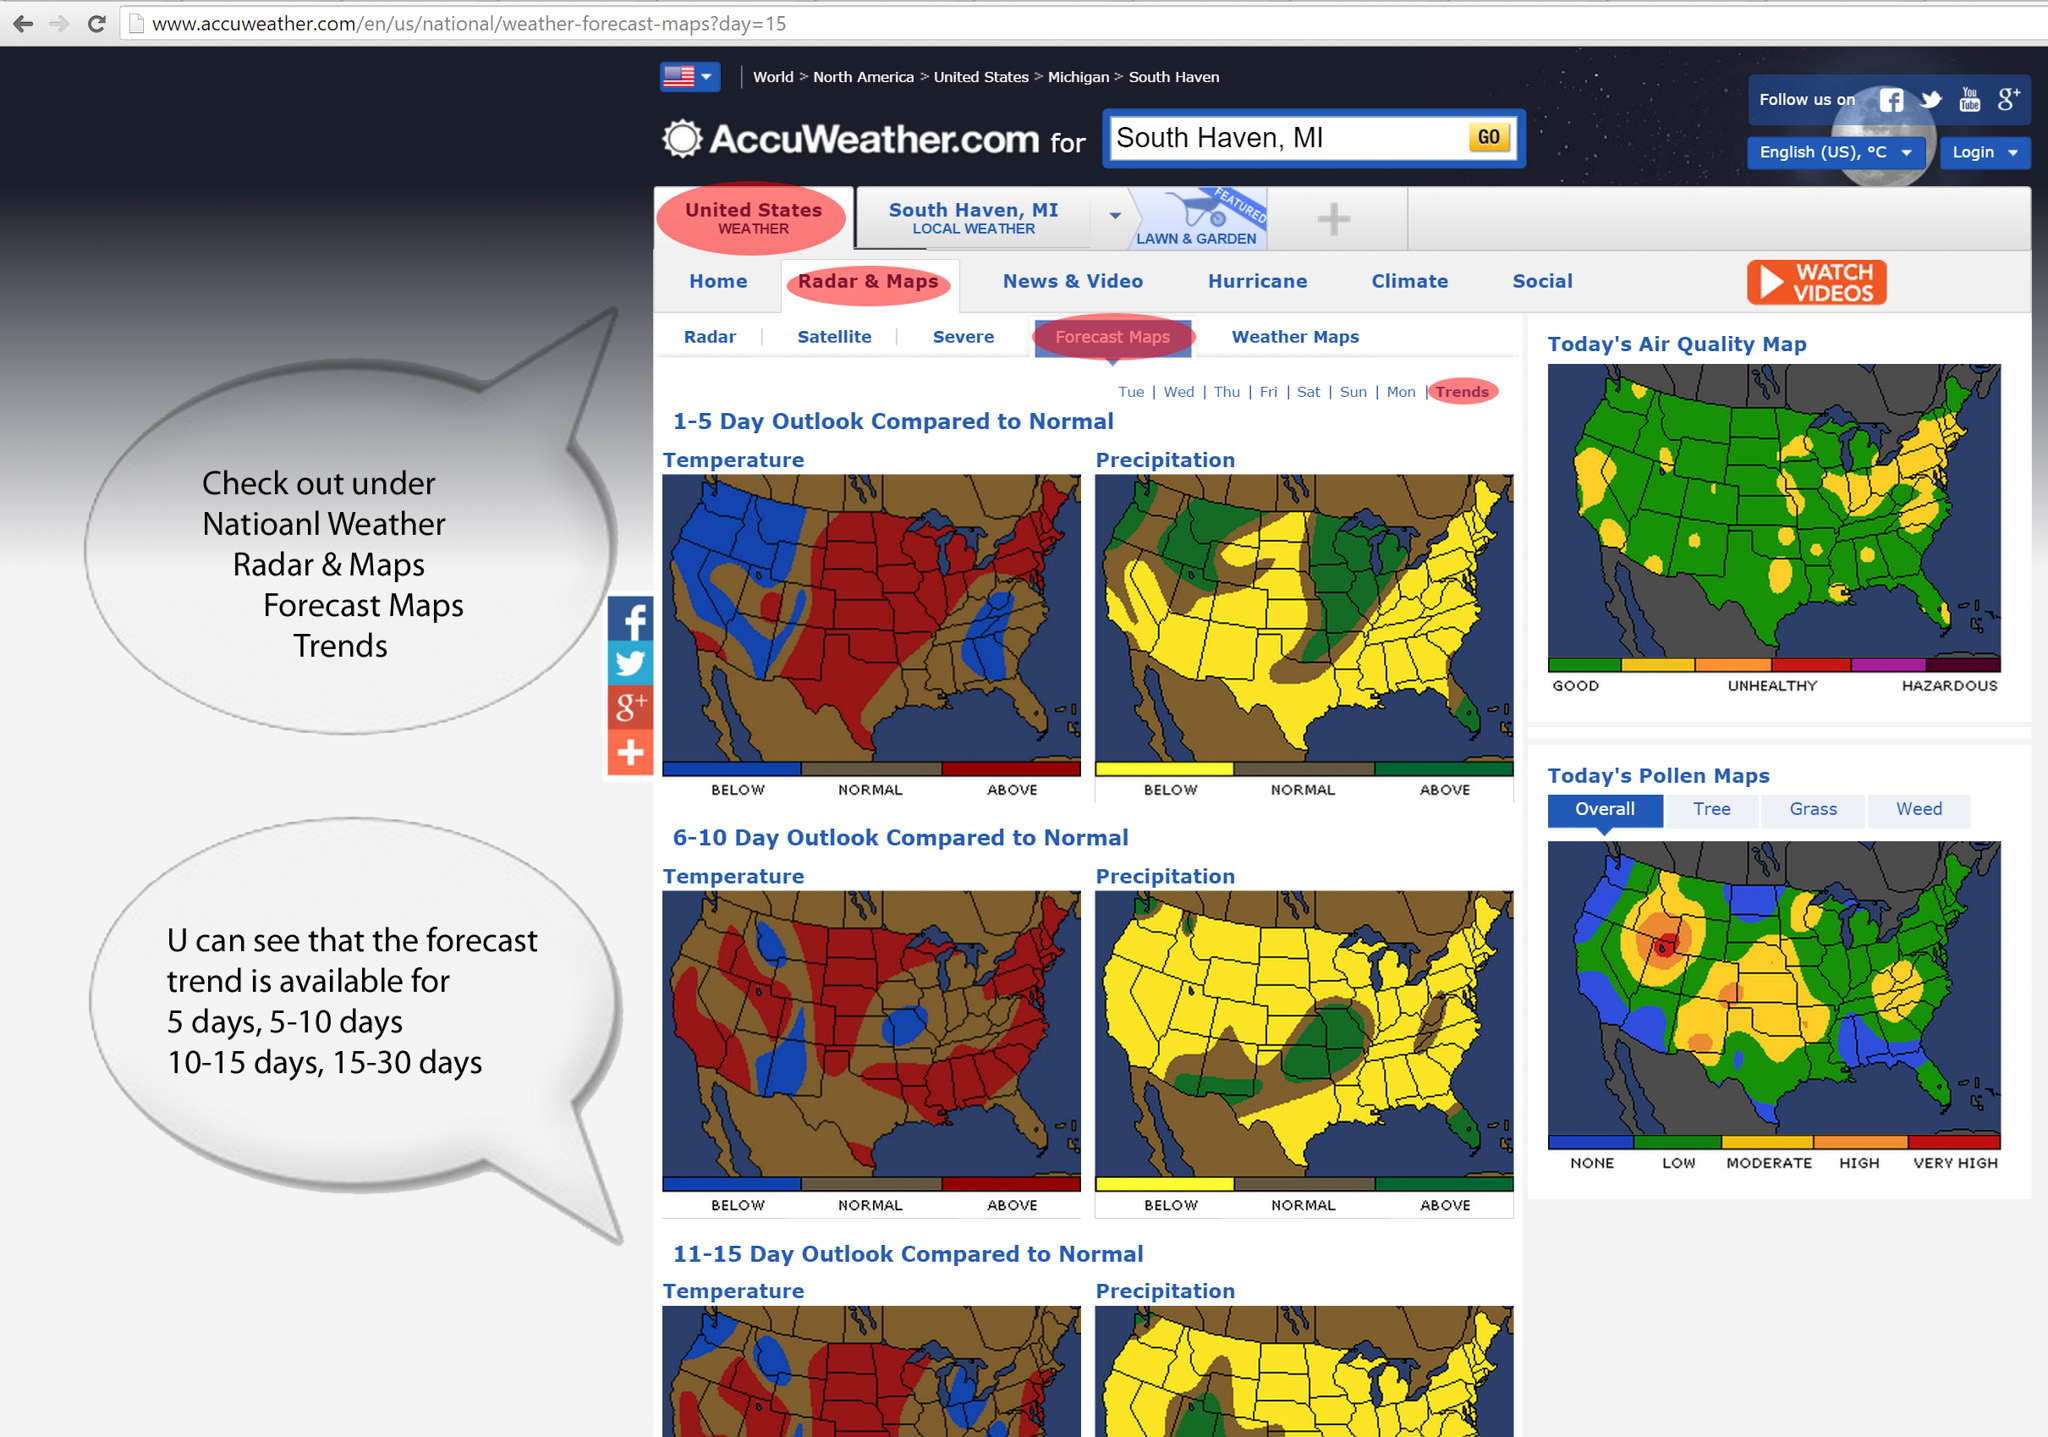
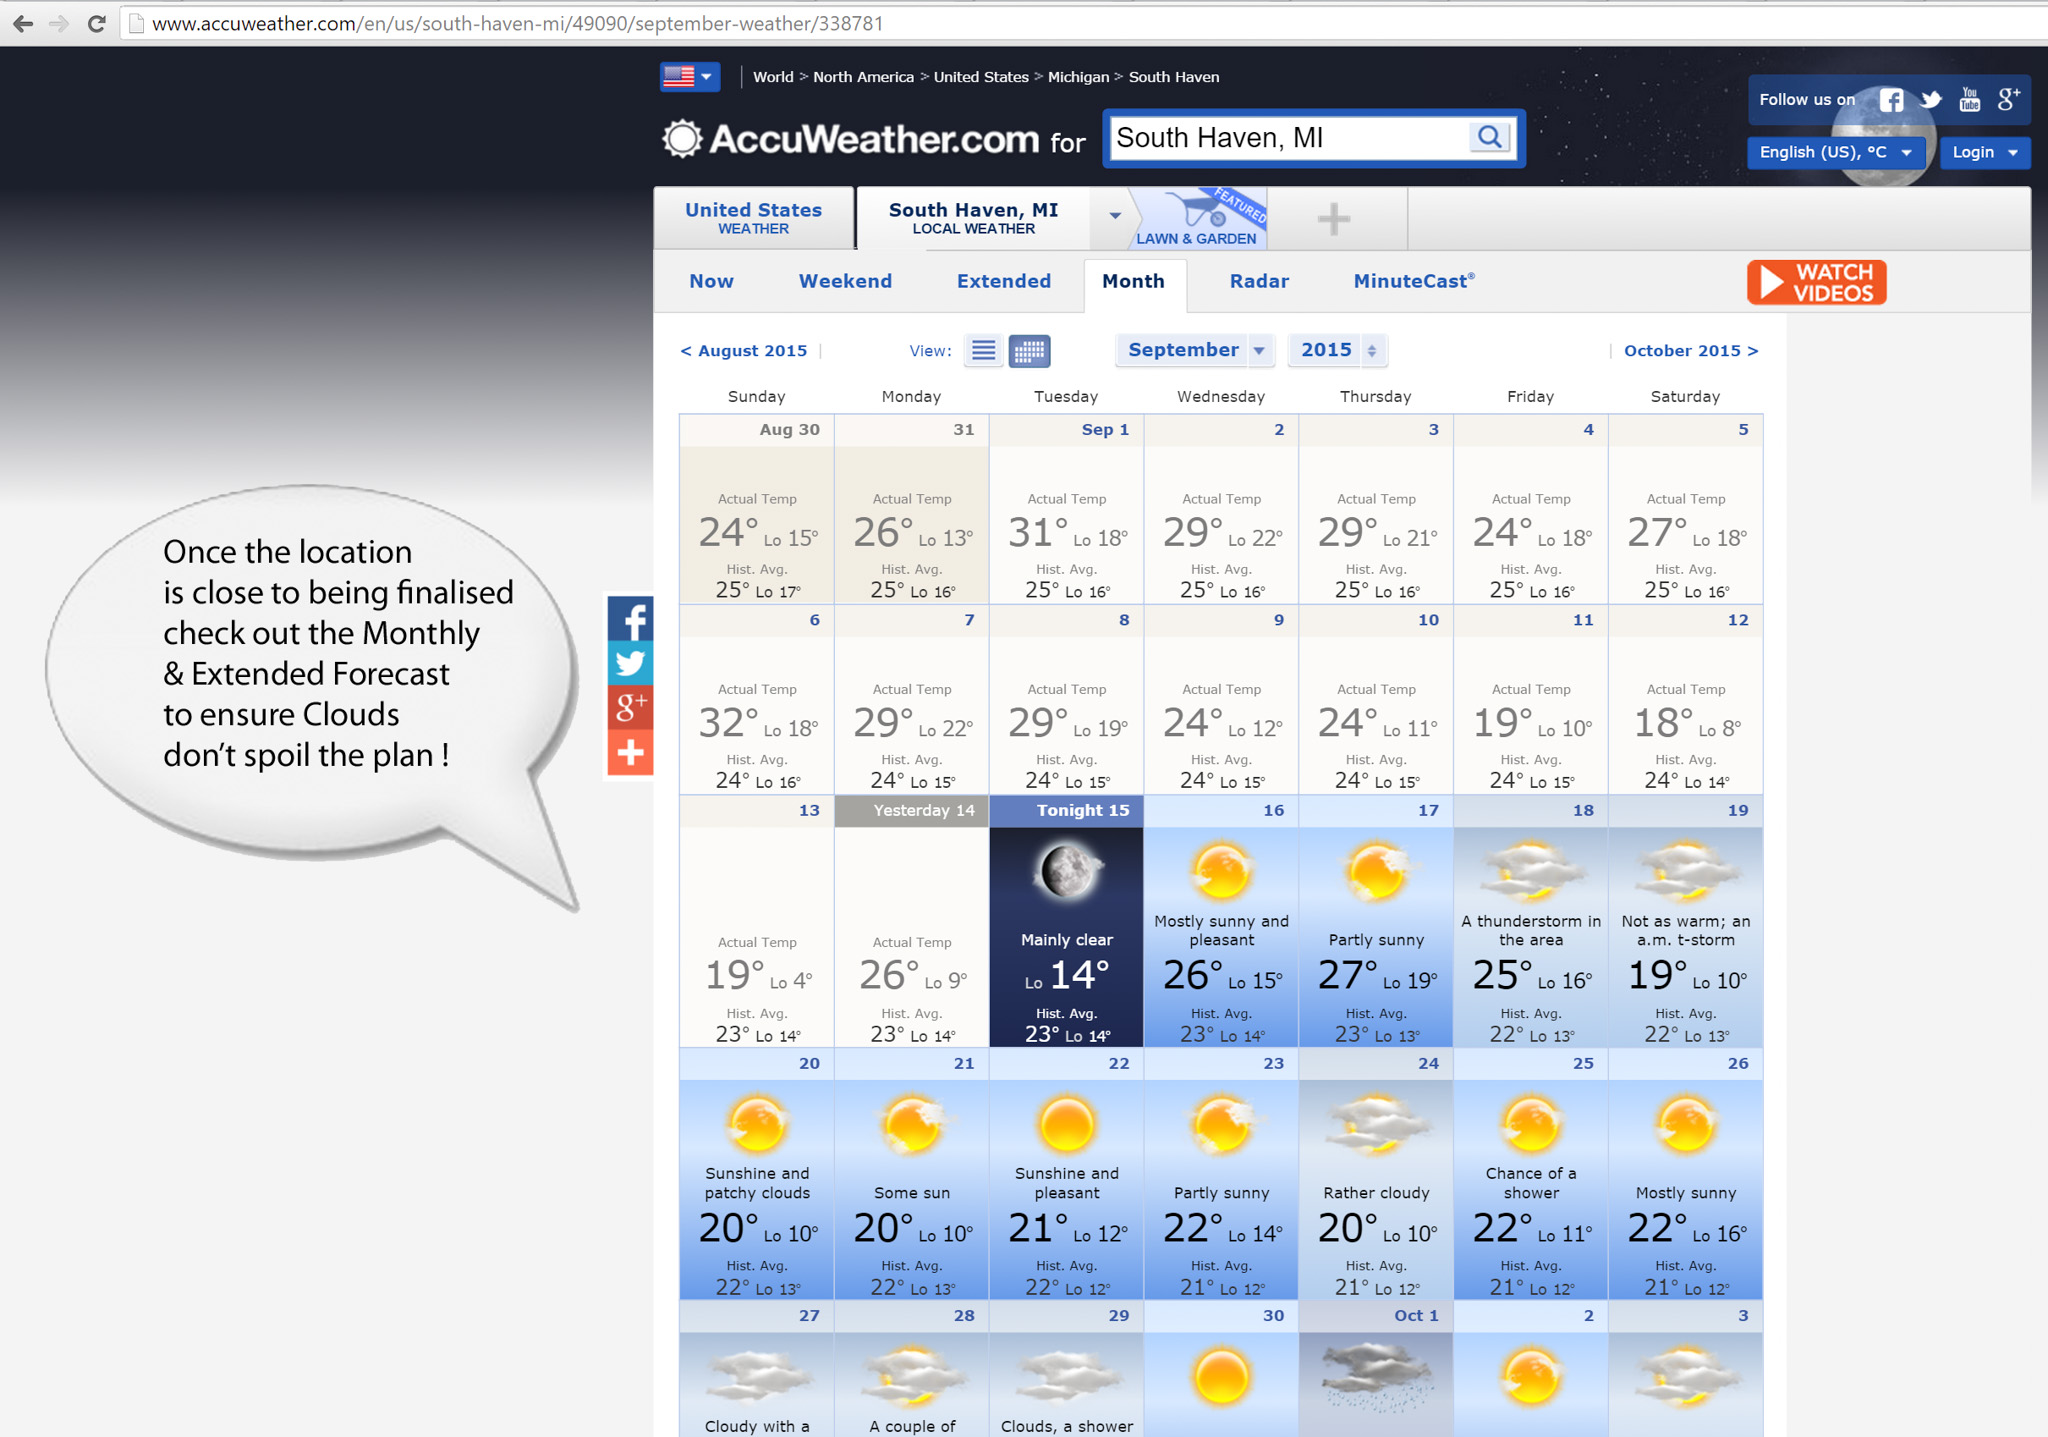
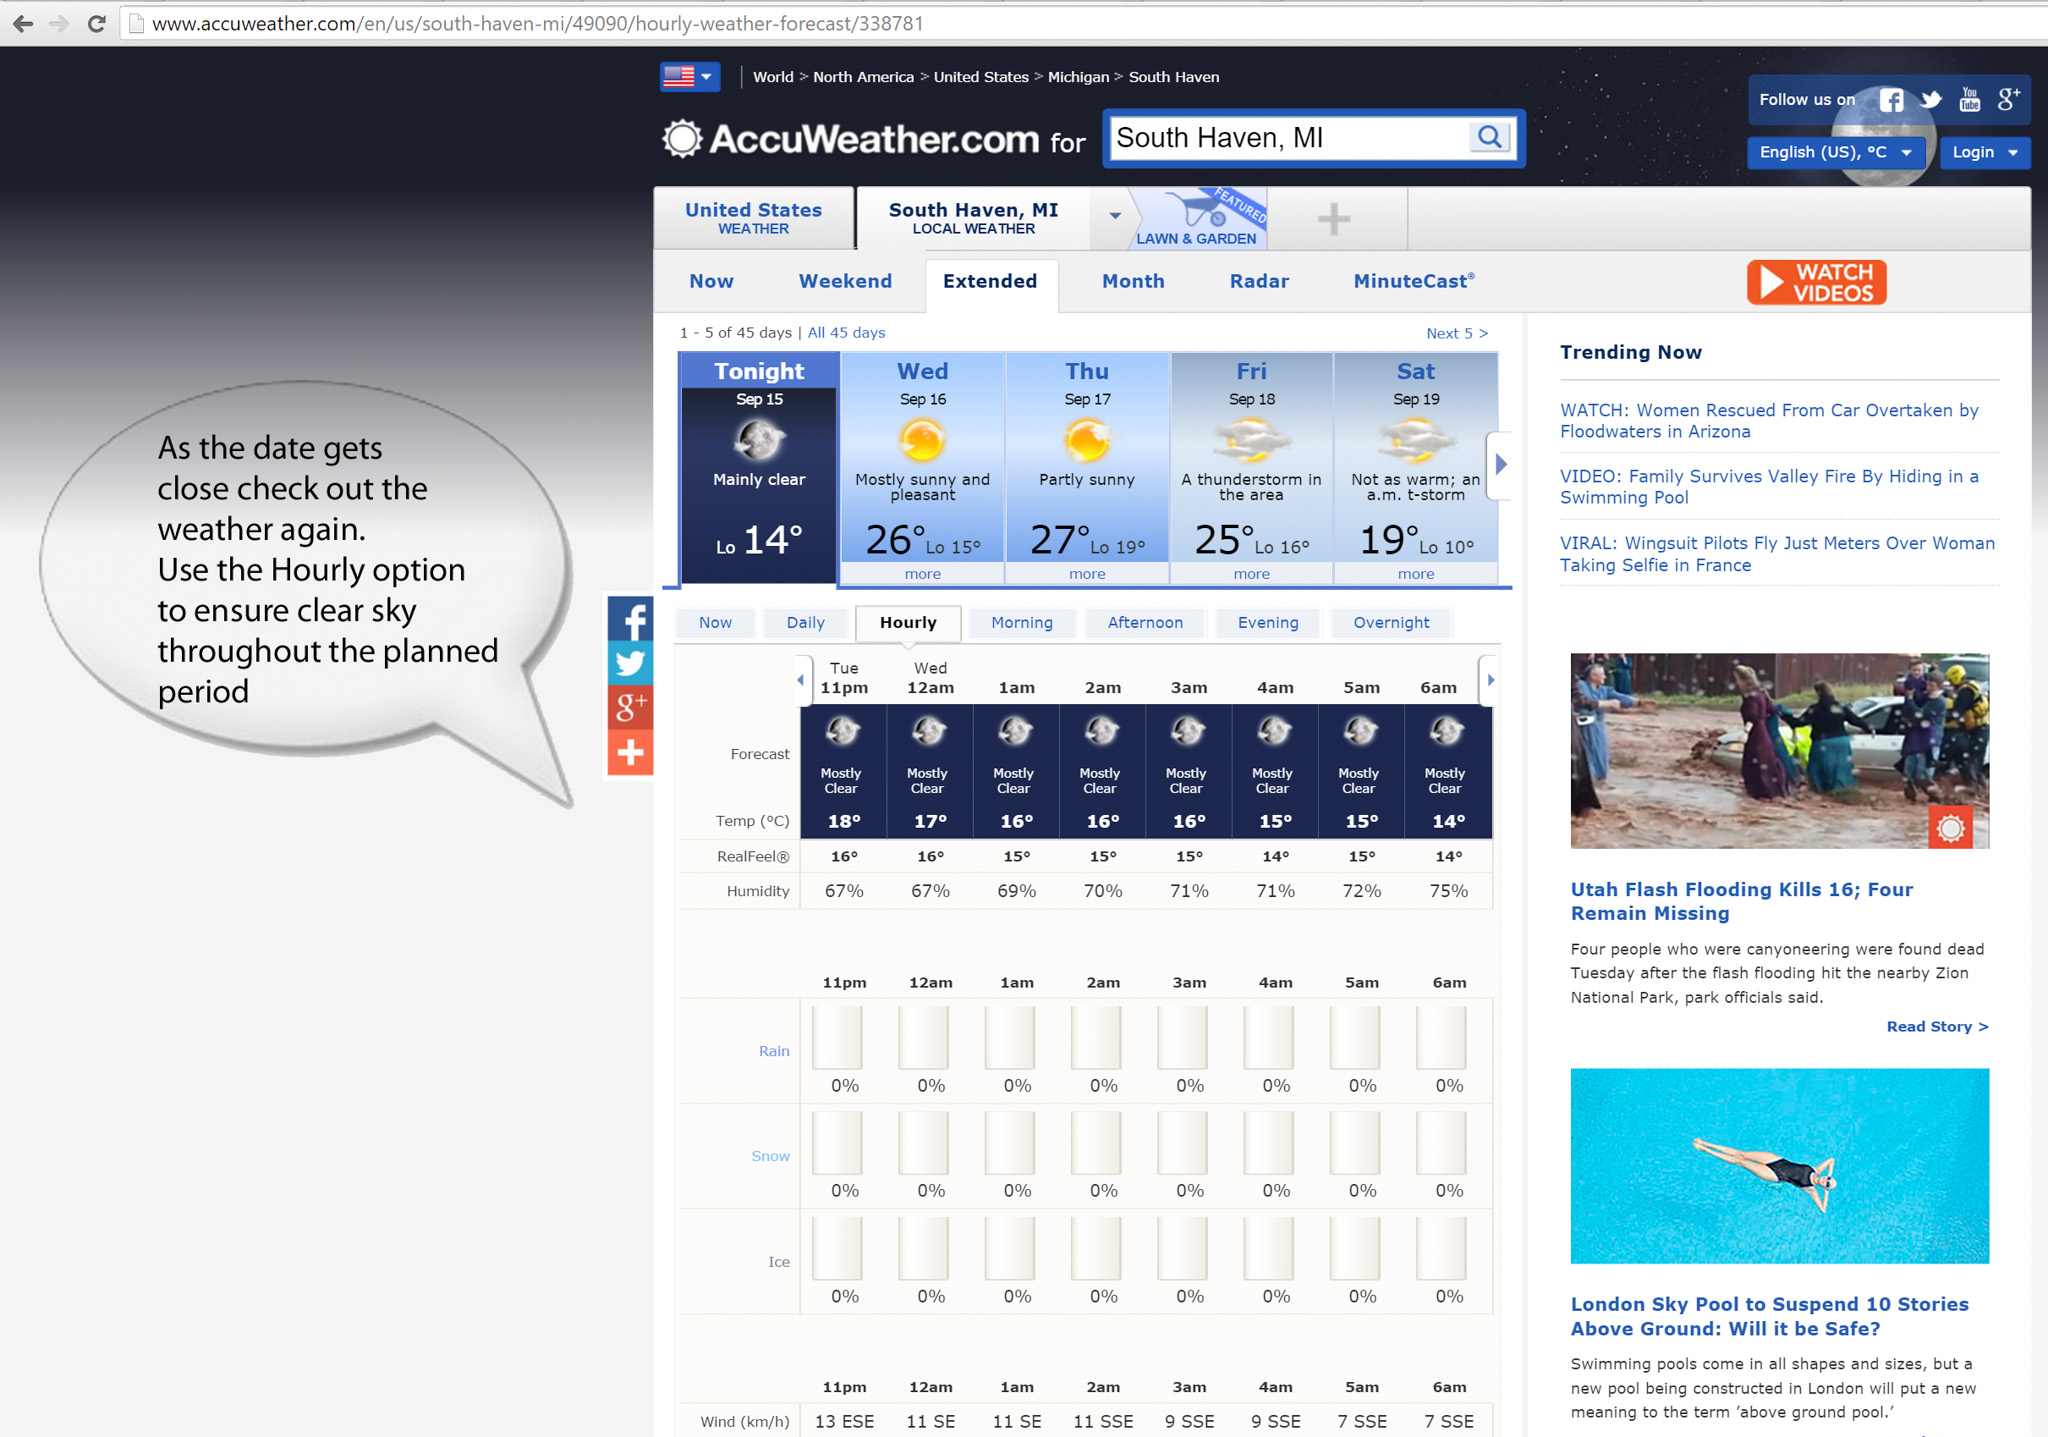
Accuweather
Lately, I’ve found accuweather very handy for checking extended forecast more than a month ahead of time. Check out the Trend/Forecast Maps for high-level planning. Once you finalize the location, you can drill down to a location-specific extended forecast for up to 45 days.
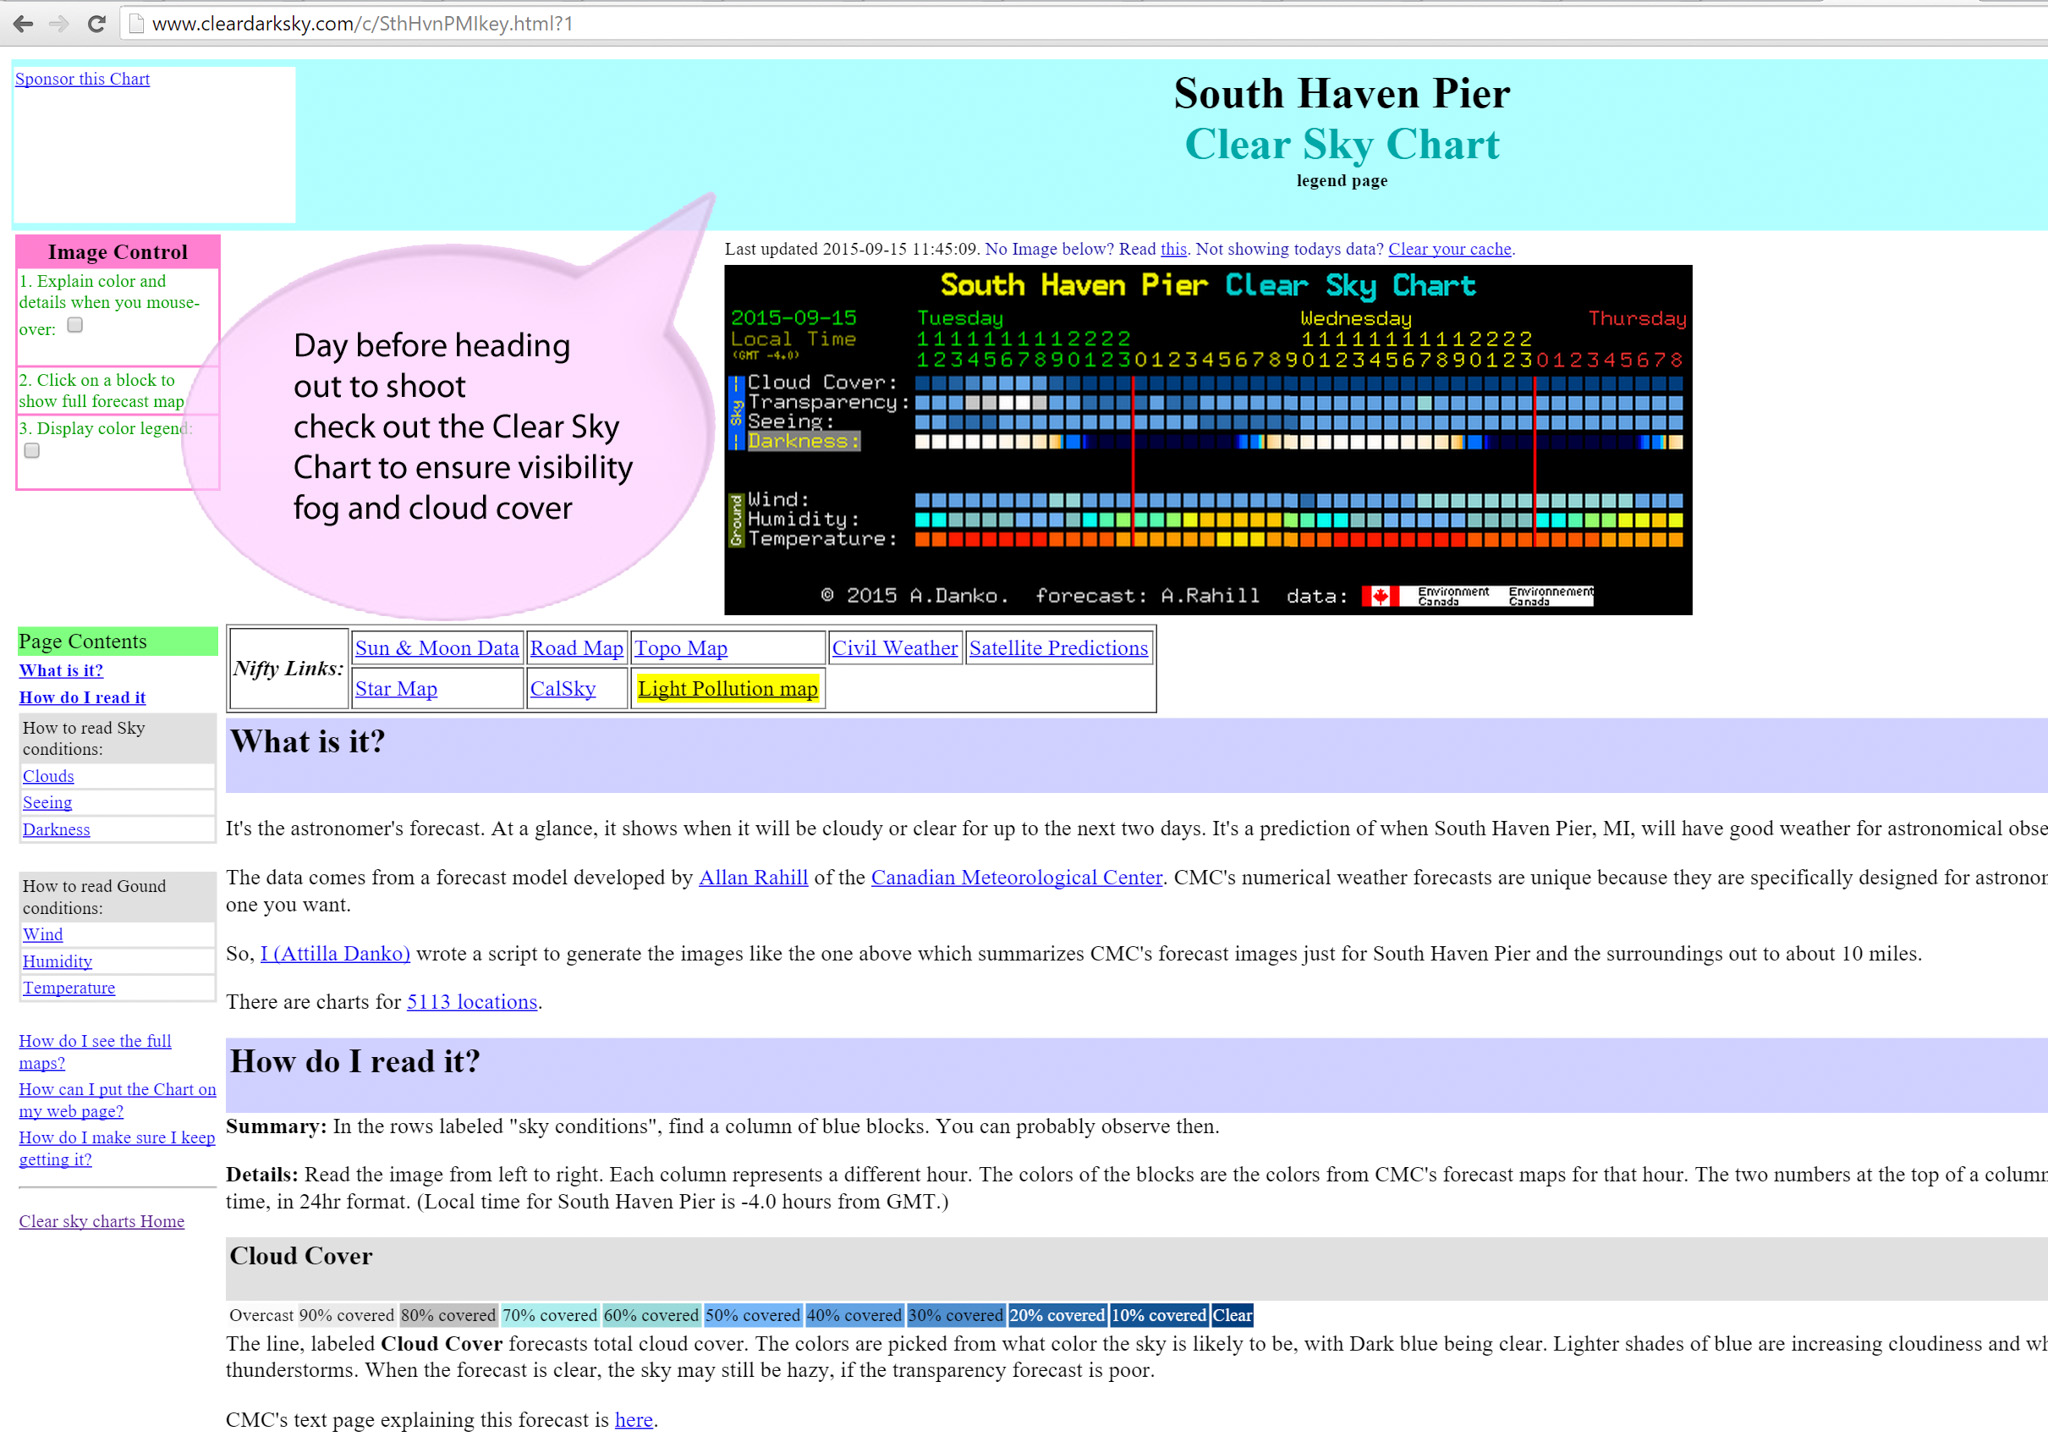
Clear Dark Skies
Clear Dark Sky allows you to get details about the humidity, transparency, temperature etc. along with the cloud cover for the given location. If you are not geeky, just use the tool and make sure you have dark blue/black forecast under Cloud Cover for better visibility. You can use the website for planning on a desktop or get it as an app for use in the field.
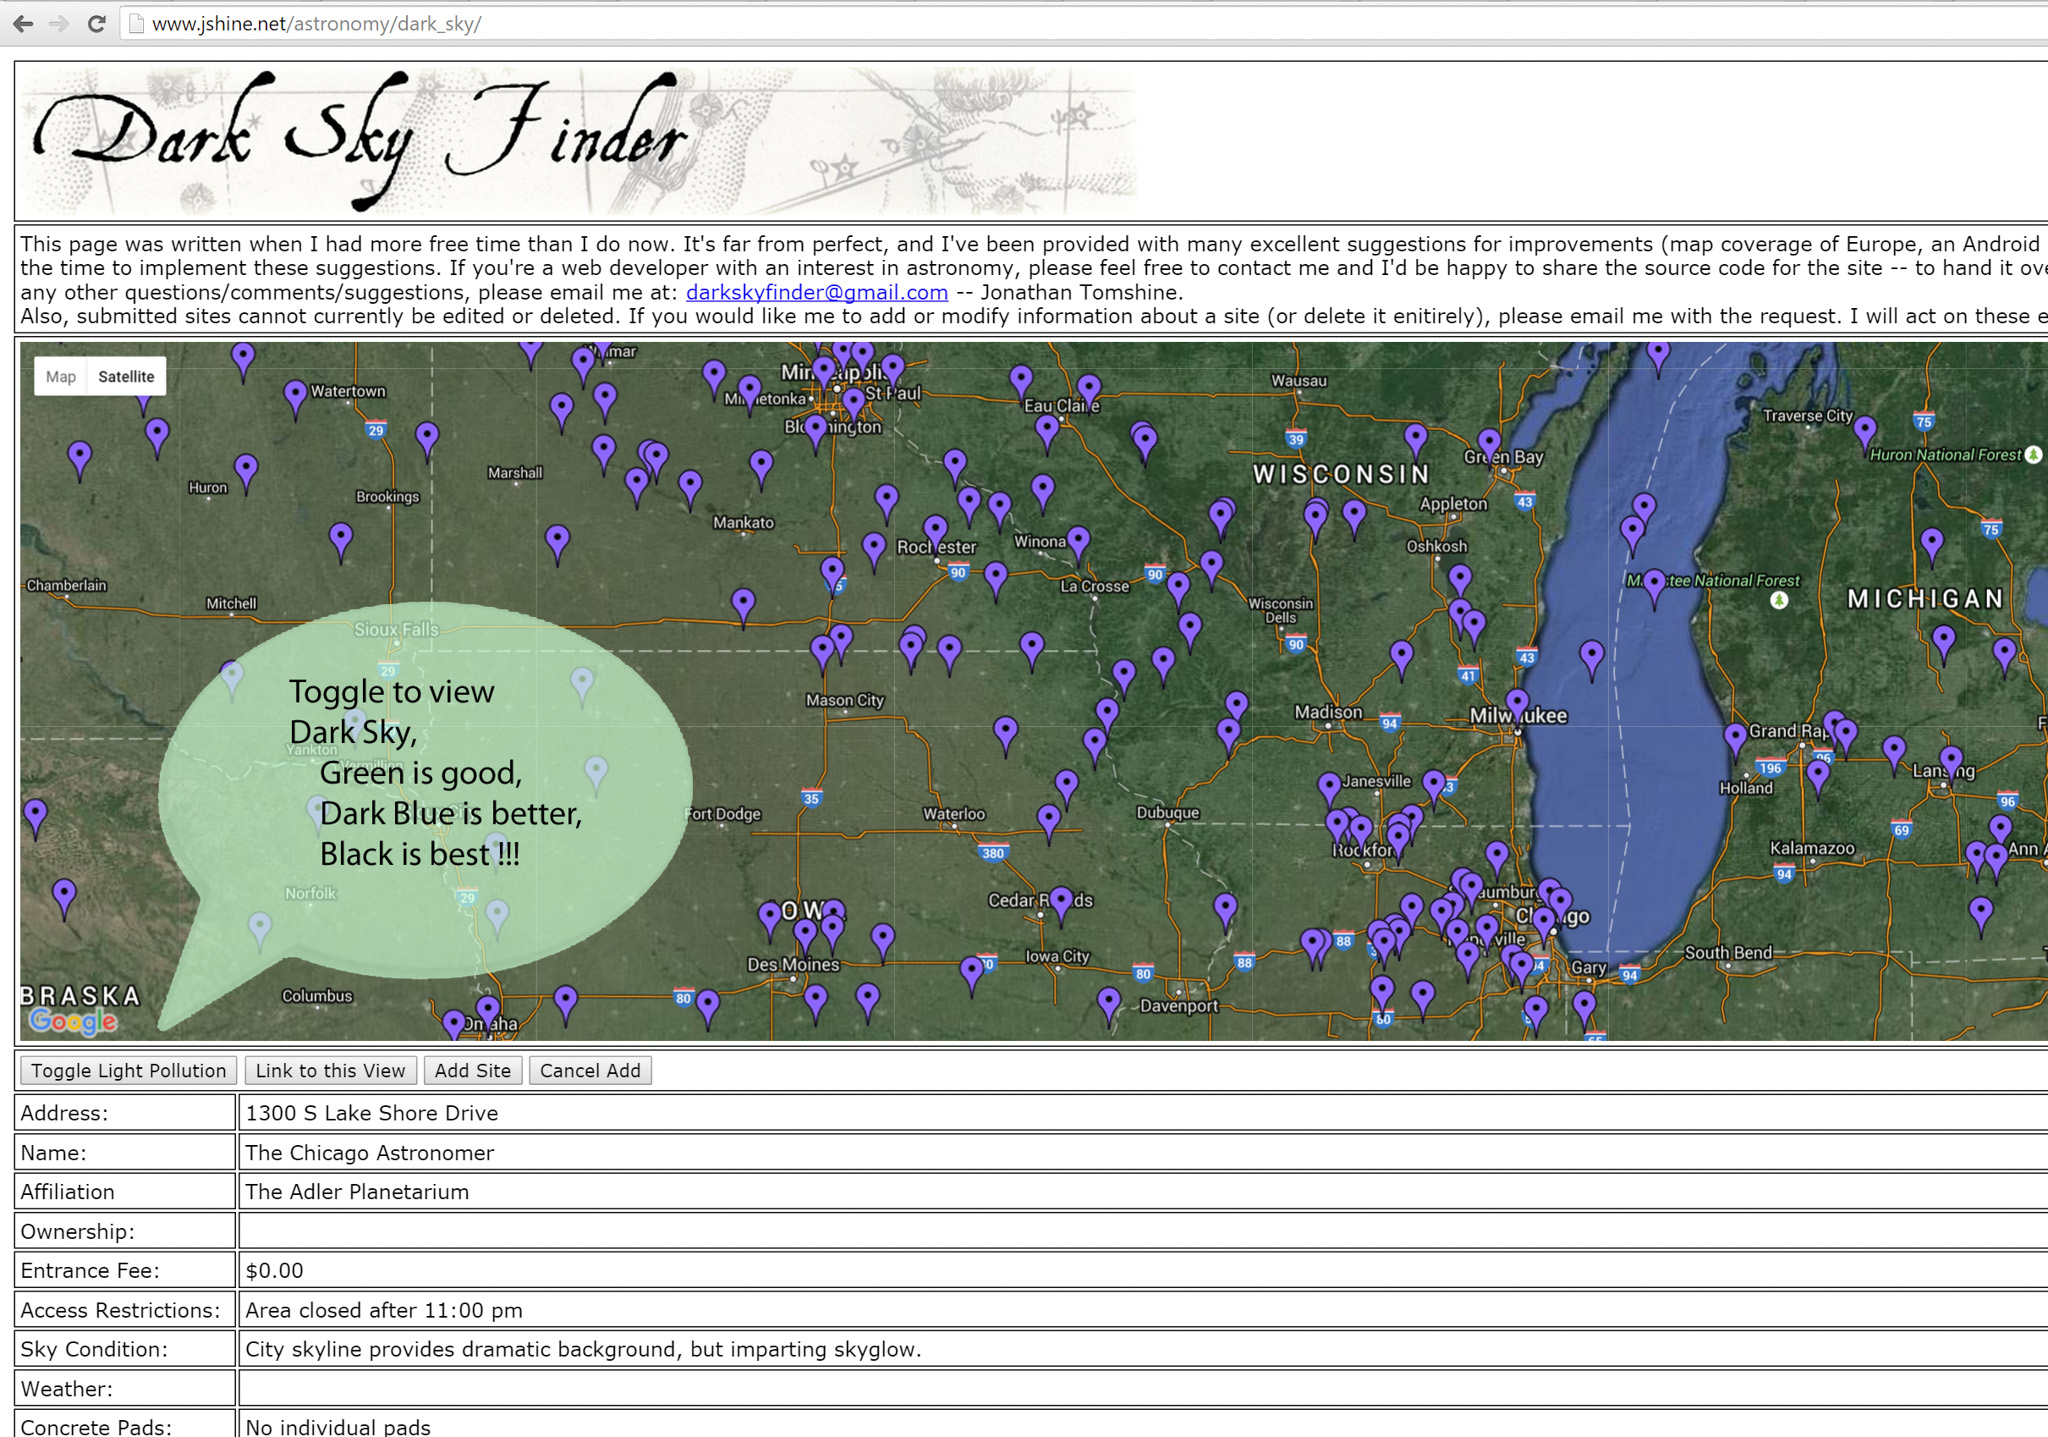
Dark Skies
Dark Sky Finder is not as important as the clear skies tool for shooting the Lunar Eclipse, but again, it all depends on what you want to shoot.
If location is more important, like the foreground, then this takes a back seat. But if you would like to shoot the eclipse against the stars (I really want to, presuming that having the moon in the shadow will help to capture some stars and still not blow out the moon :)).
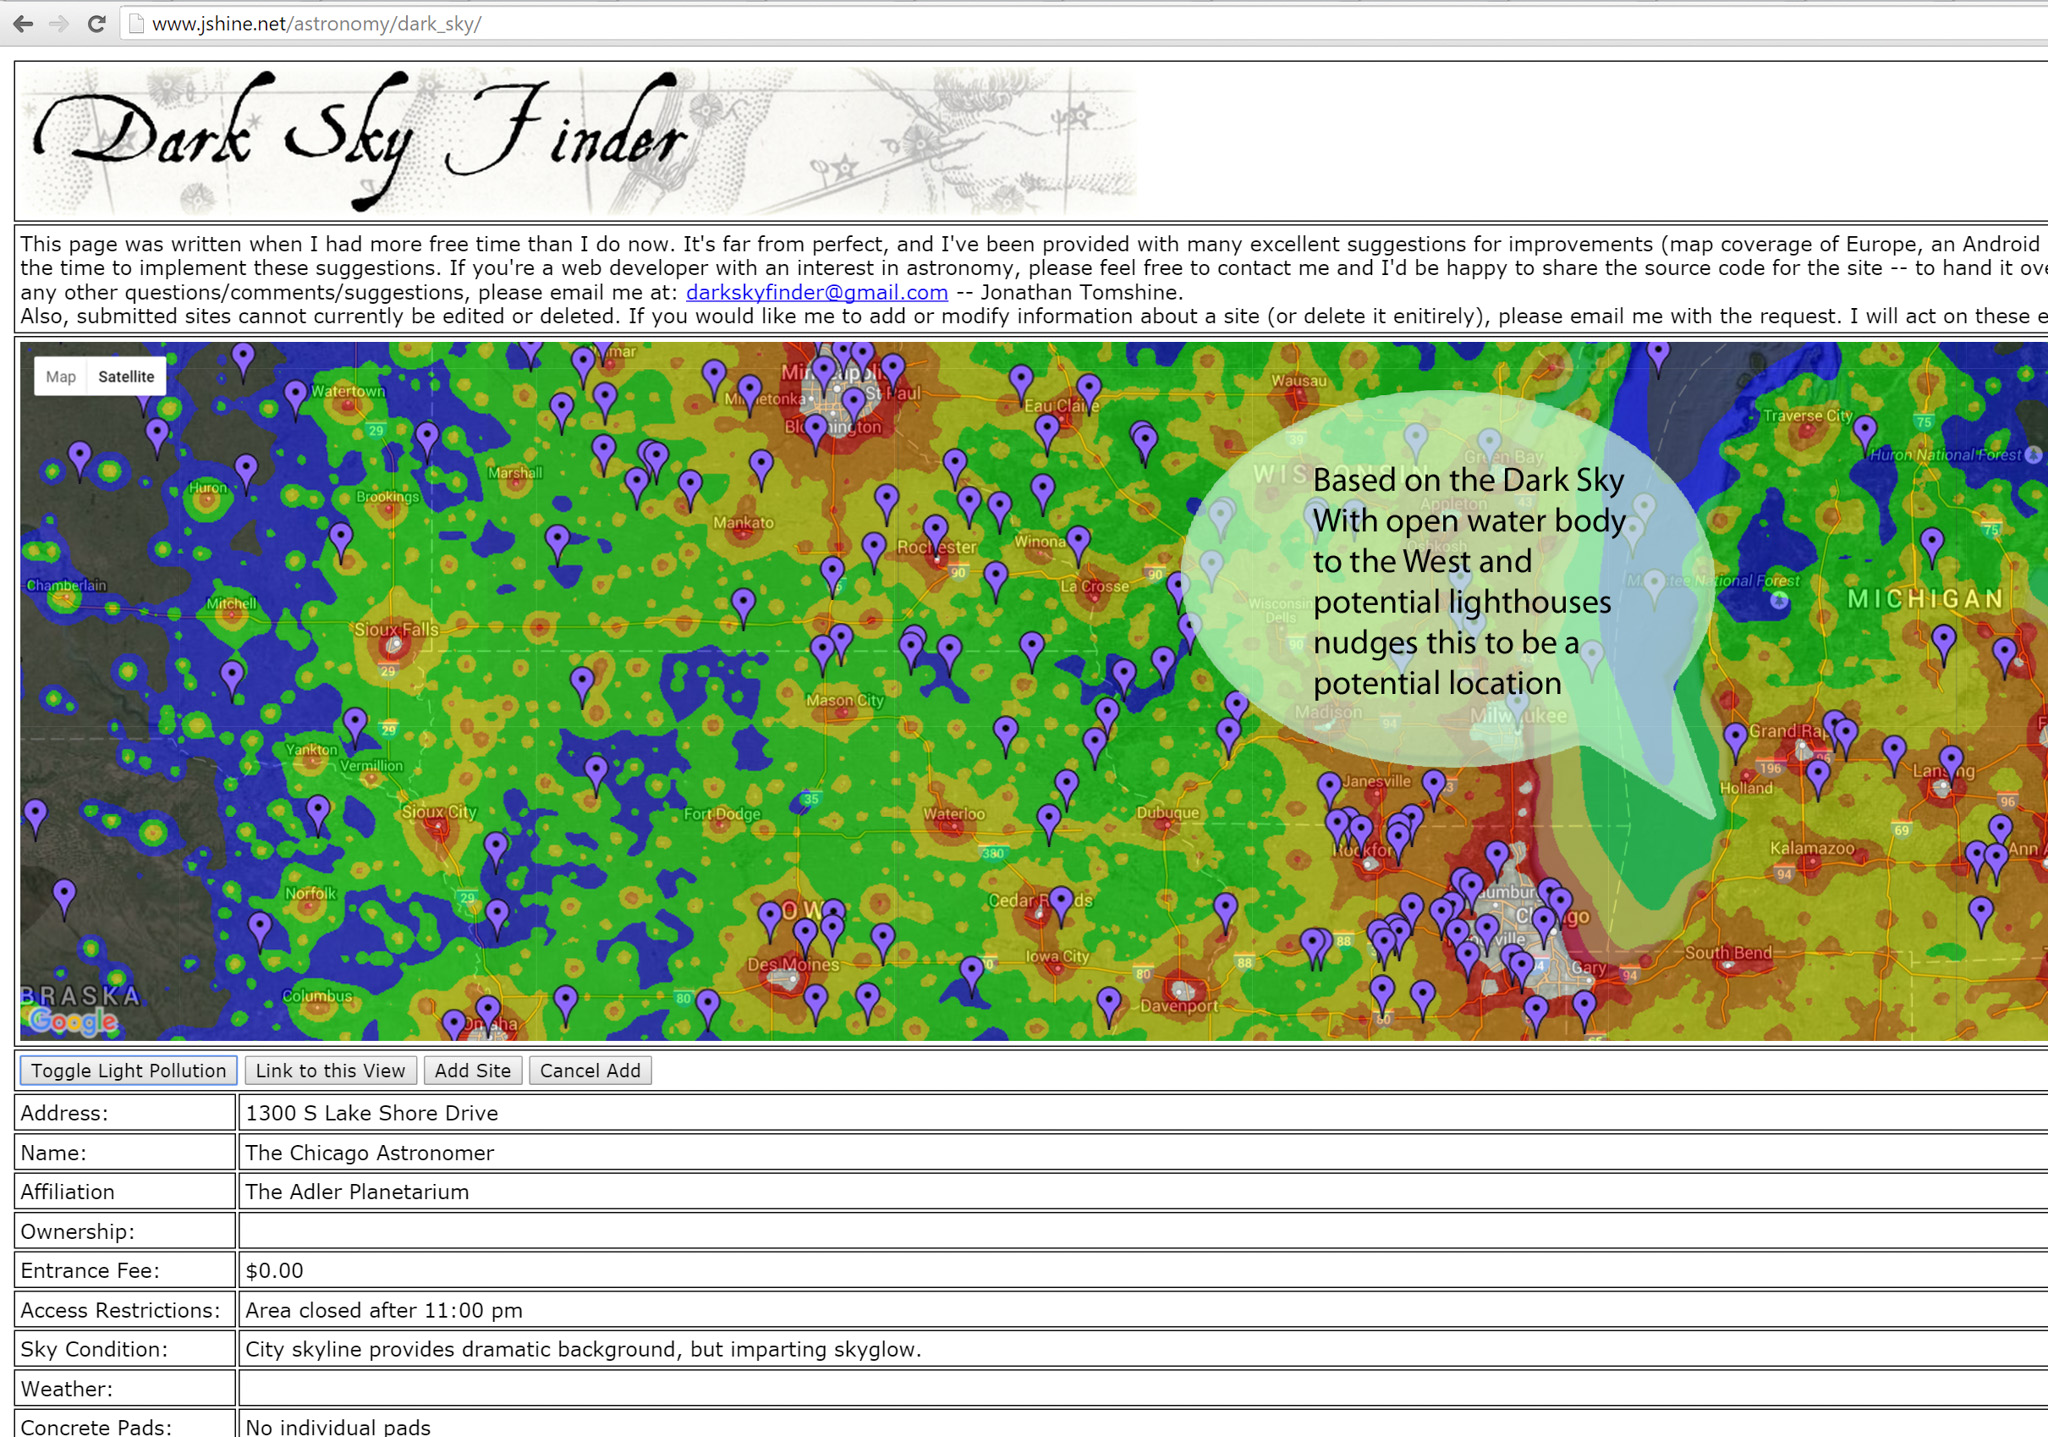
Basically, in this tool you need to look for a location that is under Green or Dark Blue, to be able to view and shoot the stars (milky way) in the night sky.
TimeZone – This depends on your location. While you are keen on planning the location, checking weather etc. just make sure you take a note of the time zone in which you will be shooting. This becomes crucial if you are located near multiple time zones or if your final spot is located in the adjacent time zone. Just be aware of the local time, especially for events like a lunar eclipse.
P.S. Some apps like Photophills combine a lot of these tools into a single, smooth planning experience. Unfortunately, it is only available on Apple devices for now. Even if you use all the above on desktop for your planning, I could definitely see the value of Photophills as it is handy in the field—a one stop shop. Come on Photophills, get us an Android version already ?
Closing Down on the Final Plan
We’ve gone through all the tools, options, and technologies that can help us. In addition, I’d like to share with you the actual planning that I did earlier this year. Knowing the process of finalizing the spot might help in your planning for subsequent events.
As I was planning for the Lunar Eclipse of April, 2015, I discovered that the event was going to take place early morning on April 4th. The moon would be setting towards the west as it was getting into full eclipse over the horizon.
Living near to Chicago, and wanting an open horizon view to the west, I zeroed in on the west coast of Lake Michigan. This had the highest potential of having a open horizon view in the early morning when the eclipse was occurring. Based on this info, I started looking at a couple of light houses from that area as great foreground objects.
Further planning was driven by weather. In addition to clear skies, for the image to really make an impact, the size of the moon against the lighthouse plays an important role. This is achieved by something called a compression effect. For this, ideally I would need to be more than 1500+ feet from the foreground element. This would aid to capture the moon along with the lighthouse.
Follow thru the below slides to see the planning process from start-to-finish using the tools described above:
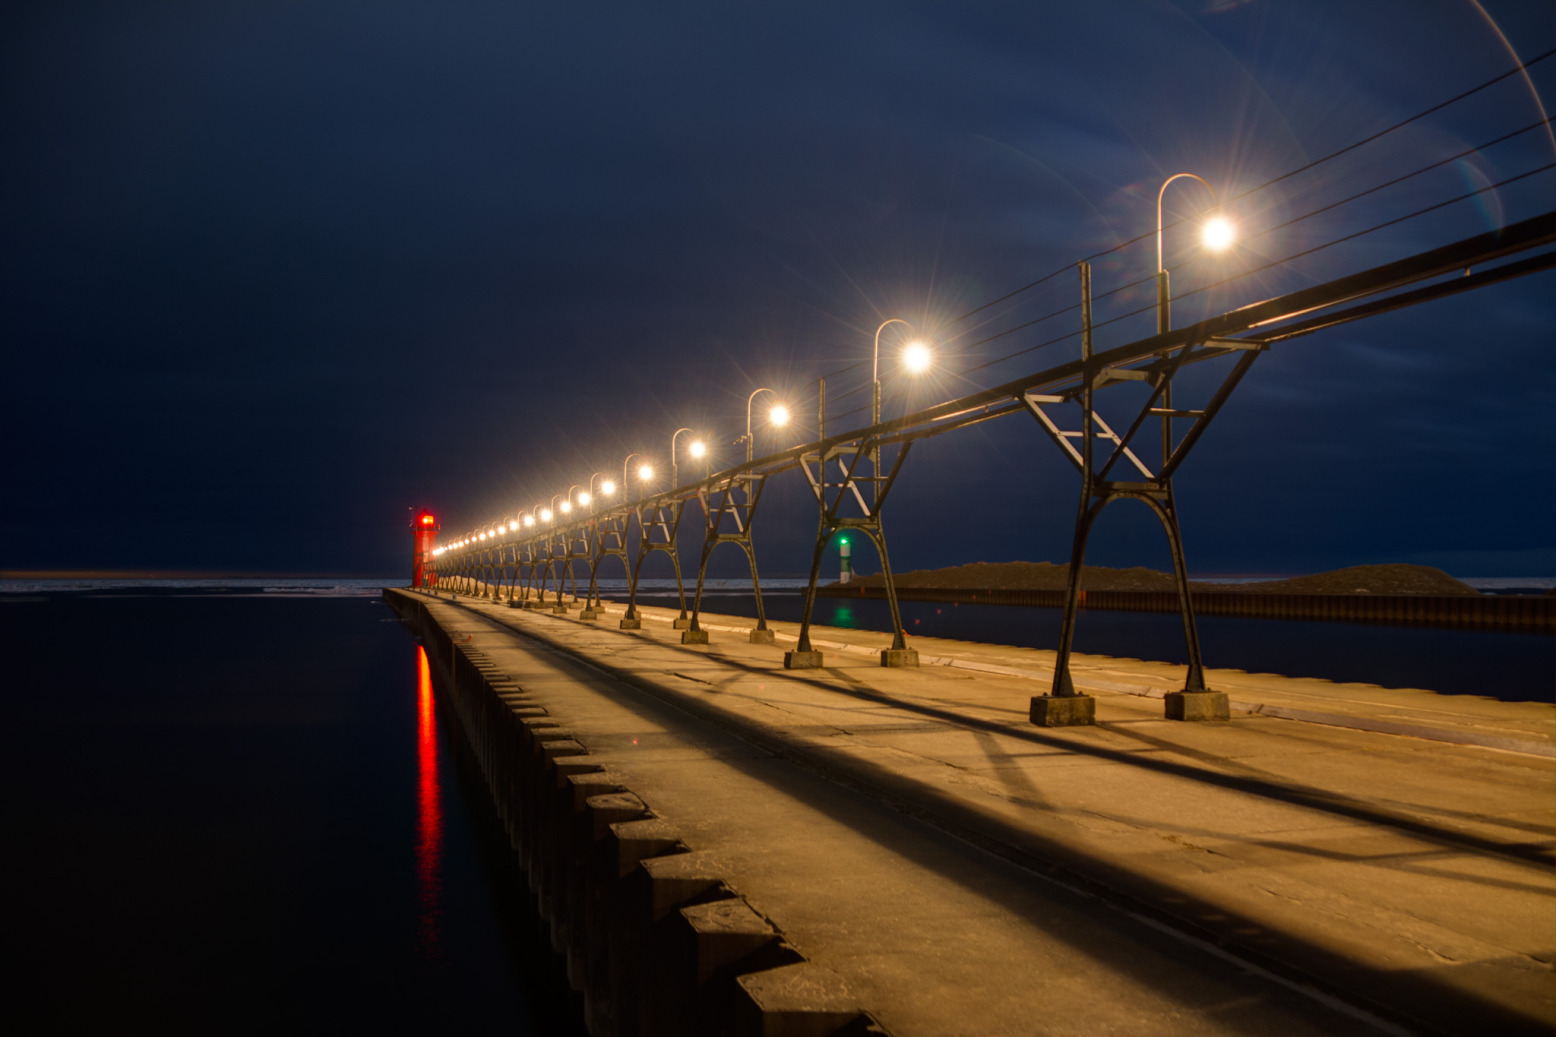
And the Final Shot!
I just love it when a plan comes together ? The details are at a high level, but you’ll get the hang of it once you start using each of these tools, apps, and services. The links to the same with tutorials are available in the next section. And, of course, feel free to ask any question in the comments!!!
All the best for the upcoming planning! The next big lunar eclipse is on Sept 27, 2015!!!